Sourdough Garlic Knots

Sourdough garlic knots make the perfect side dish for any meal. Soft, fluffy, and brushed with rich garlic butter, they’re a delicious way to use your sourdough starter. Simply mix the dough in the morning, and by dinnertime, you’ll have warm, golden knots fresh from the oven!

Is there anything better than warm, fresh-from-the-oven sourdough garlic knots? Like our soft sourdough dinner rolls and sourdough breadsticks, these knots are easy to make and always a crowd-pleaser!
These soft, golden rolls pair perfectly with any meal, but they’re incredibly delicious alongside a steaming bowl of loaded potato soup.
Baked to a beautiful golden brown and coated with rich, garlicky butter, these knots are bursting with flavor. The best part? Extra garlic butter for dipping—because there’s no such thing as too much garlic butter!
Sample Baking Schedule
For the following example, my kitchen was 70°F (21°C). Warmer kitchens need less time, and cooler kitchens need more time.
- 8 PM: Feed your sourdough starter before bed.
- 8 AM: Mix the dough, knead, cover, and let it rise at room temperature.
- 2 PM: Divide the dough, shape, and let the rolls rise.
- 4 PM: Bake.
Ingredients Needed
- sourdough starter
- all-purpose flour or bread flour
- butter
- honey or sugar
- sea salt
- fresh garlic
- olive oil (for brushing)
- optional: fresh parsley and parmesan cheese for topping
How to make Sourdough Garlic Knots
The night before you plan to mix the dough, feed your sourdough starter so that it is active and bubbly when you are ready to get started.

Step 1
Stand Mixer Instructions: Place all the dough ingredients into the bowl of a stand mixer fitted with the dough hook attachment. Mix on medium-low speed for about 8-10 minutes until the dough is smooth and begins to pull away from the sides of the bowl.
Hand Knead Instructions: Add the ingredients to a large mixing bowl and bring them together with your hands until a shaggy dough forms.
Turn the dough onto a clean work surface and knead by hand for about 10 minutes. It will become smooth in texture when it's ready for the next step.

Step 2
Cover the bowl and let the dough rise at room temperature until it increases in size by about 50-70%.

Step 3
Transfer the dough to a well-floured surface and rest for 10 minutes. Using a metal bench scraper, divide the dough into 12 equal portions, each weighing approximately 80g.

Step 4
Roll each portion into a log shape with your hands.

Step 4 continued
Gently stretch it, and tie it into a knot, tucking the ends underneath.

Carmyn's notes
Shaping sourdough garlic knots might take a little practice, but don’t worry—imperfect knots are just as delicious!
And everything tastes delicious drenched in garlic butter, right?

Step 5
Arrange the knots on a parchment-lined baking sheet.
Cover the baking sheet with a clean tea towel and let the dough rise until the knots are puffy and have increased in size by about 30%.

Step 6
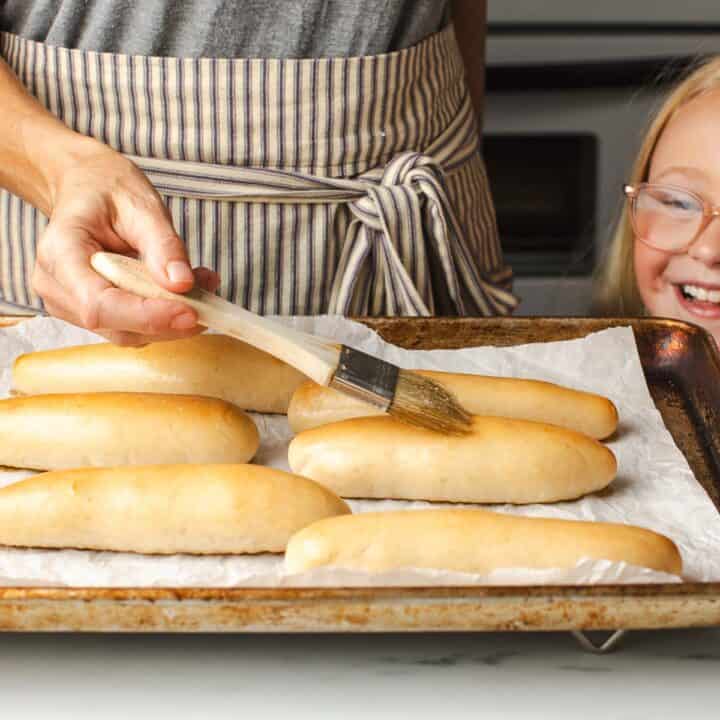
Once the knots have risen, brush each knot with olive oil.
Preheat your oven to 400°F and bake the knots for 20 minutes.

Step 7
While the knots are baking, melt the butter with the minced garlic cloves and salt to taste in a small saucepan.

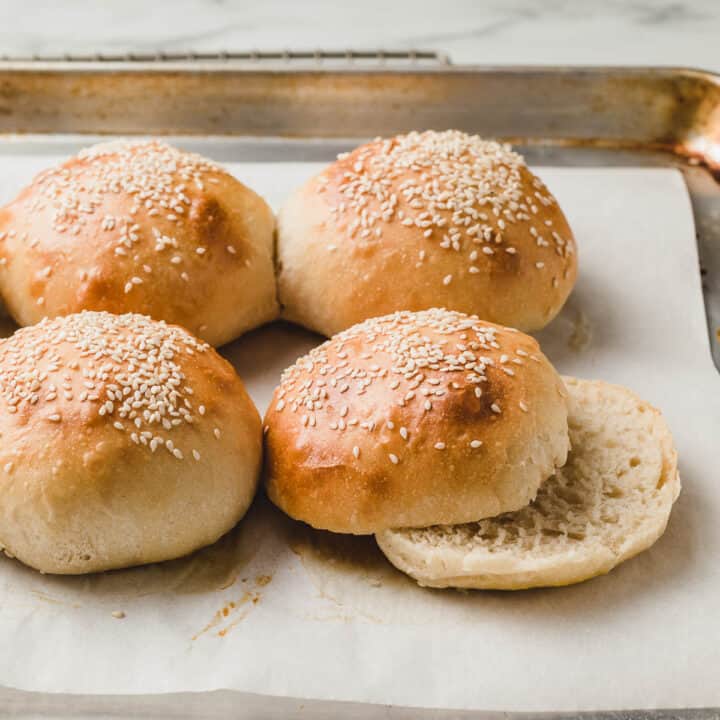
Step 8
Once the knots are done, remove them from the oven and brush them with warm garlic butter. Top with fresh parsley and parmesan cheese.
Add the rest of the garlic butter to a small bowl for dipping.
How to Store
If you have any leftover knots, store them at room temperature in a bread bag or plastic bag for up to 2 days after they’ve cooled completely.
To maintain the best taste and texture, freeze them in a freezer-safe container for up to a month for longer storage.
When you're ready to enjoy them, thaw the garlic knots in the fridge or at room temperature. Reheat in the microwave or oven at 350°F until warmed through.

More Sourdough Rolls and Buns

Subscribe to our newsletter and we'll send you more fresh recipes, valuable troubleshooting advice, useful tips, and other information we believe will be helpful to you!

Sourdough Garlic Knots
INGREDIENTS
Ingredients to make ½ cup (100 g) of Active Sourdough Starter
- 1 tablespoon (15 g) sourdough starter
- ⅓ cup + 1 tablespoon (50 g) all-purpose flour (or bread flour)
- 3 ½ tablespoons (50 g) water
Dough Ingredients
- ½ cup (100 g) active sourdough starter
- ¼ cup (56 g) unsalted butter (room temperature)
- 2 tablespoons (42 g) honey (or sugar )
- 1 cup + 2 tablespoons (270 g) water
- 2 teaspoons (10 g) fine salt
- 4 cups + 2 tablespoons (500 g) all-purpose flour
- olive oil (for brushing)
Garlic Butter (Extra for Dipping)
- 8 tablespoons unsalted butter
- 4 fresh garlic cloves (minced)
- salt (to taste)
- fresh parsley (finely chopped, for garnishing)
INSTRUCTIONS
Feed your Sourdough Starter
- 12 hours before you plan to mix the dough, add the ingredients to make ½ cup (100 g) of active sourdough starter to a clean jar. Stir until combined, loosely cover the jar and let the starter rise at room temperature. (The ingredients will create a total of 115 g active starter but, because some of it will stick to the sides of the jar during the transfer, we are making a little more than needed.) The sourdough starter is ready to use when it has doubled in size and there are plenty of bubbles on the surface and sides of the jar.
Make the Dough
- Mix the dough: Add the ingredients to a large mixing bowl and bring them together with your hands. Turn it out onto a clean work surface and knead the dough by hand for about 10 minutes. It will become smooth in texture when it is ready. (If the dough is sticky, lightly dust your hands with flour as you are kneading but don't add too much. It will become less sticky as you knead it.)Stand mixer instructions: Combine the dough ingredients in the bowl of a stand mixer fitted with the dough hook attachment. Mix on medium speed for 8-10 minutes. The dough will become smooth and pull away from the sides of the bowl when it is ready for the next step.
- Bulk Fermentation: Cover the bowl tightly with plastic wrap and allow the dough to rise 50-70% at room temperature.
- Shape: Transfer the dough to a well-floured surface and let it rest for 10 minutes. Divide the dough into 12 equal portions using a metal bench scraper; each should weigh approximately 80g. Use your hands to roll each portion out into a log, gently stretch it, and tie it into a knot shape, tucking the ends underneath.Second Rise: Line a large baking sheet with parchment paper and arrange the knots on the sheet, leaving space for them to rise. Brush each knot with olive oil. Cover the sheet with a clean tea towel and allow the dough to rise until puffy by 30%.
- Bake: Preheat your oven to 400°F and bake the knots for 20 minutes.
- Garlic Butter: Heat the butter, minced garlic cloves, and salt to taste in a small saucepan while the knots are in the oven. Remove the knots from the oven and brush each one with warm garlic butter.
those knots are very good and soft. next time i would add cheese when mixing dough. turned out awesome.
can I use a mix of whole wheat with all-purpose flour?
Yes
I love so many of your recipes (especially the bagels!!) and am working on the garlic knots dough now. Can I freeze these before baking and then thaw and bake (or maybe even bake from frozen)?
Hello, I have not tried freezing them unbaked. We always recommend baking and then freezing. This will result in a perfectly baked garlic knot that is ready to reheat at any moment.
OMG! I made these today to freeze and keep on hand. I had to pop them in the freezer as soon as possible though because I made the mistake of sampling them and they are so delicious I don't want to stop eating them!
I thought your easy sourdough bagels were my favorite, but I think they got edged out by these delicious pillows of flavor!
I have one question in the step-by-step directions it says to let the knots rise by 30% and then brush with olive oil… If you go into the recipe under step three second rise, it says to brush them with olive oil and then allow them to rise by 30%
I’m confused am I putting the olive oil on before the second rise or after the second rise?
Hi Kris, thank you for catching that! You will let the knots rise and then brush with olive oil!
Help! For the dough- is the butter melted or not? Thank you 🙏🏼
It should be at room temperature. I'm adding this to the recipe card now!
I’m about to make this, but I need to know how long the rise times are in order to plan out the timings accurately. About how long would it take for the first and second rise respectively? I am planning to let it rise inside my oven with the light on.
Hi Abby, I would let the dough rise for 3-4 hours and then 1-2 hours. It will really depend on how hot the oven light gets the inside of the oven. The warmer it is, the faster the dough will rise.
This is a great and fun recipe. I have some waiting to ferment 1st rise now, and then will put in the fridge til I bake tomorrow.....My comment is, why didn't you use the measurements in grams rather than cups etc? I am used to measuring in that way. Thanks for all the wonderful recipes - you taught me from the beginning in 2020 and have been using your recipes since then!
Hi Cheryl, Thank you, we're so thrilled you love this recipe! We appreciate you bringing this to our attention. It looks like the ingredients weren’t listed in grams due to a back-end issue, but we’ve now fixed it. You can now see the measurements in grams as well.