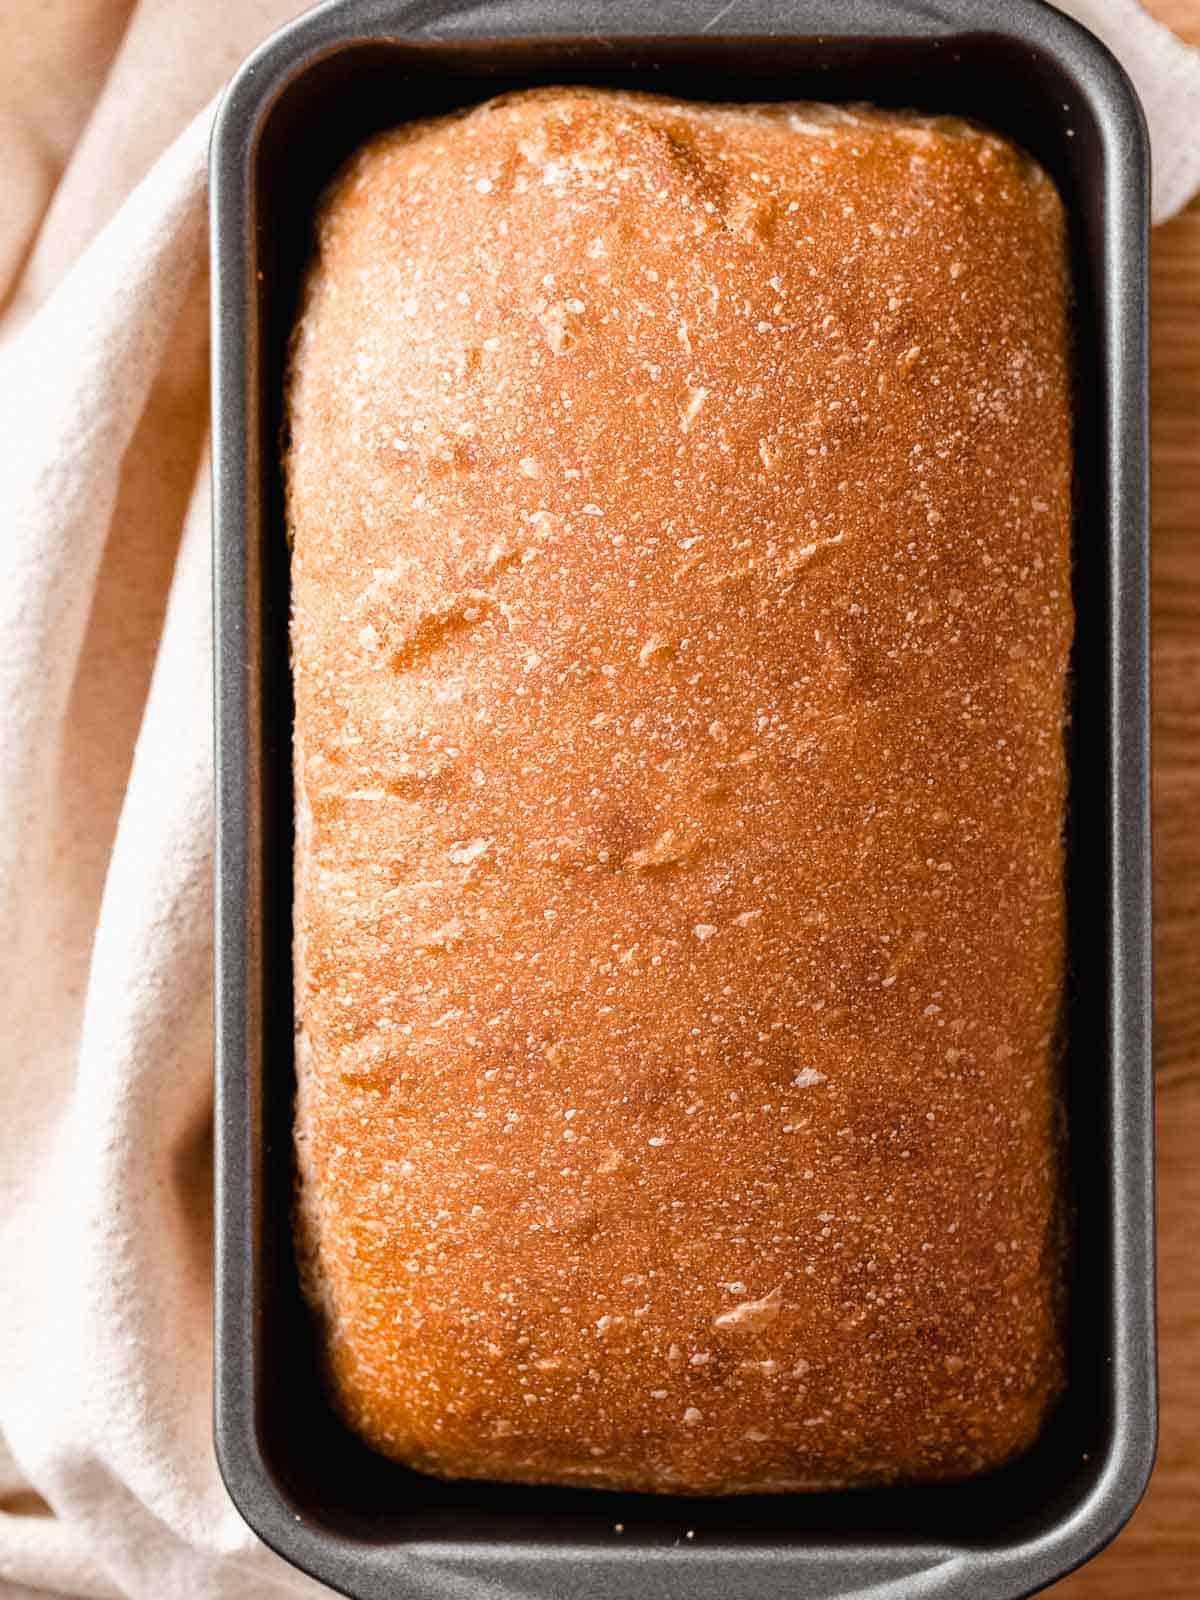
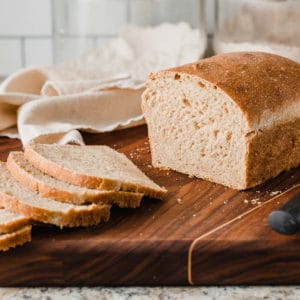
Honey Wheat Sourdough Sandwich Bread


Honey wheat sourdough sandwich bread is made with a combination of whole wheat and bread flour for a soft sandwich bread that stays fresh for days.
Just like our cinnamon raisin sourdough bread, sourdough Hawaiian rolls, and sourdough ciabatta rolls, it can be mixed and baked on the same day!
This is hands down one of the easiest sourdough sandwich breads to make. There’s only a few minutes of hands-on time and the rest is simply waiting for the sourdough to work it’s magic.
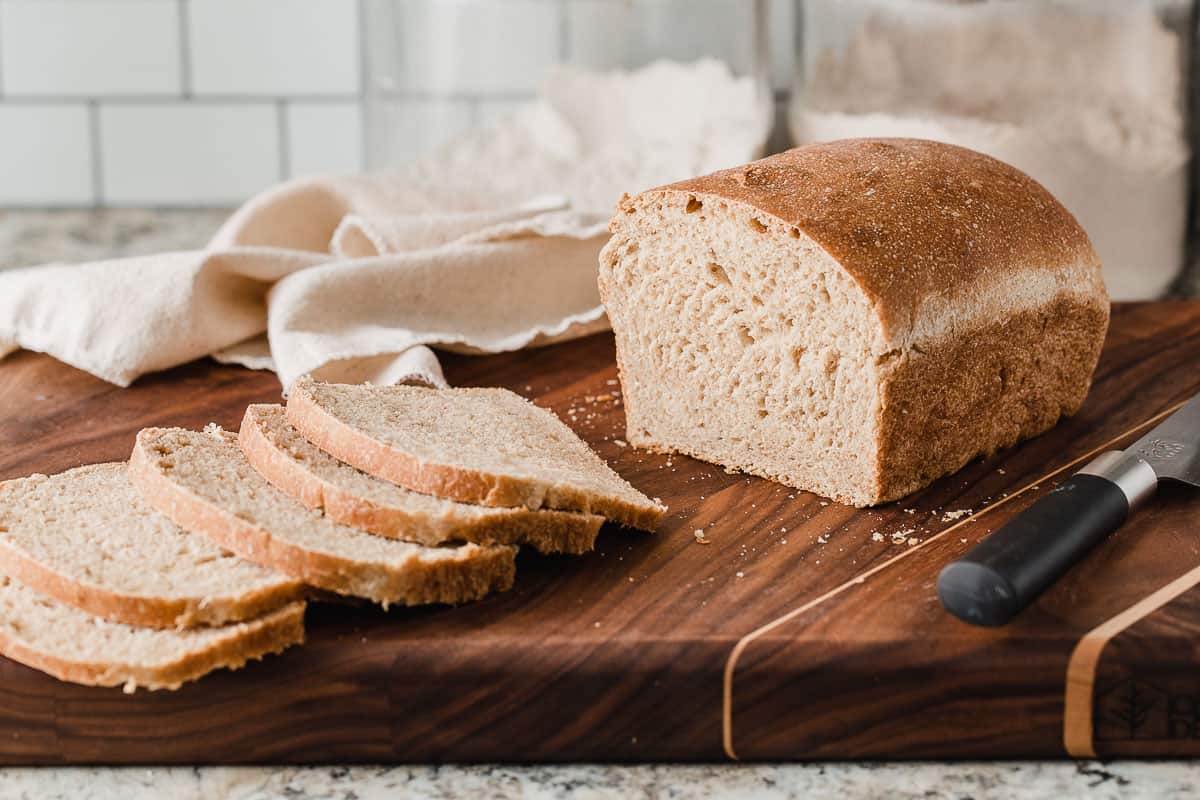
This bread is perfect to make a grilled cheese sandwich with because it has a tight, even crumb that ensures that your toppings stay inside the bread. The tight crumb also makes it easy to cut into thick or thin slices.
This sandwich bread is equally delicious as toast covered with homemade Nutella and strawberry jam.
You’re absolutely going to love the flavor, so let’s get started!
What you'll need
- whole wheat flour and bread flour: A combination of flour is used to make sure the loaf is not too dense.
- honey: Adds sweetness to the bread.
- olive oil: Helps to produce a softer loaf that stays fresher longer. Feel free to use any oil of your choice.
- salt: Fine sea salt is recommended because it dissolves more evenly.
Equipment needed
(Amazon affiliate links) - Check out my favorite kitchen essentials.
Sample baking schedule
- 8 PM: Feed sourdough starter.
- 8 AM: Mix dough and let rest 1 hour.
- 9 AM: Stretch and fold dough into a tight ball and let rest 3-4 hours.
- 1 PM: Shape dough, place into loaf pan and let rise 3-4 hours.
- 5 PM: Bake.

Tips for success
Make sure your sourdough starter has been fed and is active and bubbly when you mix the dough. I recommend feeding your starter a 1:4:4 ratio of starter, water and flour 12 hours before mixing the dough.
Kitchen temperature
Temperature is a very important factor when it comes to baking with sourdough.
Please note that the bulk ferment and second rise times in the instructions are for kitchens that are anywhere between 68-72°F.
If your kitchen is warmer than 72°F, you will need to keep an eye on the dough.
Warmer temperatures will cause the dough to rise more quickly so check it around the 2 hour mark to make sure it does not over-prove. Do the same during the second rise.
How do I know when the dough is ready to shape?
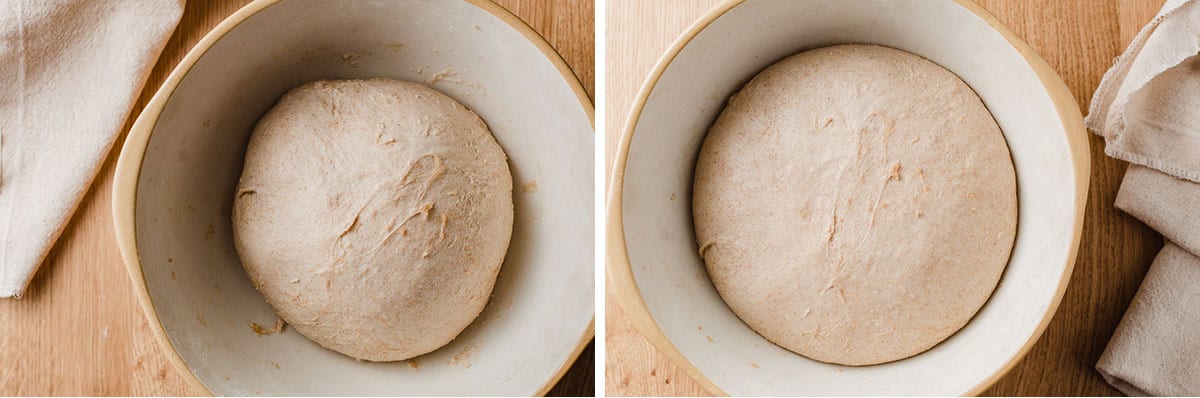
During the first rise, the dough should expand by about 50% in the bowl.
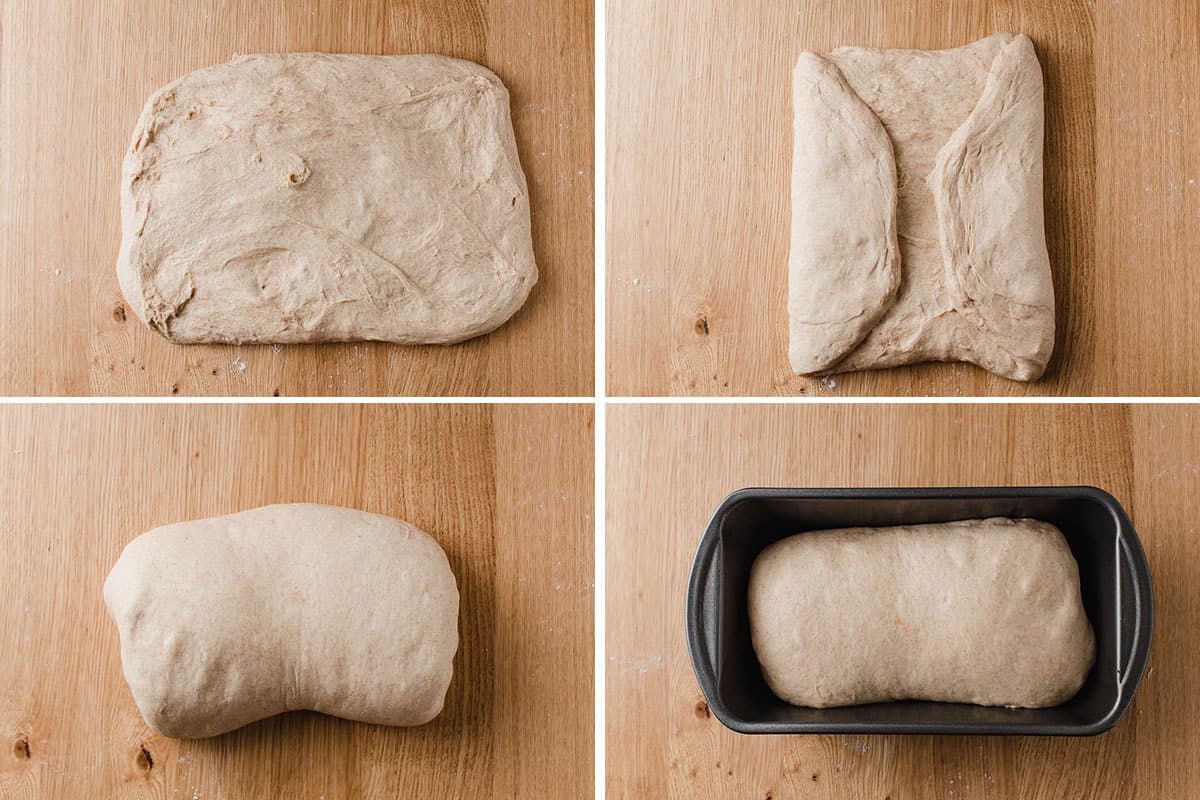
How to shape the dough
Turn the dough out onto a lightly floured surface and gently press it into a rectangular shape. Press out any large bubbles. Fold the left and right sides inward and then roll the dough into a log shape.
Place the dough, seam-side down, into a lightly greased 9 x 5” loaf pan.
Allow the dough to rise to the top of the loaf pan. The second rise should take about as long as the first rise, about 3-4 hours.
How to store and freeze
- To store: Store the baked bread in a bread bag, beeswax wrap or kitchen towel at room temperature. This honey wheat sourdough sandwich bread will keep fresh for a few days.
- To freeze: Wrap individual loaves in plastic wrap and insert into a freezer-safe container. Make sure they have cooled completely before wrapping.
Easy sourdough recipes for home bakers
Baking with sourdough is easy when you have the right recipes. Browse through our simplified sourdough recipes and you'll find step-by-step tutorials that will give you confidence in the kitchen!
- soft sourdough dinner rolls
- beginners sourdough bread
- sourdough country loaf bread
- soft sourdough pretzels
Honey Wheat Sourdough Sandwich Bread
EQUIPMENT
INGREDIENTS
Ingredients to make ½ cup Active Sourdough Starter
- 1 tablespoon (15 g) sourdough starter
- ⅓ cup + 1 tablespoon (50 g) all-purpose flour
- 3 ½ tablespoons (50 g) water
Dough Ingredients
- ½ cup (100 g) active sourdough starter
- 1 ⅓ cup + 1 teaspoon (325 g) water
- 2 tablespoons (40 g) honey
- 2 tablespoons (30 g) olive oil
- 2 teaspoons (10 g) sea salt
- 1 cup + 1 teaspoon (125 g) whole wheat flour
- 3 cups + 2 tablespoons (375 g) bread flour
INSTRUCTIONS
Feed Your Sourdough Starter
- 12 hours before you plan to mix the dough, add the ingredients to make ½ cup (100 g) of active sourdough starter to a clean jar. Stir until combined, loosely cover the jar and let the starter rise at room temperature. (The ingredients will create a total of 115 g active starter but, because some of it will stick to the sides of the jar during the transfer, we are making a little more than needed.) The sourdough starter is ready to use when it has doubled in size and there are plenty of bubbles on the surface and sides of the jar.
Make the Dough
- 8 AM - Mix the dough: To a large mixing bowl, add ½ cup (100 g) of active sourdough starter, water, honey, olive oil and sea salt. Use a stiff spatula to stir the ingredients. Add the bread flour and whole wheat flour to the bowl and stir with the spatula. Switch to your hands and mix the dough until it resembles a shaggy mess and there are no dry bits in the bowl. Cover the bowl and let the dough rest for 1 hour.
- 9 AM - First rise: Wet your hand with water and stretch and fold the dough until it tightens up and starts to form a ball. Turn the dough in the bowl until it's slightly smooth on the outside. Cover the bowl and allow the dough to rise at room temperature, 68-72°F (20-22°C), for 3-4 hours or until it has risen by about 30-50%.

- 1 PM - Shape and second rise: Turn the dough out onto a lightly floured surface and gently press it into a rectangular shape. Fold the two longest sides inwards about 1 inch. Fold the short side towards the opposite end until the loaf resembles a log shape. Place the dough seam-side down in a lightly greased 9" x 5" loaf pan. Allow the dough to rest at room temperature, uncovered until the dough has risen to the rim of the pan, about 3-4 hours.

- 5 PM - Bake: Preheat the oven to 375°F (190°C) and bake for 45 minutes. Allow the bread to cool in the pan for 10-15 minutes before transferring to a cooling rack.


NOTES
- To store: Store the bread in a bread bag, beeswax wrap or kitchen towel at room temperature. The loaf will keep fresh for a few days.
- To freeze: Wrap individual loaves in plastic wrap and insert into a freezer-safe container. Make sure they have cooled completely before wrapping.
This is the first of many sourdough recipes I've tried which has actually succeeded. It's just delicious - many thanks indeed!
I wonder about the baking temperature: a long bake at 190C, and with the sweetness of the honey, the crust got slightly burnt. How can I avoid this in future? I am certainly going to make this one again. And again.
You can try tenting the top with foil once the desired color is achieved for the remaining time it is baking.
I keep two sourdough starters. One is 100% hydration, the other, not. I was supposed to take some of the 100% to someone else, but bad weather cancelled that. I was already going to make a traditional sourdough with the other starter. So, I searched my files for a make in a day sourdough. I had saved this one. As always, I weigh everything. The house was very cold, so used the light on in the oven trick. The dough behaved just as written. At the last second, as I was forming the log, I sprinkles about 5 tablespoons of mixed seeds into the roll. They, I also spritzed the outside and rolled the log in more seeds. The last rise was right at 3 hours, then, I baked. It was a beautiful loaf. Just cut into it this morning. Perfect for sandwich bread. Great recipe.
This bread was so easy to make and is delicious!
I was so worried this recipe wasn’t going to turn out right. I’m new to sourdough and this was my first attempt at sandwich bread. I ended up having to add quite a bit more water to get a shaggy dough. Then it took almost a full 24 hours for the bread to rise to the rim, at room temperature. It’s also winter, and pretty cold in my kitchen. I was patient and it finally started rising. I baked it and it came out PERFECT! Can’t wait to try this recipe again.
THE. BEST. BREAD. EVER!!! I have literally followed your recipe exactly (by weight) and every loaf has turned out amazing! I no longer want to buy bread from the store and this will 100% be my bread loaf recipe for the rest of my life!!
My question is…I am running low on olive oil but I do have avocado oil in hand…can I substitute the olive oil with avocado oil or would that be bad? I have no problem getting more Olive oil but just thought if i could use up the avocado oil with the bread, that would be great.
Please let me know if I should just stick to olive oil or if avocado oil would be an ok substitute! Thanks!!!
Avocado oil is a perfect substitute! It doesn't have a flavor and is very versatile. I would avoid overly-processed seed oils, such as canola, soy, corn, etc., as they are bad for your health.
Thrilled with how this turned out! Finally found the perfect sandwich bread for our family after failed attempts with other recipes. Love that it’s dairy free too! Thank you!
Love this recipe and will be our new go to bread!
Please tell me the 218 cal is not per slice!🤣
My family and I love this bread. Since starting to make it, we have stopped buying store bought sandwich loaves (WIN!). However, every time I bake it, it bakes lopsided. This does not seem to affect the quality or taste, but I was wondering if you know why this is happening, and what can I do to get a more even bake?
Love this recipe. I tweaked it a bit by doubling the honey and cutting the olive oil in half. I double the recipe as well.
Thank you for sharing your tips Anastasia 🙂
I almost never rate or comment on a recipe, but this has become my weekly sandwich bread bake, and unlike many others I’ve tried, it has come out perfectly every. single. time! I’ve followed the recipe exactly as written using the weights, and now I double it and put one loaf in the freezer. I usually do a cold proof in the fridge over night, first or second, it doesn’t seem to matter, just depending on my schedule, and they are perfect regardless. In fact, I’ve pinned several of your recipes because they just work!
Thank you Amelia 🙂
I just came to the comment section specifically to see if anyone had done an overnight cold ferment, so thank you!
I have. I do the first 4 hr rise, shape it, cover it, then put into fridge 12-24 hrs. However, I've found that I still need to let it rise to the rim for 4 + hrs before baking. Why? To prevent splitting! Whenever I've baked it straight from fridge, it splits (even w scoring). 2nd rise to rim is important!
Hi Amelia,
After you have done a cold ferment in the fridge overnight, do you let it rise at room temp and then bake?
Can you share a little more info?
Thank you! Sharon G.
Amelia or Amy, have you ever experimented with putting the fermented, unbaked loaf in the freezer? And then thawing, rising, and baking at a later time?