Chocolate Chip Sourdough Scones


These chocolate chip sourdough scones are so tender and buttery on the inside and you'll fall in love with the crumbly, golden brown edges
This is a great recipe to use with your sourdough discard and we provide step-by-step instructions for you to follow!
Sourdough scones are a great way to use your sourdough starter discard. I love to save my discard to make these scones and other baked goods like, sourdough banana nut muffins and sourdough discard crackers.
If you've never had a scone before, the texture is kind of like a cross between a cookie and cake. A crumbly, golden brown outside with a soft center. It's the best of both worlds!
The recipe is made of basic ingredients like butter, flour, salt, baking powder, eggs, heavy cream and vanilla extract. So more than likely, you've got what you need to bake a batch!
Let's bake some scones!
Step by step instructions
These sourdough scones are so easy to make. Let's dive straight into the details!
- Make sure to put stick of butter in freezer ahead of time for best results!
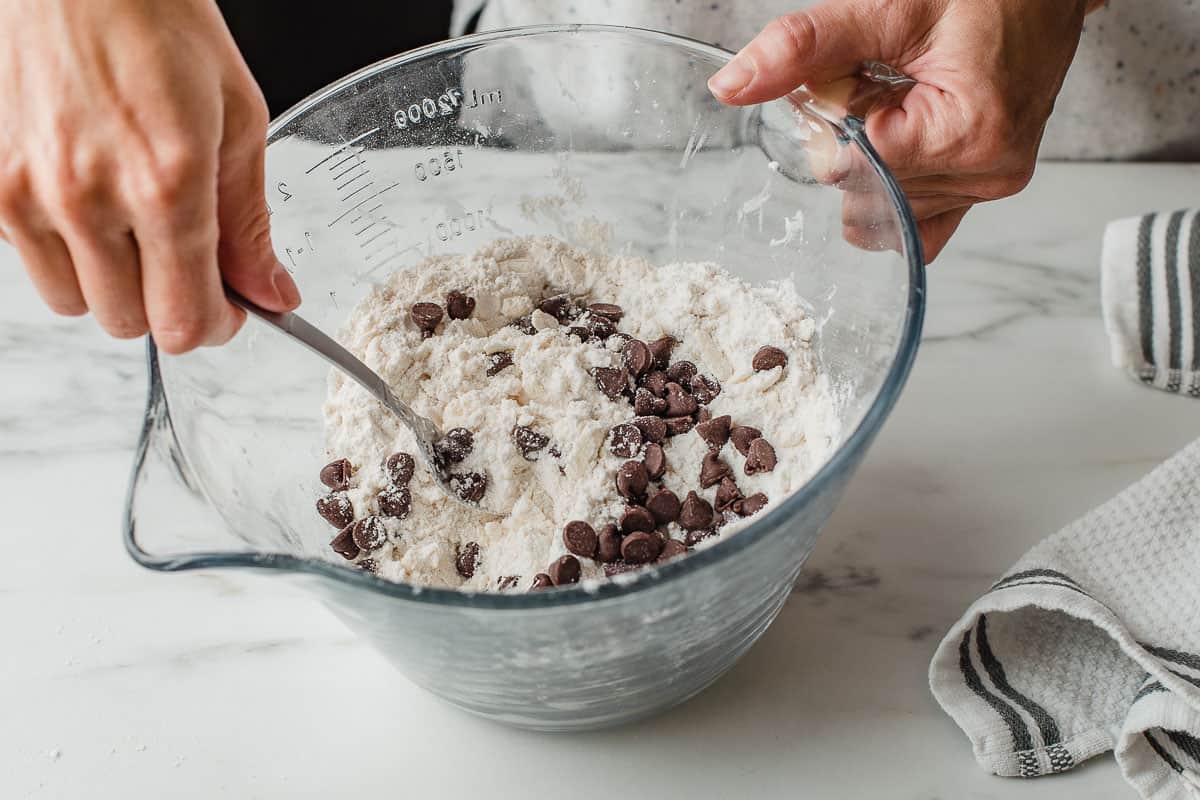
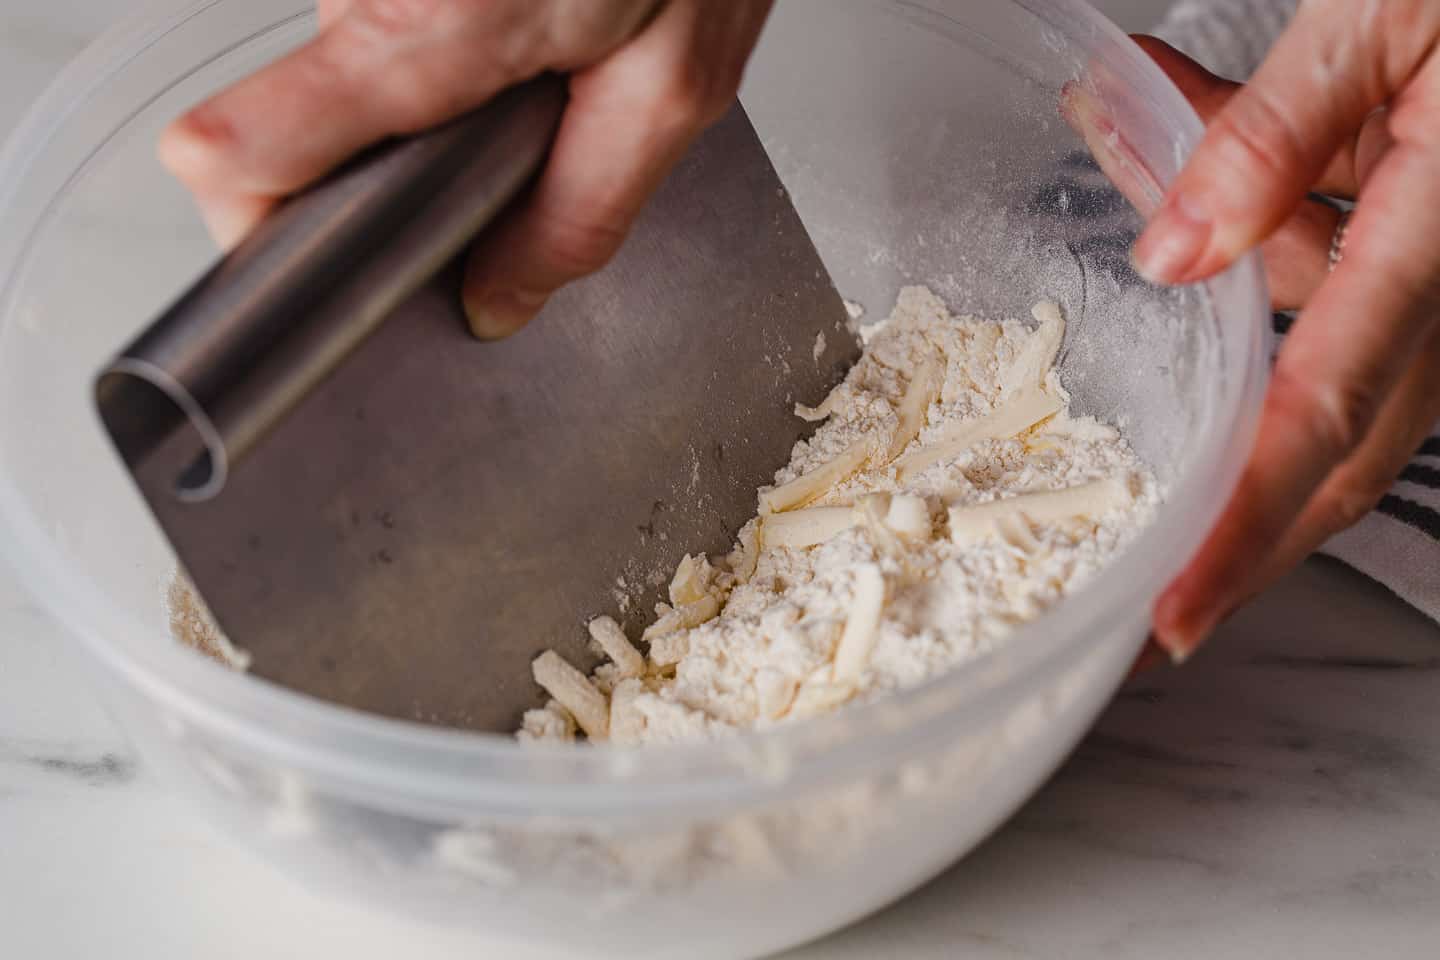
1. To a mixing bowl, add the flour, sugar, salt and baking powder and whisk to combine. Use a cheese grater to grate the frozen butter into the flour mixture. Use a fork to cut the butter into the flour until it forms pea size crumbles. Toss in the chocolate chips.
2. In a small bowl, whisk together the egg, sourdough discard, heavy cream and vanilla extract.
3. Pour the wet ingredients into the dry ingredients and use a fork to combine. Dump the dough onto a clean work surface. (The dough will seem dry and clumpy but resist the urge to add more liquid) Use your hands to press the dough together and shape into an 8" disc.
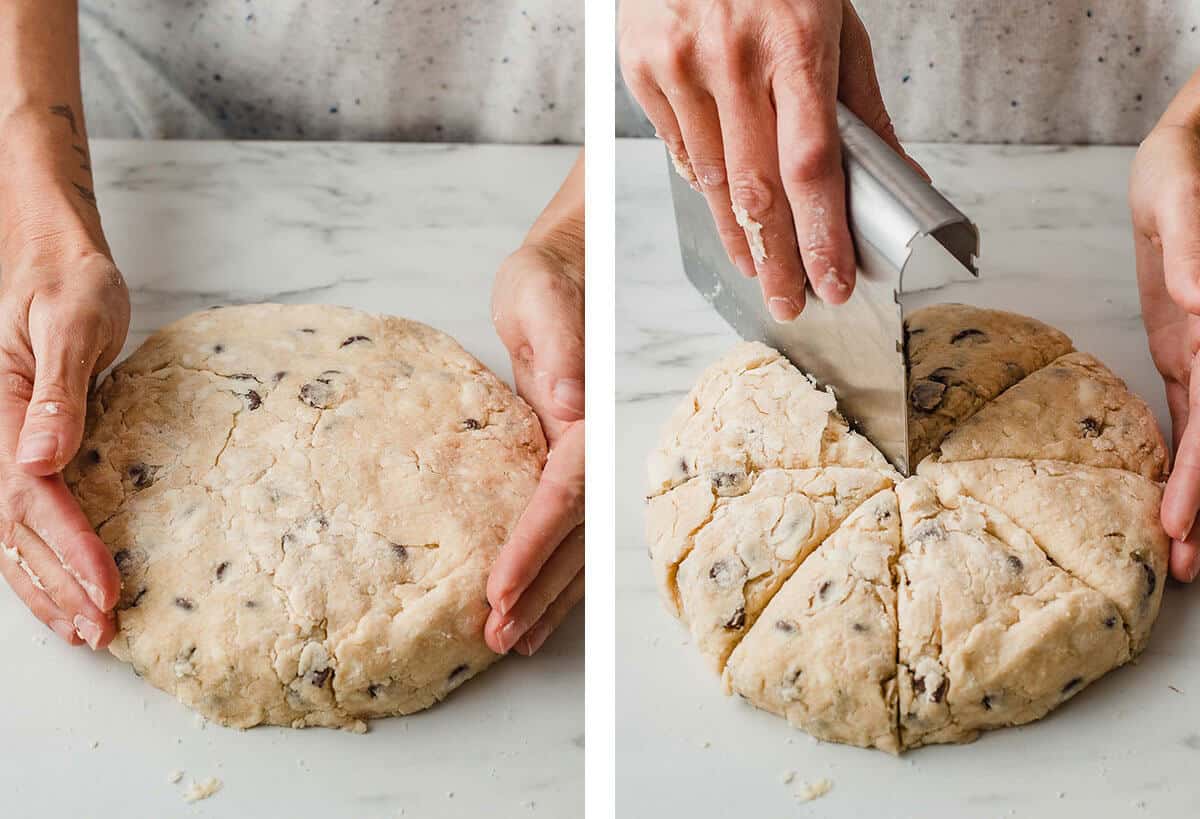
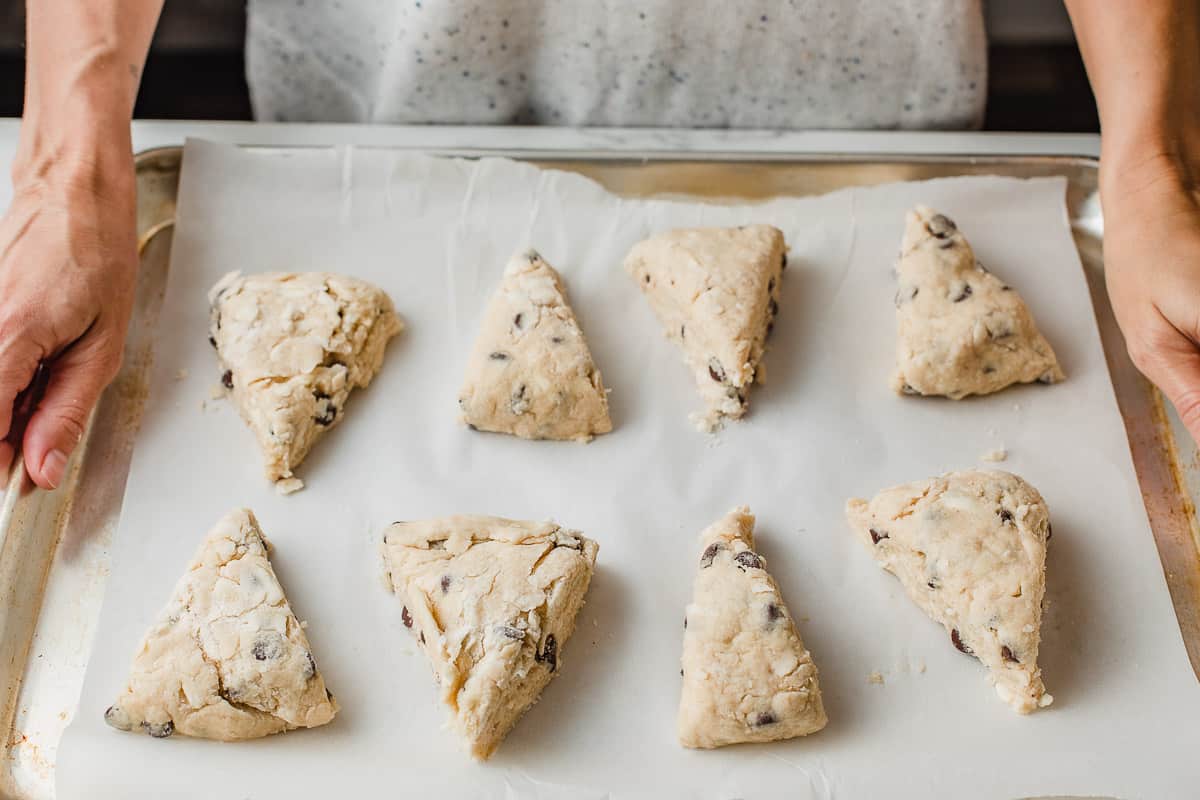
4. Cut into 8 wedges and arrange on a parchment lined baking sheet. Chill in the fridge for 30 minutes.
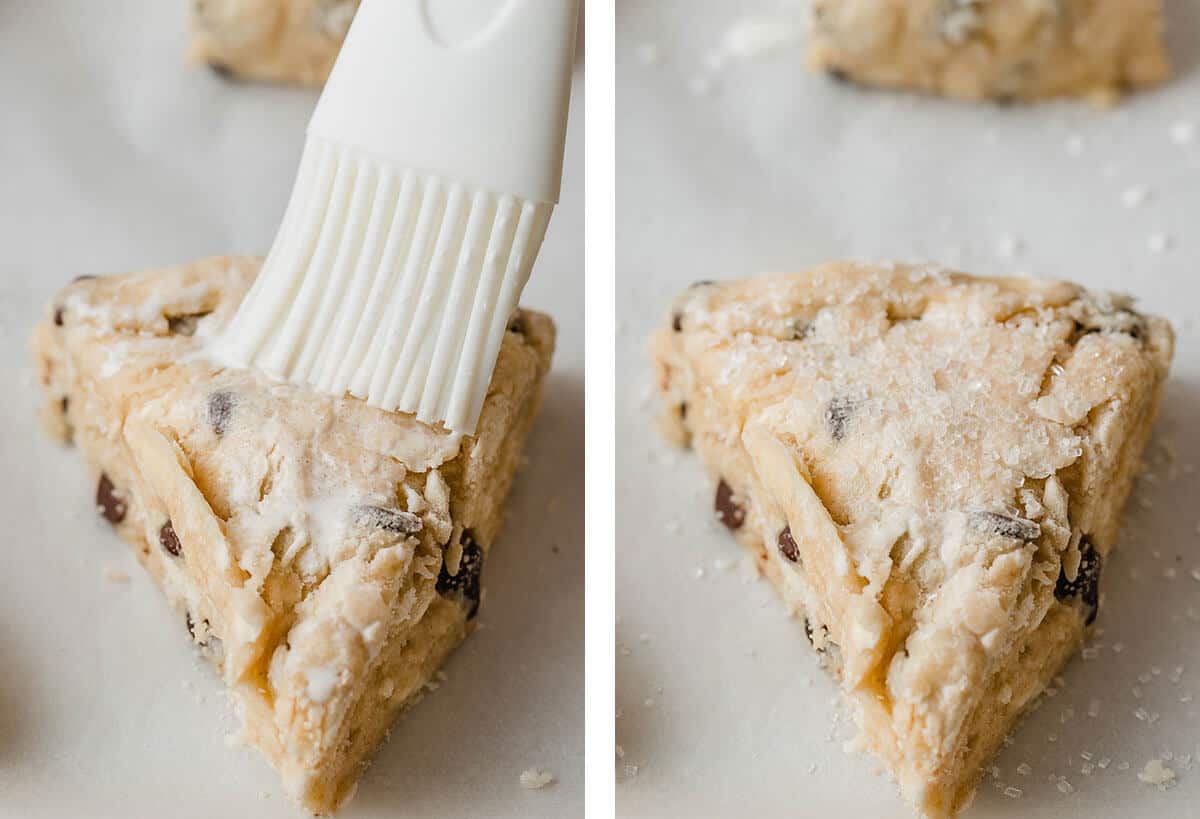
5. Preheat the oven to 400F degrees. Remove the baking sheet from the fridge, brush the tops with heavy cream and sprinkle with sugar.
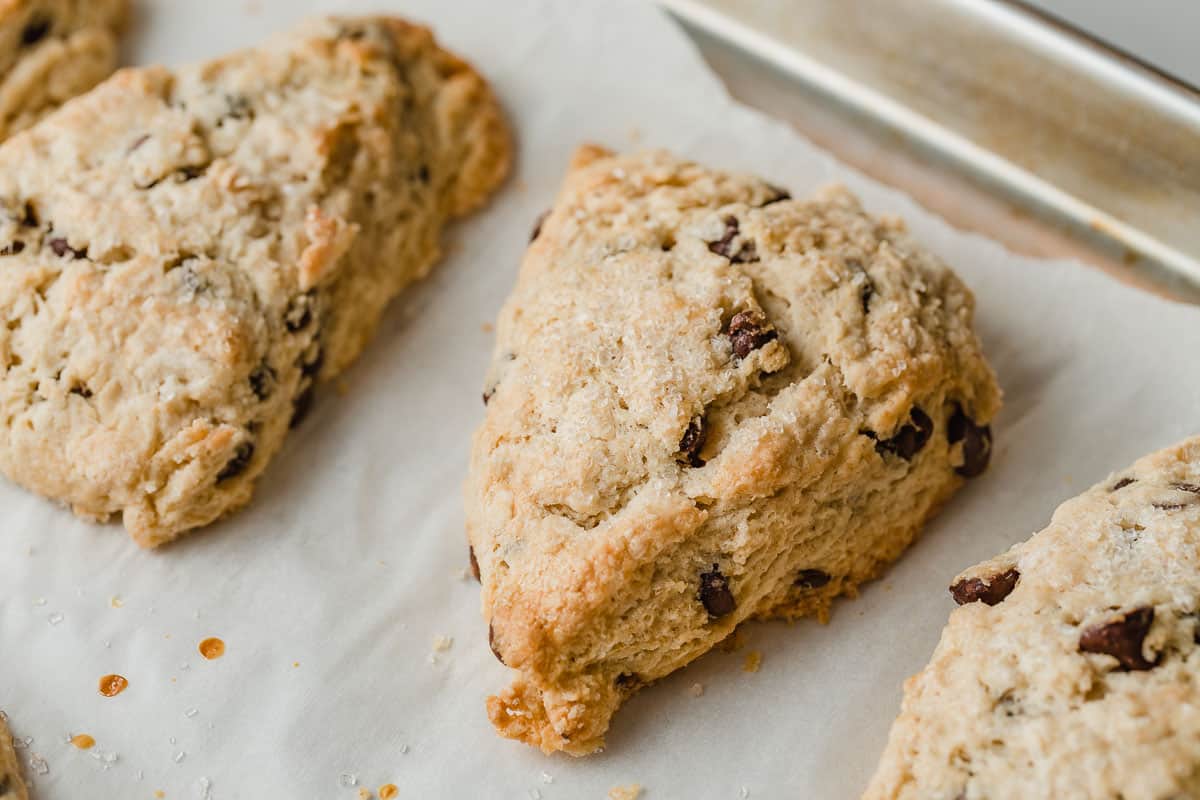
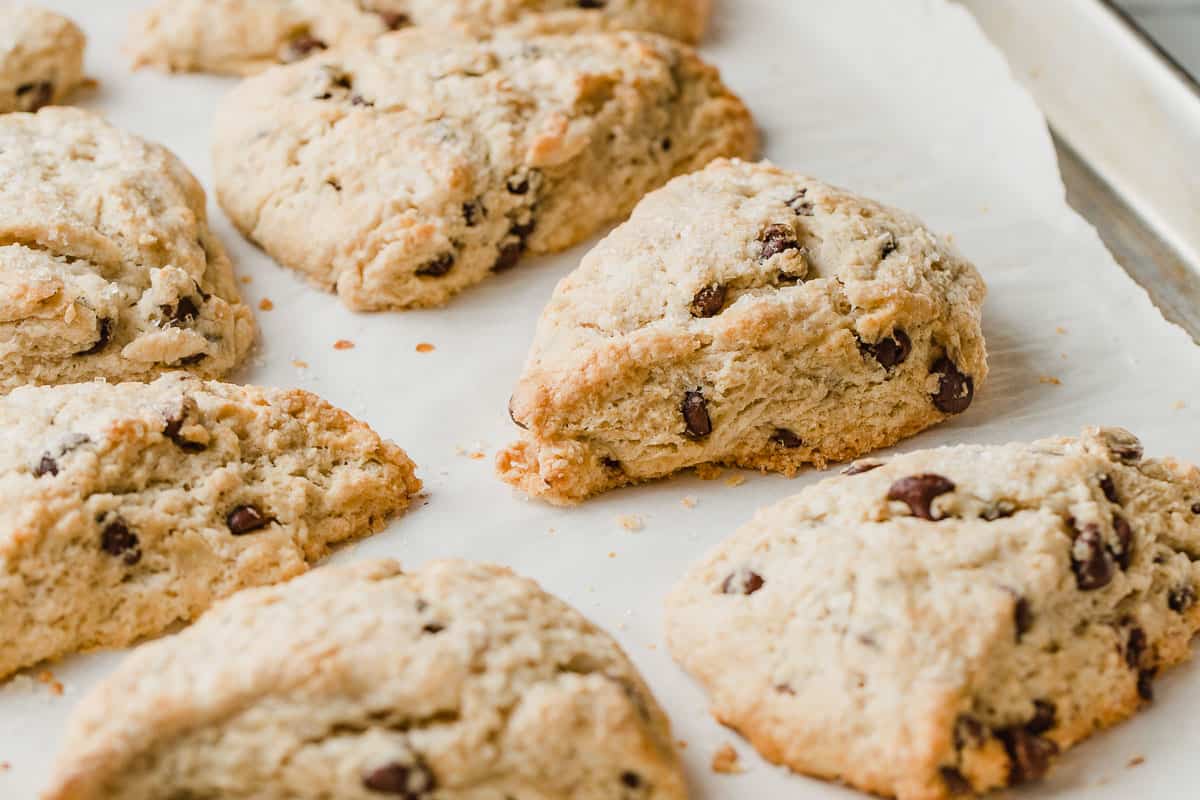
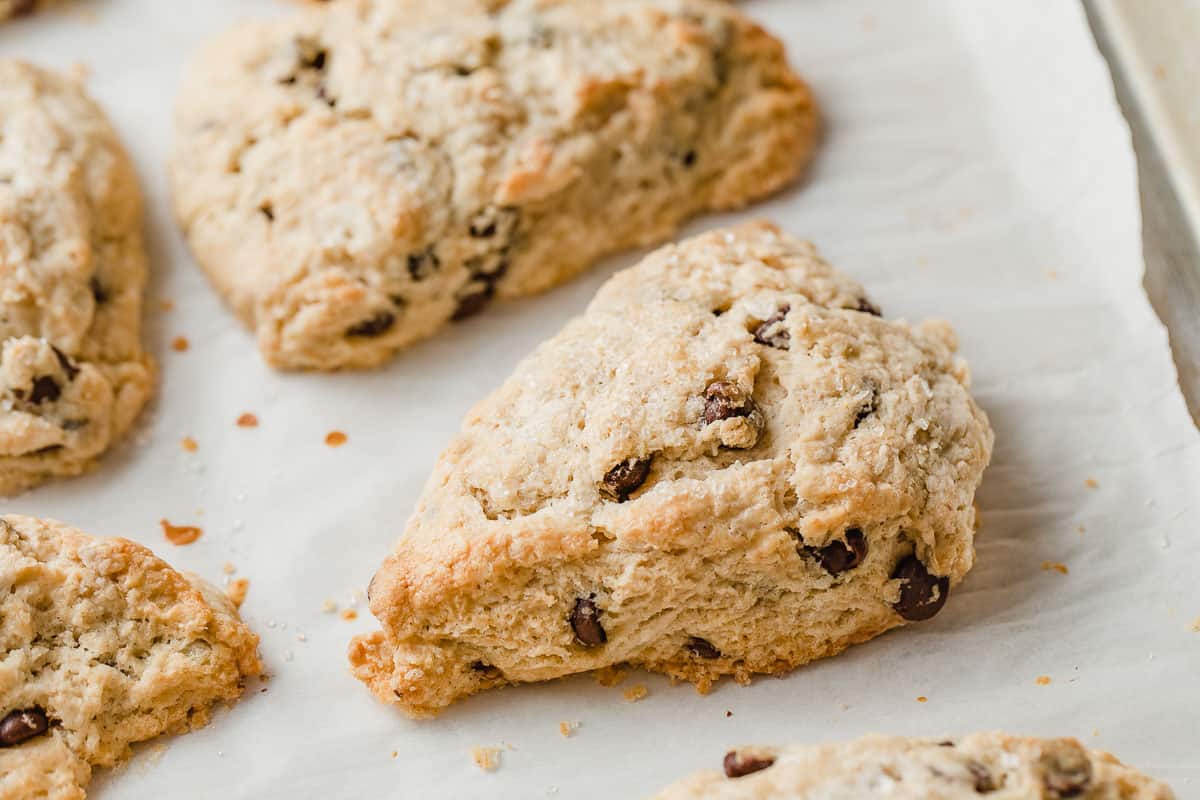
6. Bake for 25 minutes or until the scones are golden brown.
Tips for success
To make sure these scones keep their shape, make sure you chill the wedges for at least 30 minutes before baking.
Scones can be assembled the night before and kept covered in the fridge for a quick breakfast. (Brush with heavy cream and sprinkle sugar, right before baking.)
The heavy cream can be substituted with milk or half and half with no problems.
Butter should be frozen for best results, but cold butter out of the fridge will work in a pinch. Use a cheese grater to create small ribbons of butter. This makes it easy to cut the flour into the butter with a pastry cutter or a bench scraper.
Don't have a kitchen scale to measure flour?
Use the scoop and level technique to measure your flour if you do not have a kitchen scale. To do this, use a spoon to fluff up the flour in the bag. Use a spoon to scoop the flour into a measuring cup until it is heaped on top. Take a butterknife and level off the top. This should give you the most accurate measurement for flour.
Because flour is measured by weight in these recipes, if the flour is scooped straight out of the bag with the measuring cup, there will be more flour than is called for in the recipe.
Tips for baking in warm and/or high humidity areas - When baking in high humidity and/or warmer areas, it's often a good practice to use less water and bake a little longer than the recipe calls for. Reduce the water by 25 grams in the initial mix and then slowly add the remaining water until you achieve the correct hydration level. You may need to bake the scones a few minutes longer. This will take some trial and error!
How to store and freeze leftovers
Store leftover scones in an air-tight container on the counter for up to 4 days.
To freeze baked scones, let them cool completely and then wrap tightly in plastic wrap. Freeze for up to 3 months.
When ready to eat, let thaw at room temperature. You can heat them up in the microwave for about 30 seconds if you want to eat them warm!
To freeze unbaked scones, cut the scones out and arrange them on to a baking sheet lined with parchment paper. Freeze them on the sheet until they are solid and then transfer them to resealable bags and freeze for up to 3 months.
Bake the scones direct from frozen but add an extra 2-3 minutes baking time.
Other sourdough discard recipes you might like to try:
- sourdough vanilla cake
- sourdough coffee cake
- sourdough brownies
- sourdough banana bread
- sourdough cinnamon rolls
We hope you enjoy these chocolate chip sourdough scones as much as we do!
Make sure to rate this recipe and leave a comment below! We'd love to hear from you!

Chocolate Chip Sourdough Scones Recipe
INGREDIENTS
Dry Ingredients
- 2 cups + 2 teaspoons (250 g) all-purpose flour
- ½ cup (100 g) granulated sugar
- ½ teaspoon (2.5 g) fine sea salt
- 2 teaspoons baking powder
- 1 stick (113 g) unsalted butter (frozen or very cold)
- 1 cup (180 g) semi-sweet chocolate chips
Wet Ingredients
- ½ cup (125 g) sourdough starter discard
- 1 large egg
- 2 teaspoons (10 g) vanilla extract
- 2 tablespoons (30 g) heavy cream (milk or half and half can be used)
Topping
- 2 tablespoons (30 g) heavy cream (milk or half and half can be used)
- 3 tablespoons (45 g) sanding sugar (coarse sugar)
INSTRUCTIONS
- In a medium size mixing bowl, whisk the flour, sugar, salt and baking powder together. Use a cheese grater to grate the butter into the bowl. Toss the grated butter with the flour mixture with a fork to coat and separate the pieces of butter. Cut the flour into the butter using a pastry cutter or a bench scraper until the mixture comes together in pea size crumbs. Add the chocolate chips to the mixture and stir.
- In a separate bowl, whisk the starter, egg, vanilla extract and heavy cream until smooth. Pour into the dry ingredients and use a fork to gently mix. The dough will be crumbly, resist the urge to add more liquid.
- Dump the dough onto a clean work surface and use your hands to press and shape the dough into an 8" disc shape. (Use a small amount of flour if needed to help it from sticking to the surface.)
- Cut the dough into 8 wedges using a bench scraper or a large knife. Arrange the wedges onto a parchment lined baking sheet with space in between each wedge. Place the baking sheet in the fridge to chill for 30 minutes.
- When ready to bake, preheat the oven to 400°F (204°C). Brush the top of the scones with heavy cream and sprinkle with sanding sugar. Bake for 20-25 minutes or until the scones are golden brown. Remove and serve warm.
NOTES
- Use the scoop and level technique to measure your flour if you do not have a kitchen scale. To do this, use a spoon to fluff up the flour in the bag. Use a spoon to scoop the flour into a measuring cup until it is heaped on top. Take a butterknife and level off the top. This should give you the most accurate measurement for flour.
- Tips for baking in warm and/or high humidity areas - When baking in high humidity and/or warmer areas, it's often a good practice to use less liquid and bake a little longer than the recipe calls for. Reduce the liquid by 25 grams in the initial mix and then slowly add the remaining liquid until you achieve the correct hydration level. You may need to bake the scones a few minutes longer. This will take some trial and error!
- Store leftover scones in an air-tight container on the counter for up to 4 days.
- To freeze baked scones, let them cool completely and then wrap tightly in plastic wrap. Freeze up to 3 months. When ready to eat, let thaw at room temperature. You can heat them up in the microwave for about 30 seconds if you want to eat them warm.
- To freeze unbaked scones, cut the scones out and arrange them on to a baking sheet lined with parchment paper. Freeze them on the sheet until they are solid and then transfer them to resealable bags and freeze for up to 3 months. Bake the scones direct from frozen but add an extra 2-3 minutes baking time.
This is my go-to done recipe and I make scones every week for my husband's mid morning snack at work. this is the best recipe ever and I've changed it up in so many different ways! adding everything from peanut butter chips to maple chips with maple bacon and a maple glaze. This recipe has been literal foolproof and believe me when I say I have tried it! ❤️
Hello! I make these scones all of the time- so yummy! I am wondering if I freeze them unbaked for 2 days before baking for a market, can they be stored in a Tupperware? Or do I still need to wrap each first?
Hi Courtney, I would wrap them so they don't stick together!
I’m new to sourdough and scones, but I love to bake so I thought I’d try these. The recipe is easy to follow and they turned out amazing! My family and friends love them and keep asking for more. Thank you for this fun and delicious recipe.
If using active starter, do I still need to add baking powder?
Yes
Um... Wow!! These are some of the best baked goods I have ever made! Seriously, I could open a bakery and sell just these!
Not too sweet amd not overpowering sourdough flavored, but just right!
I am now going to make other variations and go digging in your site for more amazingly delicious recipes!
Thank you for sharing them!
Amazing! I’ve made a couple times using different add ins. I make a version of clotted cream to spread on them depending on add in. Love this recipe. Thank you for sharing.
Hello! I've made these before - they are delicious...Did I read somewhere I can mix up and leave in fridge overnight? I was skimming it this morning and can't seem to locate that - or maybe it's all in my head?? Any help would be greatly appreciated.
Hi Donna! Yes, you can. You can keep the dough in the fridge for up to 2 days before baking.
Um... Wow!! These are some of the best baked goods I have ever made! Seriously, I could open a bakery and sell just these!
Not too sweet amd not overpowering sourdough flavored, but just right!
I am now going to make other variations and go digging in your site for more amazingly delicious recipes!
Thank you for sharing them!
These scones are delicious. My grandkids love them, as well as anyone else I’ve baked them for!!! I would love to know how to modify the recipe for blueberry scones. Thank you
oh my goodness, these are so delicious! They are soft and cakey and not too sweet. I will definitely be making these again and again.
I’ve attempted scones several times in my baking adventures and have never had them turn out so beautifully! I was also very encouraged by a comment stating that the baker also made sugar free, and savory to much success. Thank you so much for sharing this recipe, my family is going to be thrilled!