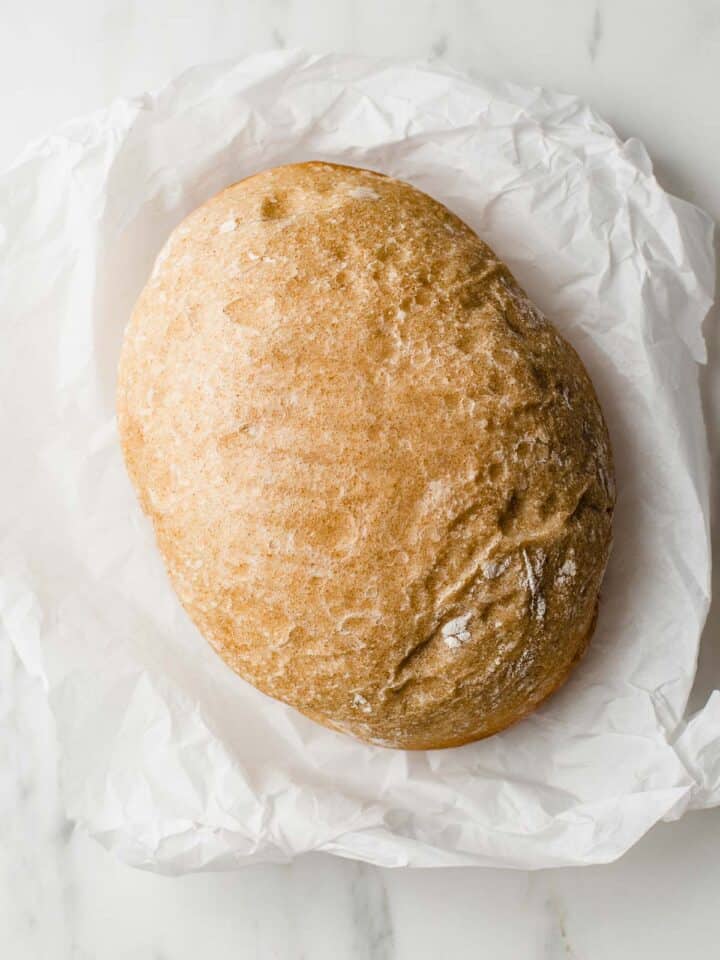
Olive and Walnut Sourdough Bread

Sourdough bread is even more delicious when loaded with salty olives, crunchy walnuts, and sweet roasted garlic. This olive and walnut sourdough bread can be served alongside soups or enjoyed as a hearty snack all on its own!
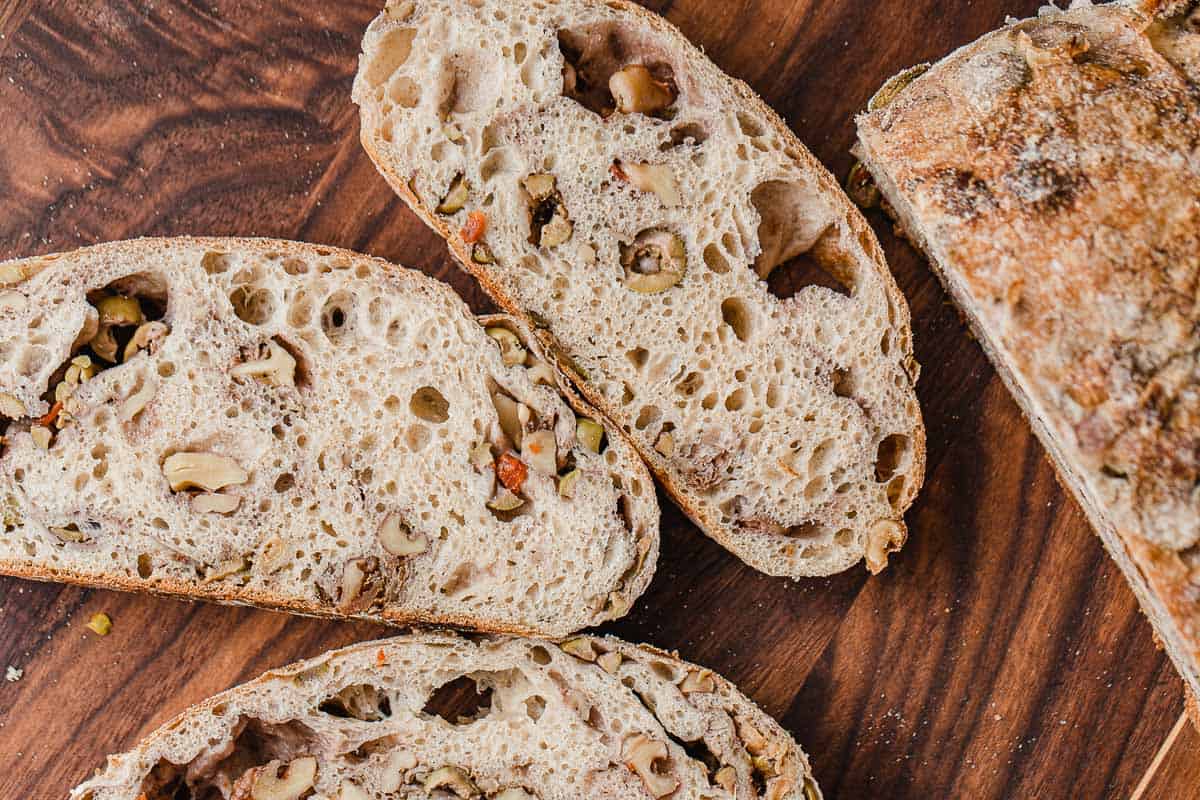
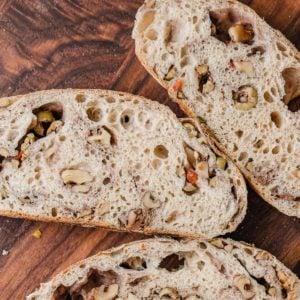
I'm giving you fair warning, you won't be able to eat just one slice of this olive and walnut sourdough bread.
Not only is it beautiful to look at, but every bite is filled with exciting flavors and textures for a truly unique sourdough experience. It is INSANELY delicious!
This is our basic sourdough country loaf recipe, with olives, walnuts, roasted garlic, and dried basil added to the dough in the second set of stretch and folds.
Mix this dough up in the morning, and you'll enjoy it at supper!
Ingredients needed
- olives: Green pre-sliced manzanilla olives with pimentos are perfect for this bread. Kalamata or black olives are other good options.
- walnuts: Chopped walnuts add a delicious texture and flavor.
- roasted garlic: If you don't have any garlic on hand, you can omit it without compromising the taste of the final loaf. It is a delicious enhancement, but nothing to worry about if you have all the other ingredients and don't want to run to the store.
If you are looking for proving baskets, you can find the kind I use in our Kitchen Essentials list and other items you may need.
Sample baking schedule
- 8 PM: Feed sourdough starter.
- 8 AM: Mix flour, water and starter. Cover and let rest for 1 hour. Roast garlic and set aside for later.
- 9 AM: Mix in salt and remaining water. Cover and let rest for 1 hour.
- 10 AM: Perform the first set of stretches and folds. Cover and let rest for 30 minutes.
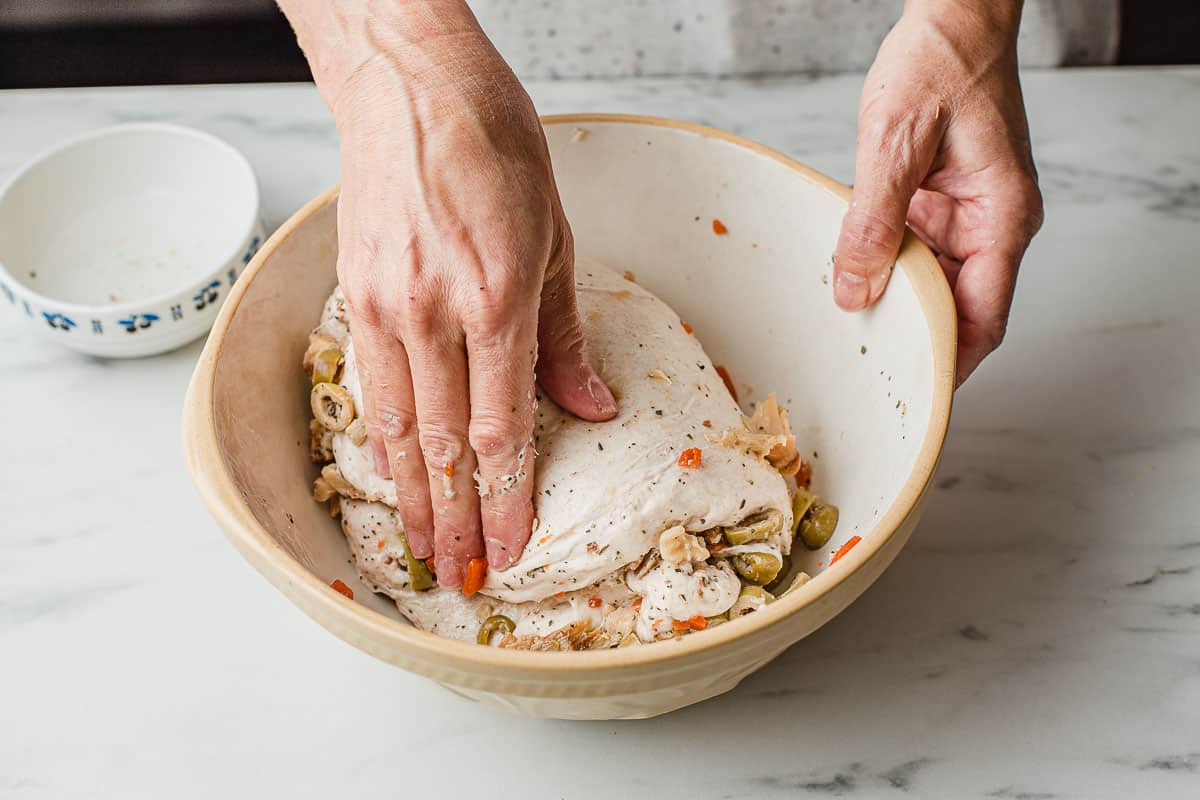
- 10:30 AM: Add olives, walnuts, roasted garlic, and dried herbs. Perform the second set of stretches and folds. Cover and let rest for 30 minutes.
- 11 AM: Perform the third set of stretches and folds. Cover and let rest for 2 ½ hours. (Kitchen temperature is 70°F)
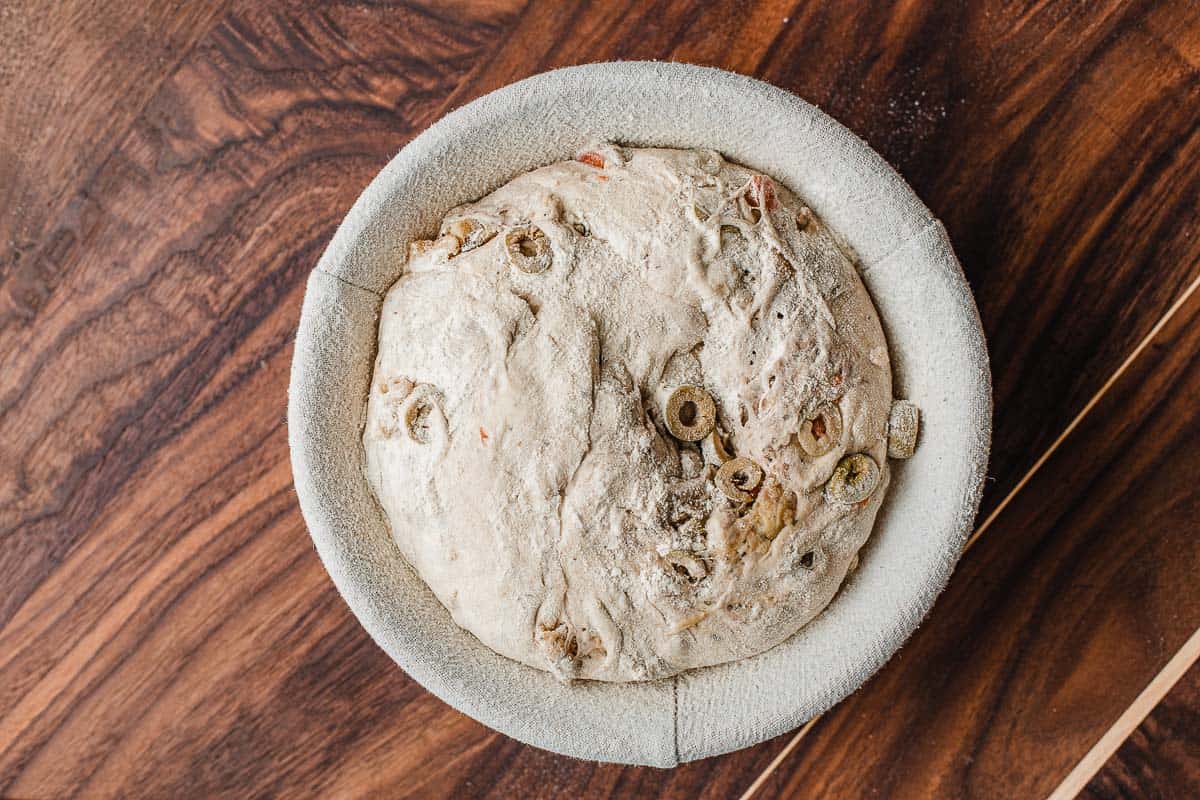
- 1:30 PM: Dump the dough onto a floured surface, rough shape it into a ball, and place it in a floured proving basket. Cover and let rise for 2 ½ hours.
- 4 PM: Preheat oven, score and bake.
Pro Sourdough Tip
- The optimal time to mix your sourdough bread dough is when your sourdough starter is at its peak of activity. Count the number of hours it takes for your starter to peak after you feed it, and use that information to adjust your baking schedule.
Step-by-step instructions
Step 1: Feed your sourdough starter
Feed your sourdough starter 4-12 hours before mixing your dough so it's bubbly and active. Roast the garlic and set aside until ready to mix the dough.
Step 2: Mix the dough - Autolyse
Use your hands to mix the flour, sourdough starter, and water in a large bowl until there are no dry bits. Cover and let the dough rest for one hour.
Step 3: Add Salt
Add the salt to the dough and work it with your hands until well combined. Cover and let rest for one hour.
Step 4: Stretch and Fold
Perform three sets of stretch and folds over the first hour and a half, 30 minutes apart. Add the olives, walnuts, roasted garlic, and dried basil to the dough during the second set of stretch and folds.
Step 5: First rise
Cover the dough and allow it to ferment at room temperature for an additional 2-3 hours.
Step 6: Shape and Second Rise
Turn the dough onto a floured surface and shape into a rough ball. (It will not be smooth). Flour the top of the dough and place it in the proving basket, top-side down. Allow to rise at room temperature for 2-3 hours or until it has risen about 20%-30%.
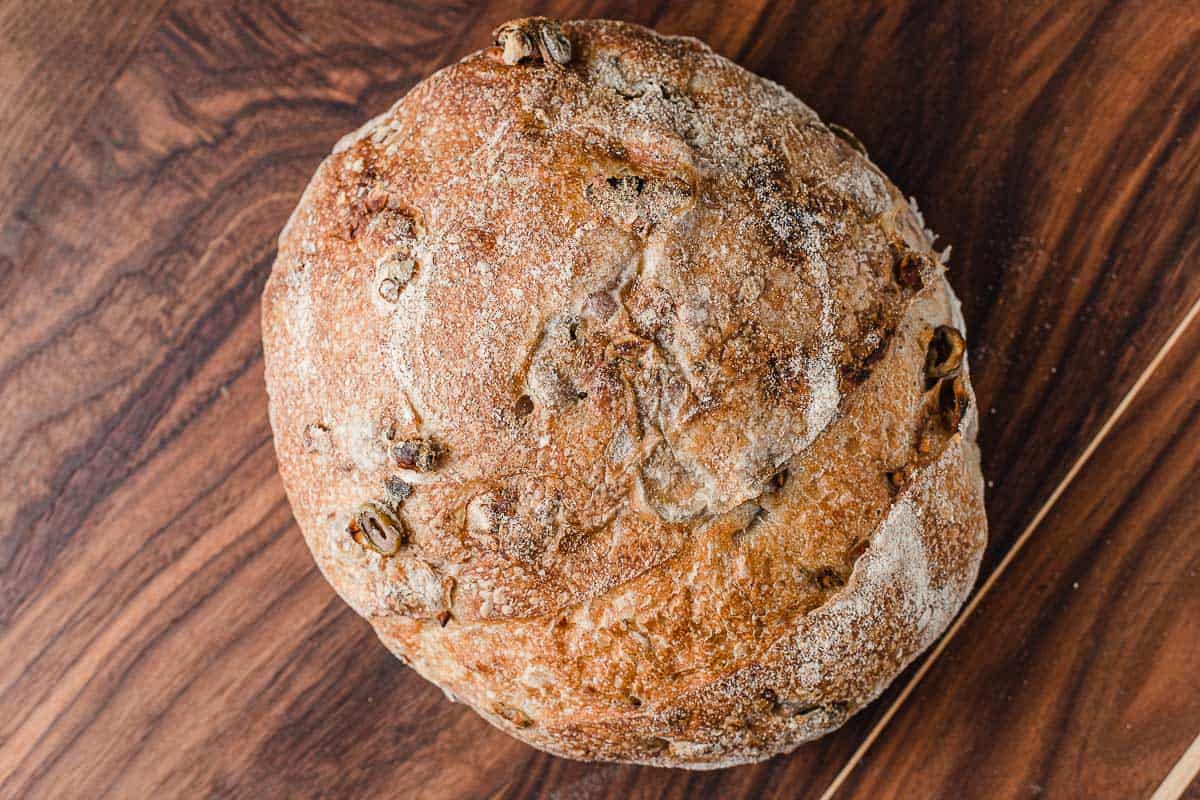
Step 7: Score and Bake
Preheat your oven to 500°F (260°C) with a Dutch oven inside. Turn the loaf out onto a piece of parchment paper and score the top. Transfer the loaf to the Dutch oven and spritz with water. Place the Dutch oven back into the oven and turn the temperature down to 450°F (232°C).
Bake covered for 20 minutes, then remove the lid and bake for an additional 30 minutes. To avoid a gummy texture, allow the bread to cool completely before slicing.

How to Store
Store your bread at room temperature, wrapped in a kitchen towel or beeswax wrap. You can also store the bread and slice it down on a cutting board with a cake stand top covering the bread.
It is not recommended to store sourdough bread in the fridge as it will become stiff.
Full loaves or individual slices wrapped tightly in plastic wrap and inserted into a freezer-safe container can be frozen for up to 3 months.
more sourdough bread recipes


Subscribe to our newsletter and we'll send you more fresh recipes, valuable troubleshooting advice, useful tips, and other information we believe will be helpful to you!
Olive and Walnut Sourdough Bread Recipe
INGREDIENTS
Ingredients to make ½ cup (100 g) of Active Sourdough Starter
- 1 tablespoon (15 g) sourdough starter
- ⅓ cup + 1 tablespoon (50 g) all-purpose flour
- 3 ½ tablespoons (50 g) water
Sourdough Ingredients
- ½ cup (100 g) active sourdough starter
- 1 ½ cups (360 g) water (30 grams divided)
- ⅓ cup + 1 tablespoon (50 g) whole wheat flour
- 3 ¾ cups (450 g) bread flour
- 2 teaspoons (10 g) fine sea salt
Add-in Ingredients
- 1 cup (135 g) sliced olives
- 1 cup (120 g) walnuts (rough chopped)
- 1 teaspoon (5 g) dried basil
- 1 head garlic
- 1 tablespoon olive oil (for roasted garlic)
INSTRUCTIONS
Feed Your Sourdough Starter
- 12 hours before you plan to mix the dough, add the ingredients to make ½ cup (100 g) of active sourdough starter to a clean jar. Stir until combined, loosely cover the jar and let the starter rise at room temperature. (The ingredients will create a total of 115 g active starter but, because some of it will stick to the sides of the jar during the transfer, we are making a little more than needed.) The sourdough starter is ready to use when it has doubled in size and there are plenty of bubbles on the surface and sides of the jar.
Prepare Add-ins
- Roast garlic: Preheat oven to 425°F (218°C). Cut the top of the head of garlic off, drizzle with olive oil and loosely wrap in foil. Bake for 45 minutes. Let cool.
- Add the sliced olives, walnuts, roasted garlic and dried basil to a bowl and set aside.
Make the Dough
- Autolyse: In a mixing bowl, combine 330 grams of water and 100 grams active sourdough starter, stir to combine. Add 50 grams whole wheat flour and 450 grams bread flour and use your hands to combine the ingredients until there are no dry bits and the dough looks like a shaggy mass. Cover the bowl and let the dough rest on the counter for 1 hour.
- Add salt: Add 10 grams of salt to the remaining 30 grams of water in a small bowl and stir to dissolve. Add the salt water to the dough and use your hands to work it in until well combined. Cover the bowl and let rest on the counter for 1 hour.
- Bulk fermentation - Perform 3 sets of stretch and folds, 30 minutes apart, over the first hour and a half. Add the olives, walnuts, roasted garlic and dried basil to the dough during the second set of stretch and folds. Keep the bowl covered between sets.*To perform a set, while the dough is still in the bowl, pick up one side with a wet hand. Pull it up and over itself. Turn the bowl and repeat this action on 4 sides of the dough until the bowl has come full circle. Once finished with the third set of stretch and folds, cover the dough and allow to rise at room temperature for an additional 2-3 hours.
- Shape and Second Rise - Turn the dough onto a floured surface and shape into a rough ball. (It will not be smooth). Flour the top of the dough and place into a floured proving basket, top-side down. Allow to rise at room temperature for 2-3 hours or until it has risen about 20%-30%.
- Score and Bake: Preheat the oven, with the dutch oven inside, to 500°F (260°C) for 30 minutes.Turn the dough out onto a piece of parchment paper and score the top with a razor. Remove the dutch oven and place on stove-top. Use the parchment paper as a sling and lift the dough up and into the dutch oven. Cover, turn oven down to 450°F (232°C) and bake for 20 minutes. Remove the cover and bake an additional 25-30 minutes or until the crust is at the desired color.
- Let the bread cool on a cooling rack for 2 hours before cutting.
NOTES
- Use the scoop and level technique to measure your flour if you do not have a kitchen scale. To do this, use a spoon to fluff up the flour in the bag. Use a spoon to scoop the flour into a measuring cup until it is heaped on top. Take a butterknife and level off the top. This should give you the most accurate measurement for flour.
- Use large silicone gloves when bread baking to protect hands and forearms from burns.
- During the first rise (bulk fermentation), if your kitchen temperature is warmer than 68°F (20°C), check the dough 2 hours after the last stretch and fold to make sure that it does not over proof. The dough is ready for shaping when it has risen about 30% and has bubbles around the edges of the bowl.
- Let the loaf cool completely before slicing to prevent the crumb from becoming gummy in texture.
- Tips for baking in warm and/or high humidity areas - When baking in high humidity and/or warmer areas, it's often a good practice to use less water and bake a little longer than the recipe calls for. Reduce the water by 50 grams in the initial mix and then slowly add the remaining water until you achieve the correct hydration level. Bake the bread about 5-10 minutes longer with the lid on, remove the lid and bake until done. This will take some trial and error!
- Store your bread at room temperature, wrapped in a kitchen towel or beeswax wrap. You can also store the bread, slice down, on a cutting board with a cake stand top covering the bread. It is not recommended to store sourdough bread in the fridge as it will become hard.
- Freeze full loaves or individual slices wrapped tightly in plastic wrap and inserted into a freezer-safe container for up to 3 months.
I actually used more whole wheat flour (maybe 350 g, and I used all purpose flour for all the flour in this recipe), had to leave it in the fridge overnight after the first rise, and I preheated a thick bottomed stainless steel pan in the oven with water in the steam tray since I don't have a dutch oven. I cooked it about 45 mins. I thought I might have over done it because it was a deep brown, but omg it's probably the best quality loaf I've ever made. The crumb was open and so soft, while the outside had the most perfectly thin crust! I'm definitely making it again!
made this for my son. had it for dinner with hummus. love it . will be a repeat recipe for sure
Can you make up the dough and then let it for a bit in the refrigerator overnight to bake the following night?
Hi Cindy, I would place it in the fridge after its first bulk rise. Then you can take it out and let it rise before baking the next day.