How to Make Cheese Tortellini

Learn how to make cheese tortellini from scratch with your sourdough pasta dough. It's a great way to use leftover sourdough discard.
Whip up a large batch and freeze some for quick and easy meals!

Why you'll love this cheese tortellini recipe
- Time saver: I love having a few bags of these cheese tortellini ready to go in the freezer. It's so easy to just throw some into a pot of boiling water when I'm in a pinch for time. No thawing necessary!
- No food waste: If you've got a sourdough starter, you're always looking for ways to use sourdough discard. This pasta recipe is perfect for putting it to good use.
- Homemade pasta: Nothing beats the flavor and texture of homemade pasta dough. Store-bought pasta doesn't come close!

Ingredients & Substitutions
- pasta dough: Use our easy recipe for homemade sourdough pasta or your favorite pasta recipe if you have one!
- ricotta cheese: This is the main part of the cheese filling. You can use blended cottage cheese in its place.
- egg
- parmesan cheese: Adds flavor and saltiness to the cheese filling so there's no reason to add extra salt. You can also try romano cheese.
- fresh spinach: A great way to sneak in some veggies.
- fresh basil: If you don't have fresh basil you can use dried basil or Italian seasoning.
- black pepper
- nutmeg
How to make cheese tortellini
Step 1: Make the pasta dough
Make the sourdough pasta dough for your cheese tortellini at least 2 hours before you plan to cook them. Then, let the dough chill in the fridge for 2 hours before rolling it out.
Step 2: Roll the pasta
Use a rolling pin or a pasta machine to roll it out to a 1/16" thickness.
Next, cut out rounds from the pasta with a 3" biscuit cutter.


Pro Tip
- Rolling pasta dough to a thickness of 1/16 inch with a rolling pin can be tricky. Take your time and try to roll it as thin as you can. If the dough keeps bouncing back, let it rest for 10 minutes to relax the gluten, then try again.
- If you don't have a biscuit cutter, use a drinking glass or a wide-mouth mason jar instead. A regular-sized drinking glass is usually about 3 inches wide while a wide-mouth mason jar is a bit wider, a little over 3 inches.
Step 3: Make the cheese filling
In a medium-sized bowl, mix the ricotta cheese, egg, parmesan cheese, chopped spinach, fresh basil, black pepper, and nutmeg until the mixture is smooth and well combined.
Put 1 teaspoon of filling in the middle of each round.


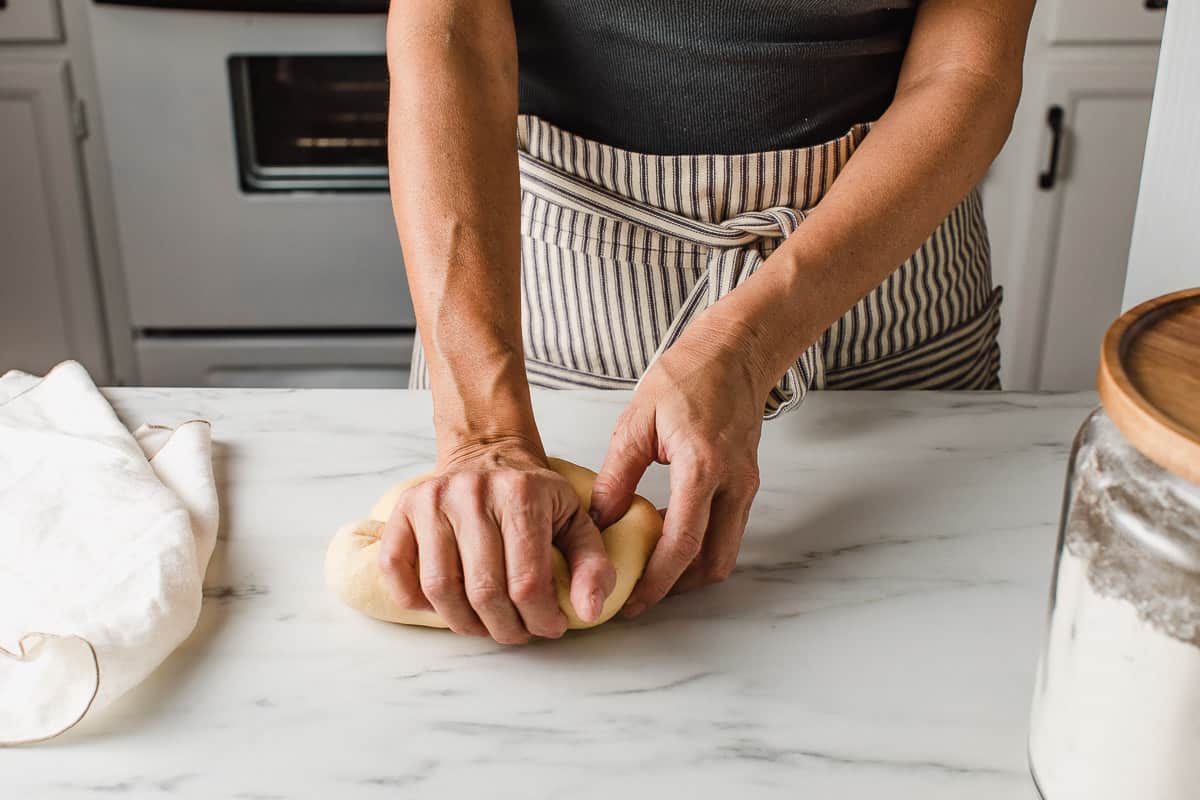
Step 4: Shape the tortellini pasta
Working with one at a time, use your finger to wet the edge of the pasta dough with water.
Fold the dough in half to form a half-moon and press down the edges to seal the filling inside of the dough.
Draw the two corners together to create the tortellini shape and press tightly to seal the dough.


Set aside on a baking sheet and prepare the boiling water.

Step 5: Cook
Bring a large pot of salted water to a boil. Drop a few tortellini in at a time using a slotted spoon, so they don't come apart.
Stir them gently to stop them from sticking together. They're done when they float to the top, which takes about 5 minutes.
Drain the water and add the cheese tortellini to the dish of your choice!

Serve
- baked tortellini: Layer cooked tortellini in a baking dish with marinara sauce and cheese, then bake until bubbly and golden for a hearty and comforting casserole.
- cold pasta salad: Mix cooked and chilled tortellini with diced vegetables, olives, cheese, and a light vinaigrette dressing for a refreshing pasta salad.
- soups: Stir the cooked tortellini into soups during the last few minutes of cooking for added heartiness and flavor. They taste really good in soups with a tomato sauce base.
- with pesto: Toss cooked tortellini with homemade pesto sauce for a vibrant and flavorful pasta dish.
- side dish: Serve alongside chicken, shrimp, or Italian sausage dishes.
Store
You can store tortellini cooked or uncooked by placing them in a container with a lid and keeping them in the refrigerator for up to 4 days.
Tortellini freezes well for a fast meal. Spread them on a baking sheet lined with parchment paper and freeze for 30 minutes. Then, transfer them to a freezer-safe container. They'll stay good for up to 3 months.
They can be cooked directly from the freezer but need about 3-4 minutes of additional cooking time.
More easy pasta recipes
Subscribe to our newsletter and we'll send you more fresh recipes, valuable troubleshooting advice, useful tips, and other information we believe will be helpful to you!

Sourdough Cheese Tortellini
INGREDIENTS
- 1 batch sourdough pasta
Cheese filling
- 4 oz. ricotta cheese
- 1 large egg
- ¼ cup parmesan cheese (grated)
- 2 tablespoons chopped spinach
- 4 large fresh basil leaves (chopped)
- ¼ teaspoon black pepper
- pinch of nutmeg
INSTRUCTIONS
- Make your pasta dough and use a rolling pin to roll it out to a 1/16" thickness. Use a 3" biscuit cutter to cut out rounds.
- Combine the filling ingredients in a mixing bowl. Place 1 teaspoon into the center of each round.
- Working with one at a time, use your finger to wet the edge of the pasta dough with water. Fold the dough in half to form a half-moon and press down the edges to seal in the filling. Draw the two corners together to create the tortellini shape and press tightly to seal the dough. Toss with flour and set aside on a baking sheet covered with a tea towel.
- Bring a large pot of salted water to a boil. Add the tortellini, a few at time by using a slotted spoon to gently lower them into the water. This will prevent the tortellini from opening. Stir the pasta to prevent them from sticking to each other. The tortellini is ready when they start to float to the surface of the water, about 5 minutes. Drain the water and add the cheese tortellini to the dish of your choice.
To freeze
- After shaping the tortellini, place the baking sheet in the freezer for one hour. Transfer the frozen pasta to a freezer-safe bag and keep frozen for up to 3 months. They can be cooked directly from the freezer but will need additional 3-4 minutes of cooking time.
NOTES
- Rolling pasta dough to a thickness of 1/16 inch with a rolling pin can be tricky. Take your time and try to roll it as thin as you can. If the dough keeps bouncing back, let it rest for 10 minutes to relax the gluten, then try again.
- If you don't have a biscuit cutter, use a drinking glass or a wide-mouth mason jar instead. A regular-sized drinking glass is usually about 3 inches wide while a wide-mouth mason jar is a bit wider, a little over 3 inches.
I veganized this recipe last night with great results! I substituted the ricotta cheese for homemade vegan ricotta (1 garlic clove, 5 oz medium firm tofu, 1 tbsp lemon juice, 1/2 tbsp oil, 1/2 tsp salt), omitted the egg and used Daiya dairy-free parmesan. I ended up having to make the filling a second time since I ran out of it halfway through, but I count this as a win to indicate the pasta was sufficiently rolled out (by hand)!
My trick is to roll out all the dough on the counter, cover the portion not being worked on with a damp tea towel, and then cut 4 to 5 circles at a time from one vertical edge. After those circles have been removed, I'll give it another roll towards the side that's been removed since the edges are by far the easiest portions to roll. I'll also spritz with water since it takes a good while to work through all the dough, and find it so much harder if it dries out.
I definitly have to make those tortellini next week-end. They look so delicious ! Thank you very much for the recipe
I’m looking forward to making this. It makes 8 servings of 8 tortellini? So about 64 pieces?
Yes.
I was a tad intimidated to make my own tortellini (my first homemade pasta!) but as always you come through with great, easy to follow instructions. This pasta was easy to make and delicious! I added it to It's a Flavorful Life's Marry Me Chicken Tortellini recipe and the homemade tortellini brought it to a completely different level! Thank you!
This was delicious! It’s definitely worth the effort involved. I used a blend of fresh milled grains ( the recipe is from Grains in Small Places for her all purpose blend that uses kamut). The first few were a learning process for us but we used a wide mouth mason jar ring to cut them out, rolled them very thin and I also had to triple the ingredients for the filling except for the egg. My filling was a little runny from the type of ricotta used. Thank you for another fantastic recipe. Even have made of yours has been delicious. I have shared starter with several people at work and always tell them to go to your site for the best recipes, tips and tricks.