Sourdough English Muffins


These easy sourdough English muffins cook up light and fluffy, with a delicious sourdough flavor!
Mix everything the night before and wake up to a beautiful dough that's ready to be cut out and cooked to "nook and cranny" perfection!
Do you know what I love about this sourdough English muffin recipe? Everything!
The taste. The texture. The ease!
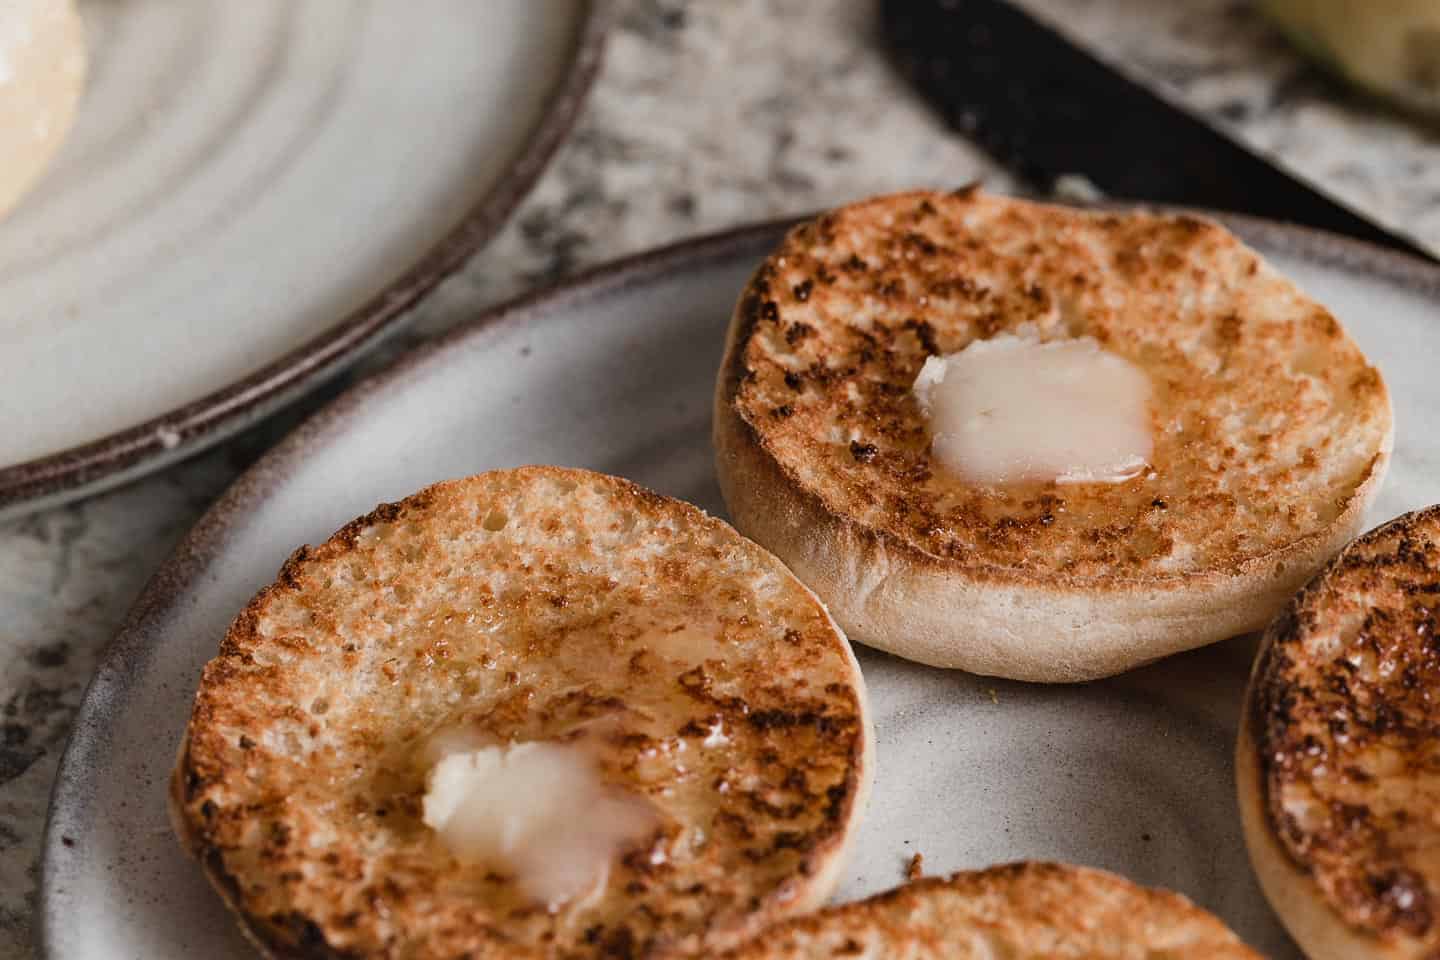
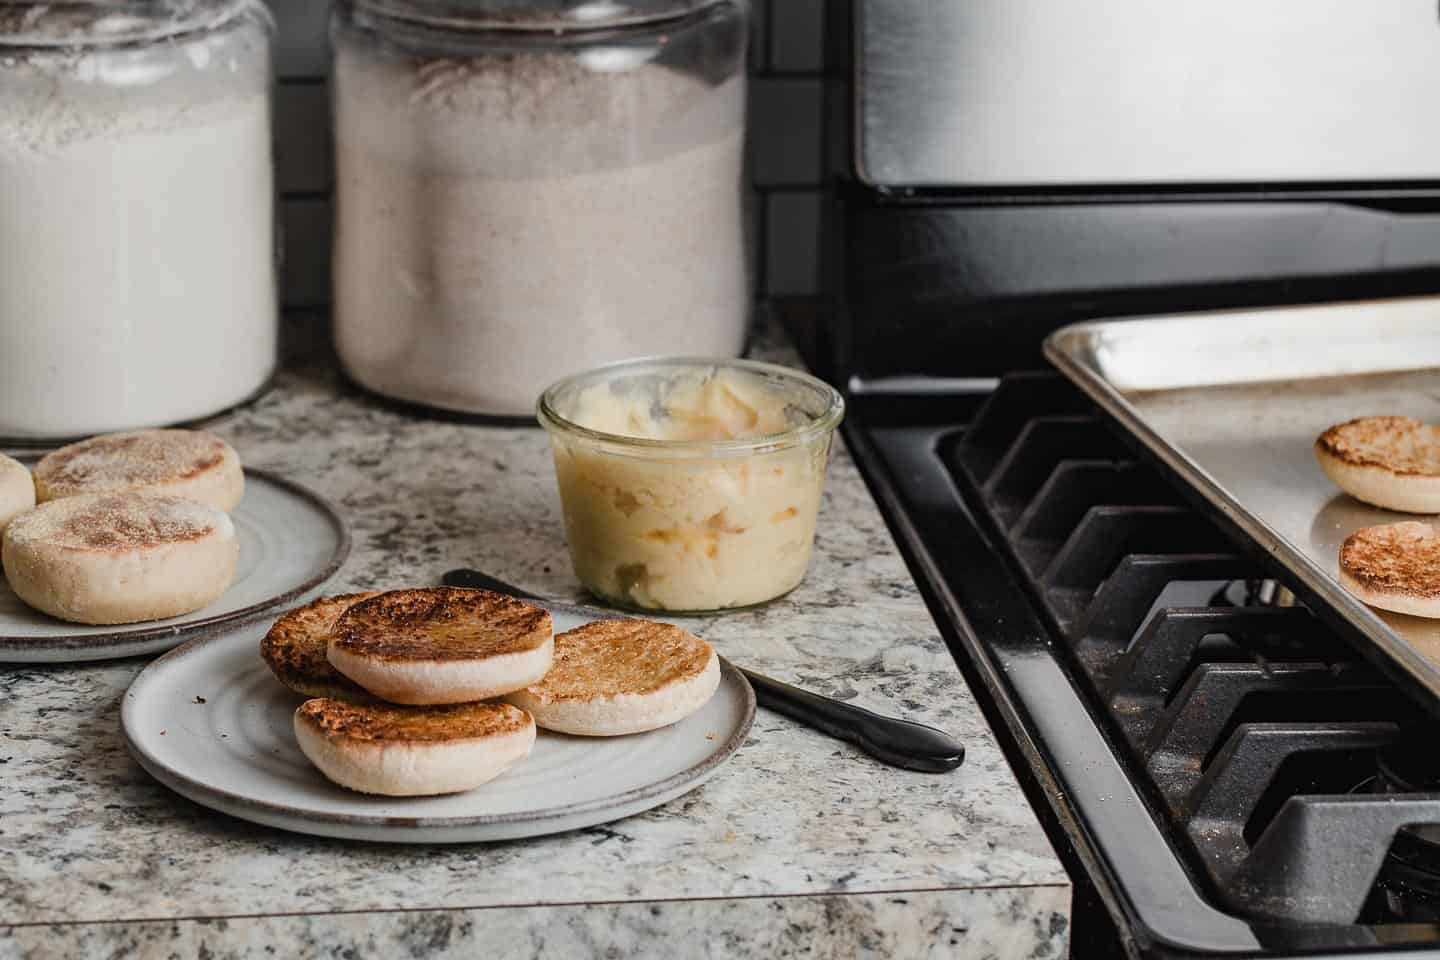
Enjoy them slathered with homemade butter and a little cinnamon sugar for a quick breakfast or an afternoon snack.
They are very filling when turned into little breakfast sandwiches with eggs, ham, and cheese.
We even serve them as a side at dinner instead of rolls.
Cook a batch to eat right away or freeze it for later!
Jump to:
Step-by-step instructions
These sourdough English muffins are simple to make, so let's dive straight into the details!
1. Feed your sourdough starter 12 hours prior to mixing dough so that it's active and bubbly.
2. In a medium-sized bowl, mix all of the ingredients together with your hands until they are fully combined. Cover the bowl and let rest for 30-60 minutes.

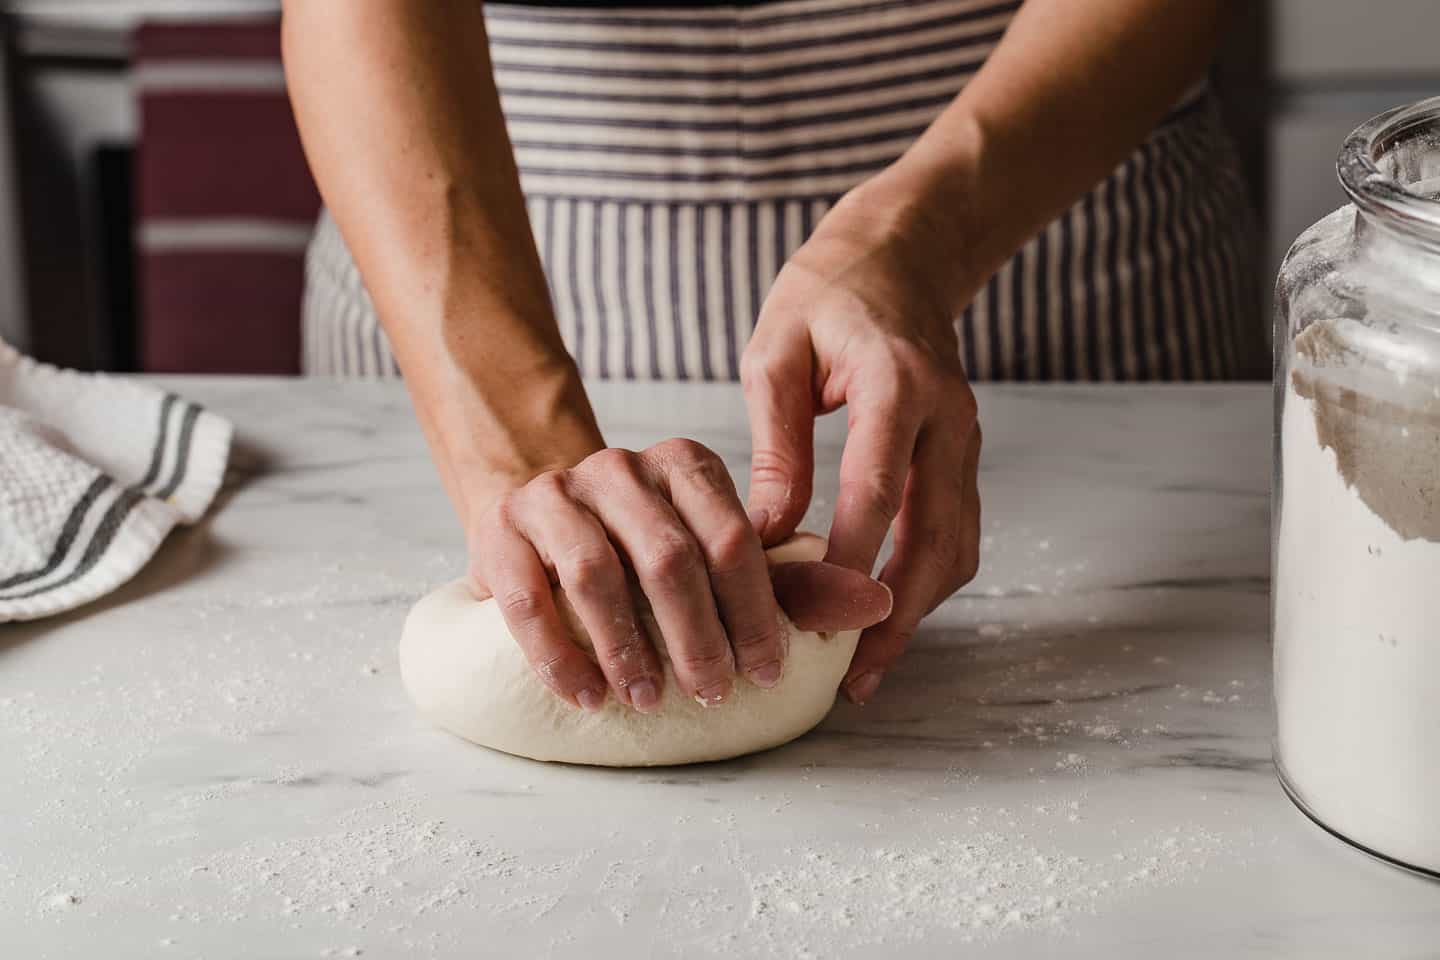
3. Turn the dough out onto a floured surface and knead for 5 minutes with your hands. (This step can also be done in a stand mixer, using a dough hook, on low speed for 5 minutes.)
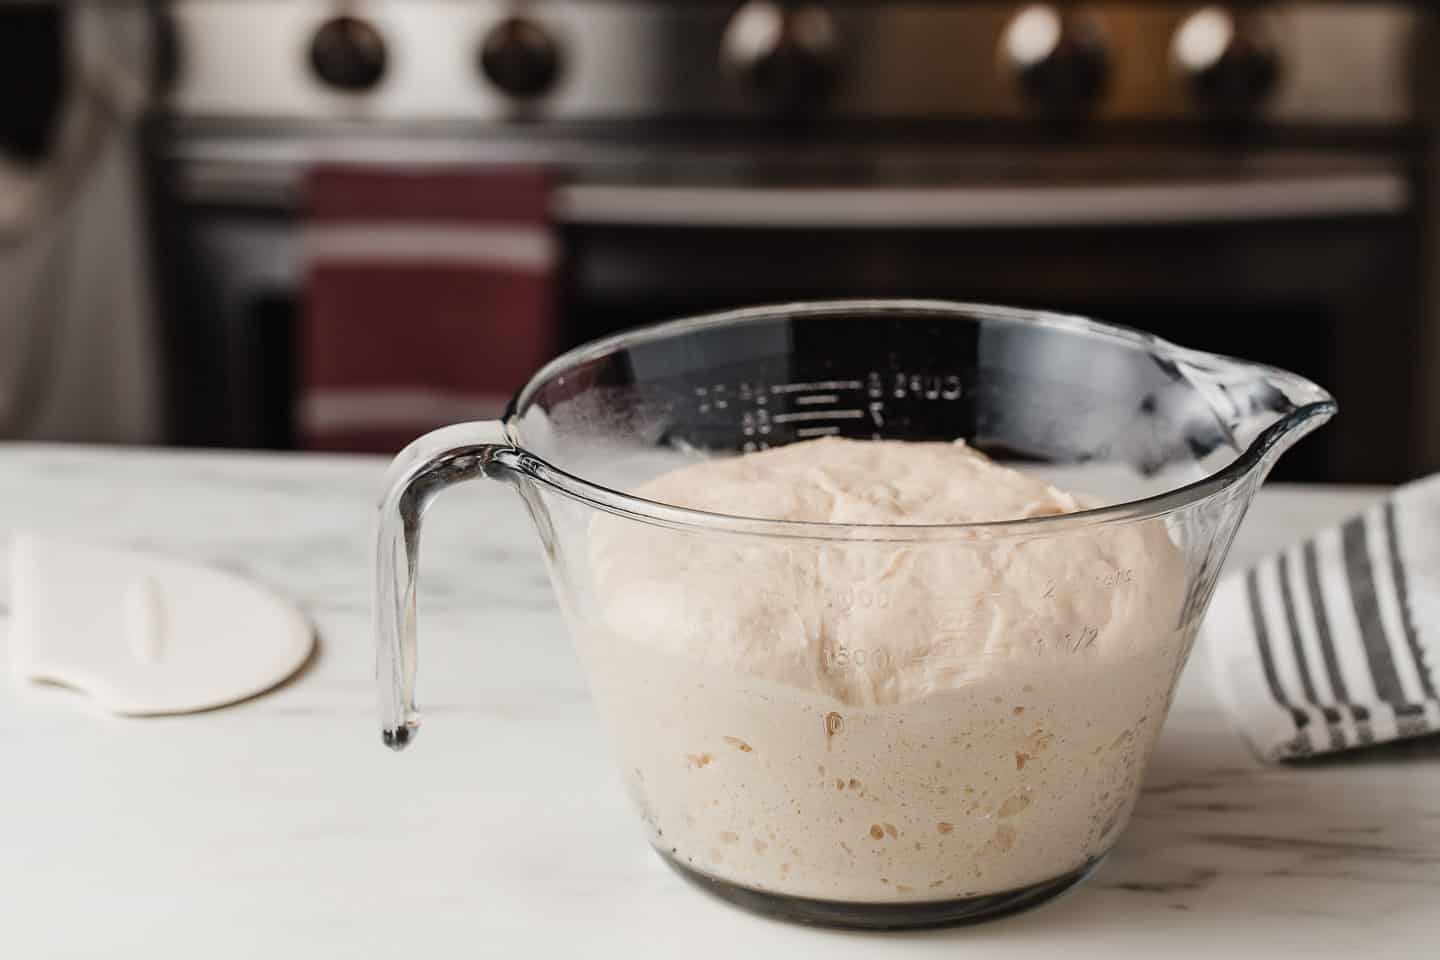
4. Place the dough back into the bowl, cover, and let rise at room temperature for 8-12 hours at 65-70 degrees. (It will double in size.)
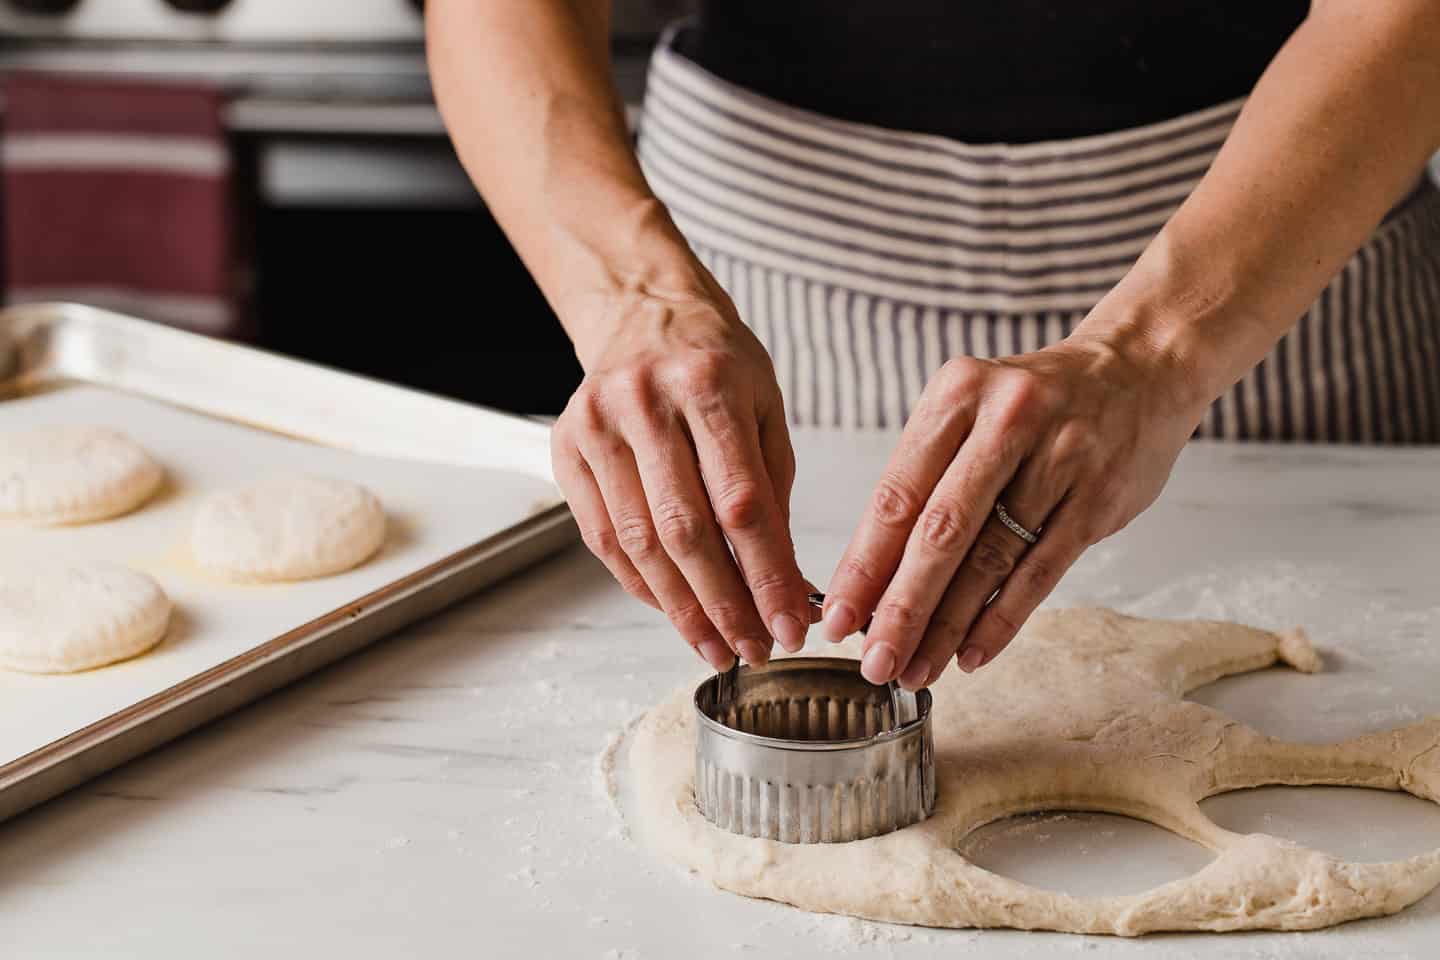
5. Turn the dough onto a floured surface, flour the top of it, and press it out to a ½" thickness, using your fingertips.
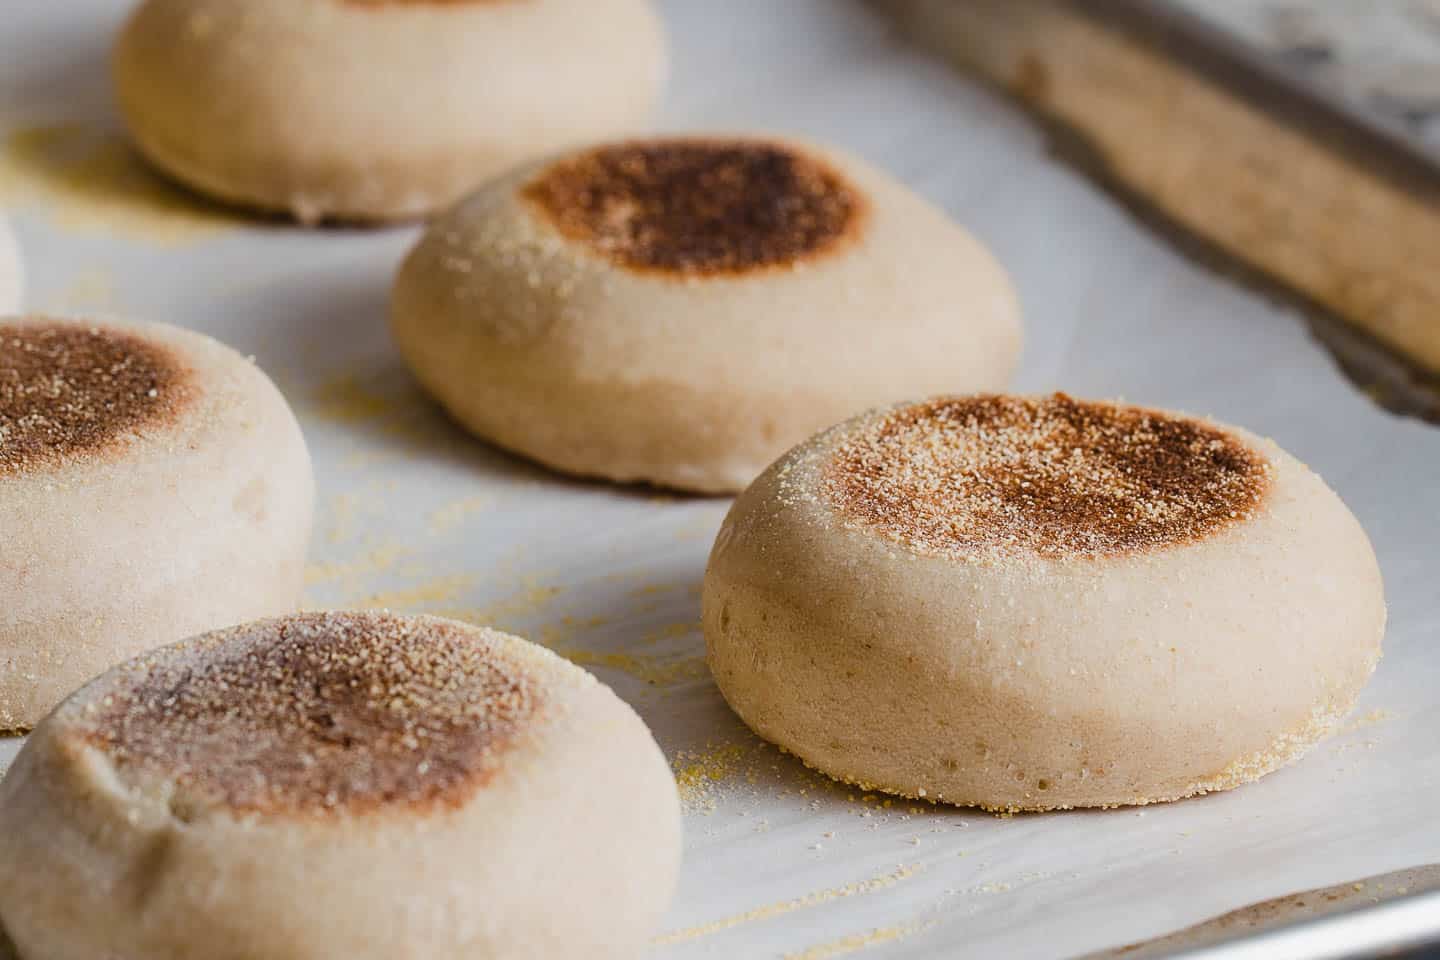
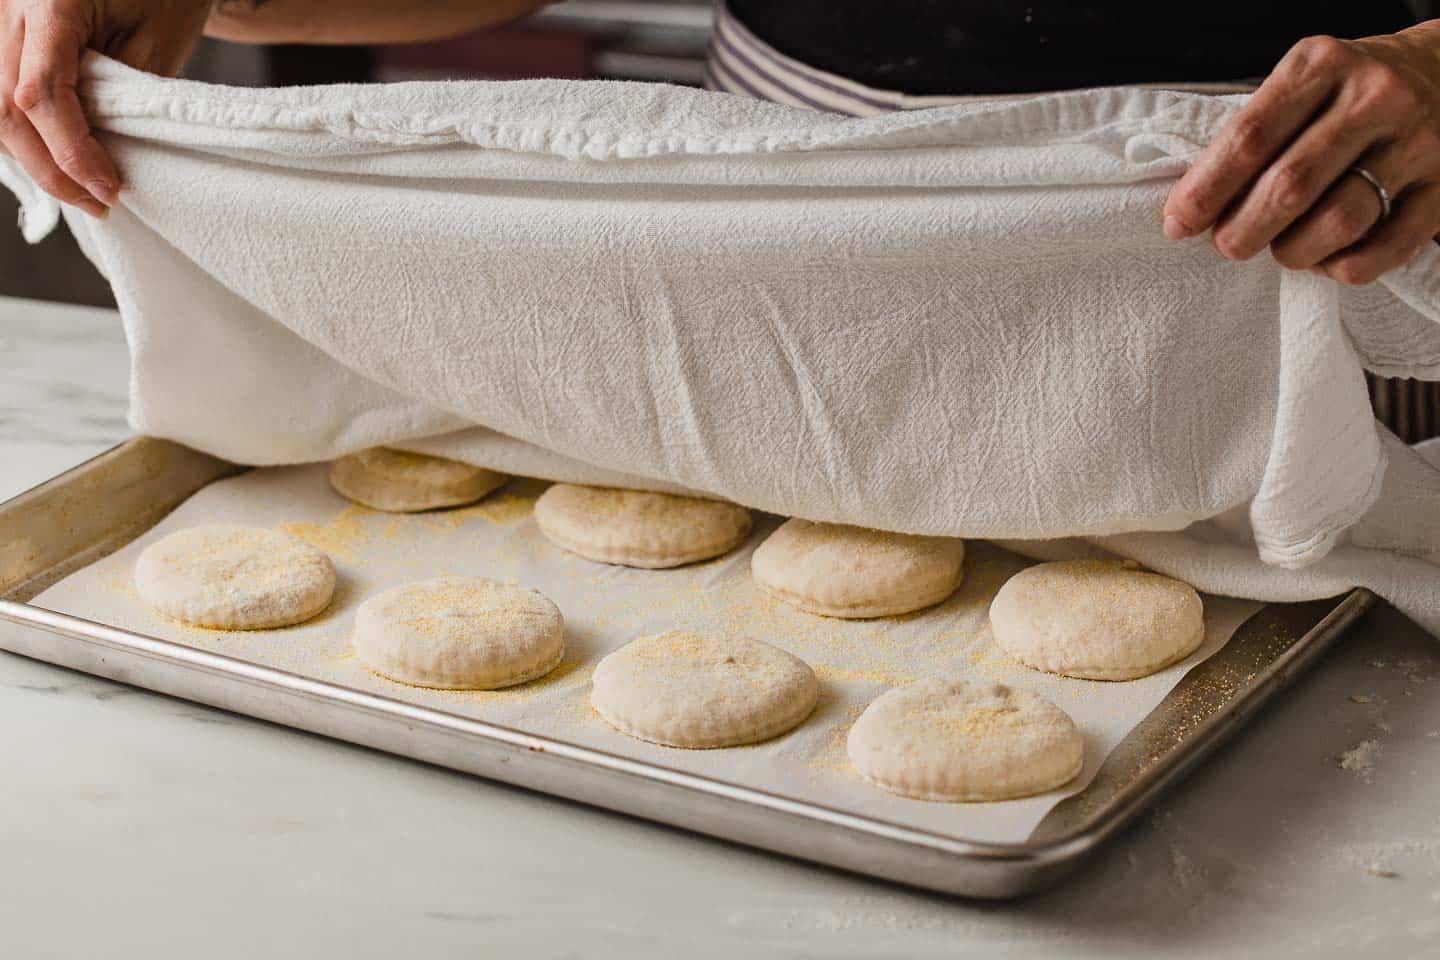
6. Cut out 3" rounds and place them on a parchment-lined baking sheet that's been sprinkled with cornmeal.
7. Sprinkle the tops with cornmeal. Cover with a tea towel and let rise at room temperature for 1 hour.
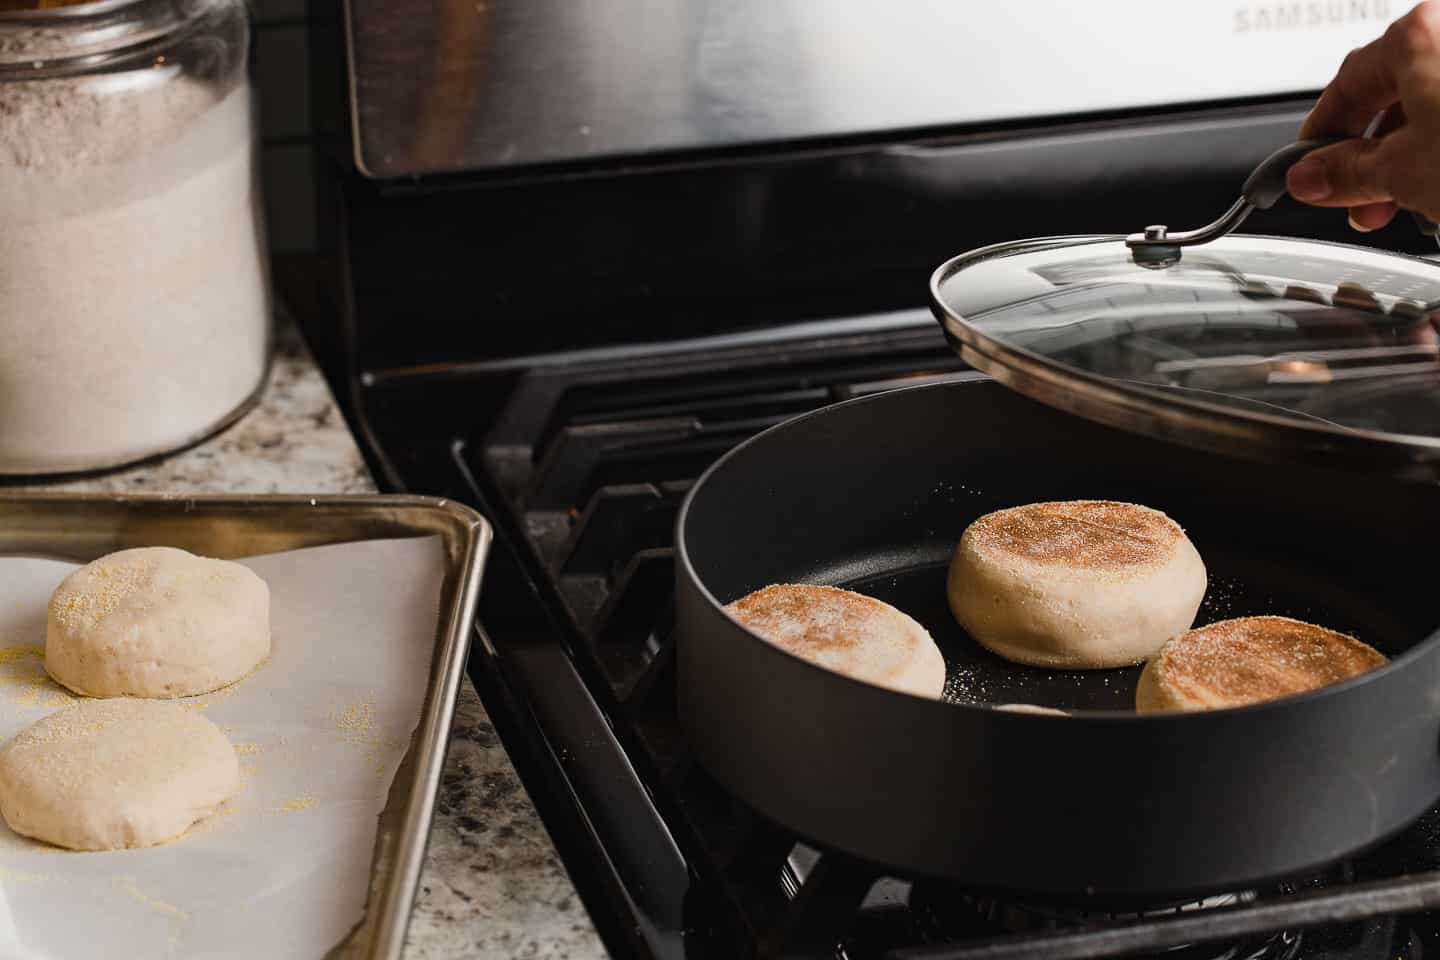
8. Preheat a non-stick skillet over LOW heat. Place 4 muffins into the skillet, making sure there is 2" of space in between each one. Cover and cook for 4 minutes per side. (No need to add oil to the pan before cooking.)
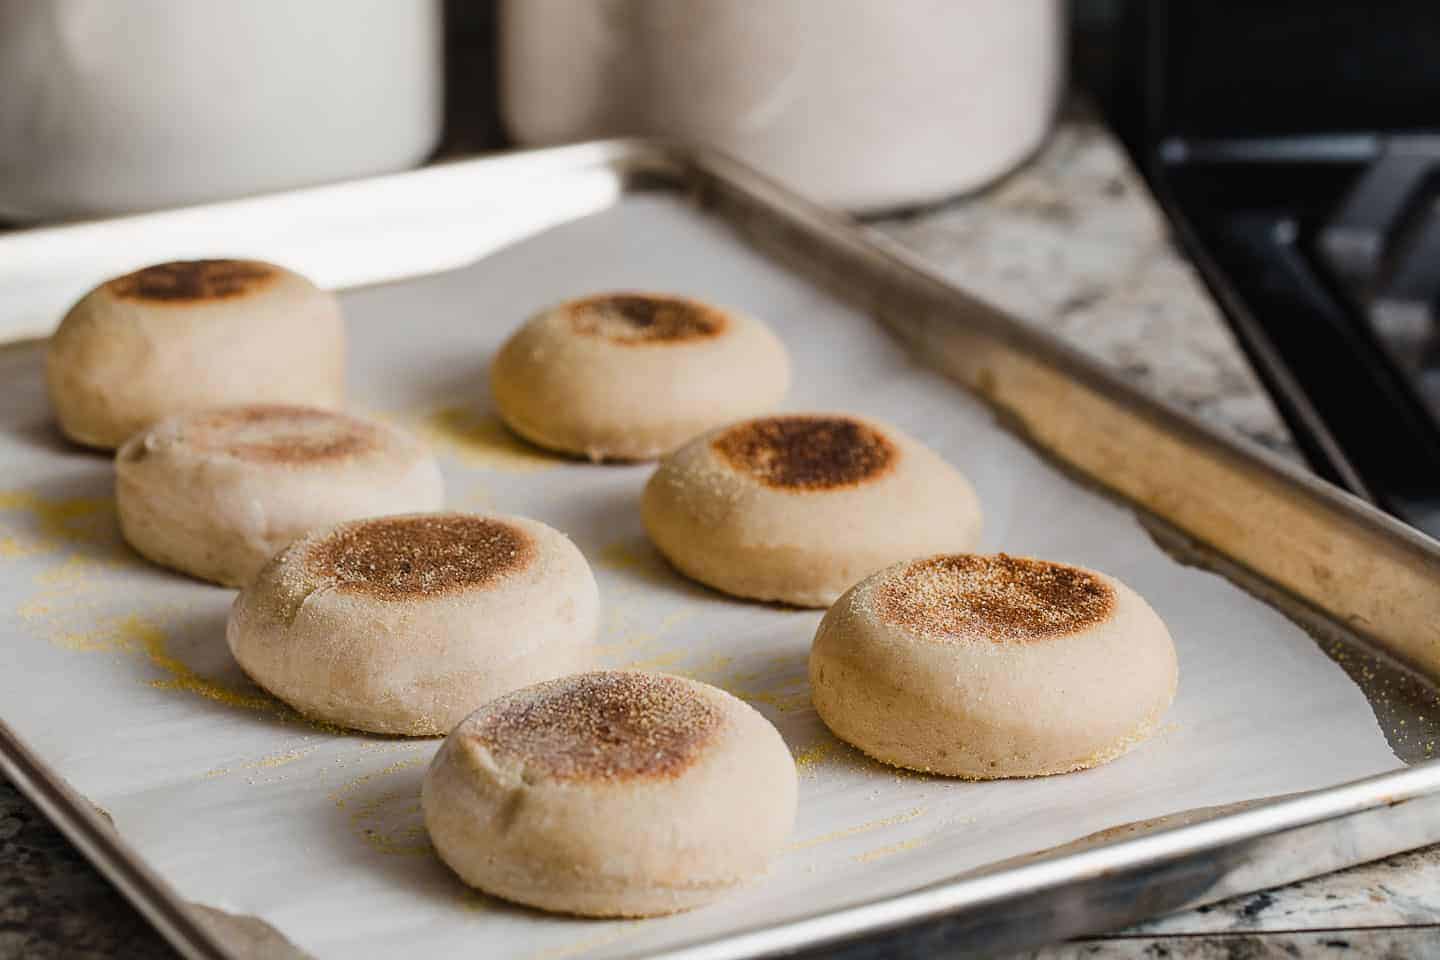
9. Place the muffins back onto the parchment paper to cool before slicing them in half.
Tips for success
The sourdough English muffins should be cooked over a very low heat, and covered, for best results. This will allow the inside to cook evenly while the outside does not burn.
A good quality all-purpose flour works best in this recipe. I always test my recipes with King Arthur brand for consistent results.
Don't have a kitchen scale to measure flour?
Use the scoop and level technique to measure your flour if you do not have a kitchen scale. To do this, use a spoon to fluff up the flour in the bag. Use a spoon to scoop the flour into a measuring cup until it is heaped on top. Take a butterknife and level off the top. This should give you the most accurate measurement for flour.
Because flour is measured by weight in these recipes, if the flour is scooped straight out of the bag with the measuring cup, there will be more flour than is called for in the recipe.
If you do not want to knead the dough by hand, use a stand mixer with a dough hook attachment. Mix at the lowest speed for 5 minutes.
If you live in a very warm or humid environment, you may need to adjust the recipe. I recommend reducing the milk by 30g and using granulated sugar instead of honey to help the dough from being too sticky to work with. Add more liquid if the dough is too stiff.
How to store and freeze
- These sourdough English muffins can be frozen after they have been cooked for up to 3 months.
- Store them in a container at room temperature for up to 5 days.
Make sure you try these sourdough English muffins toasted with a slab of honey butter melted on top!
Other recipes you may like:
- sourdough berry sweet rolls
- sourdough coffee cake
- sourdough biscuits
- sourdough bagels
- sourdough cinnamon rolls
Did you make this recipe? I'd love to know how it turned out!
Leave us a message in the comment section below. And don't forget to rate the recipe!

Sourdough English Muffins Recipe
EQUIPMENT
- Mixing Bowl
- Baking Sheet
- Parchment Paper
- Tea towel
- Non-stick skillet with cover
INGREDIENTS
Ingredients to make ½ cup (100 g) of Active Sourdough Starter
- 1 tablespoon (15 g) sourdough starter
- ⅓ cup + 1 tablespoon (50 g) all-purpose flour
- 3 ½ tablespoons (50) water
Dough Ingredients
- ½ cup (100 g) active sourdough starter
- 1 tablespoon (20 g) honey (sugar or maple syrup)
- 1 cup (240 g) milk
- 3 cups (360 g) all-purpose flour
- 1 teaspoon (5 g) fine sea salt
- ¼ cup (40 g) cornmeal (for sprinkling)
INSTRUCTIONS
Feed Your Sourdough Starter
- 12 hours before you plan to mix the dough, add the ingredients to make ½ cup (100 g) of active sourdough starter to a clean jar. Stir until combined, loosely cover the jar and let the starter rise at room temperature. (The ingredients will create a total of 115 g active starter but, because some of it will stick to the sides of the jar during the transfer, we are making a little more than needed.) The sourdough starter is ready to use when it has doubled in size and there are plenty of bubbles on the surface and sides of the jar.
Make the Dough
- Add 100g of the active starter and the rest of the ingredients (except corn meal) to a large bowl and use your hands to mix until well combined. Cover and let rest 30-60 minutes. Turn the dough out onto a floured surface and knead the dough by hand for 5 minutes. (A stand mixer with a dough hook attachment can be used on the lowest speed.)
- Place the dough back into the bowl, cover and let ferment on the counter at room temperature 8-12 hours. (Room temperature is 65-70°F)
Cut and Cook
- Turn the dough out onto a floured surface, flour the top of the dough and press it out using your fingertips until it is ½" in thickness.
- Use a 3" biscuit cutter to cut rounds and place them on a parchment lined baking sheet that's been sprinkled with cornmeal. Sprinkle the tops with cornmeal, cover with a tea towel and allow to rise for 1 hour at room temperature.
- Preheat your non-stick skillet over LOW heat. Place 4 muffins into the skillet spaced 2" apart, cover and cook the first side for 4 minutes. Turn the muffins over and cook for an additional 4 minutes. (When done, the center of a muffin should register about 200°F on an instant-read thermometer.)
NOTES
- Use the scoop and level technique to measure your flour if you do not have a kitchen scale. To do this, use a spoon to fluff up the flour in the bag. Use a spoon to scoop the flour into a measuring cup until it is heaped on top. Take a butterknife and level off the top. This should give you the most accurate measurement for flour.
- If you live in a very warm or humid environment, you may need to make adjustments in the recipe. I recommend reducing the milk by 30g and using granulated sugar instead of honey to help the dough from being too sticky to work with. Add more liquid if the dough is too stiff.
- Store at room temperature for up to 5 days in a container or freeze for up to 3 months.
I absolutely love this recipe! Super easy and delicious! The only issue I'm having is after I roll out the dough and cut biscuits, the biscuits kind of shrink back into themselves, especially on top, making them a kind of wonky shape. what am I doing wrong and how can I prevent this? I do flour my surface and have tried letting the dough relax for a minute or so after rolling it out and before cutting. Thank you!
I began my dough yesterday-put it in a bowl for long initial proofing. My home is very warm, and the dough made fast work of rising. I covered with plastic wrap & refrigerated overnight. The dough was soft & lovely to work with. I made large muffins-total of 7. I did have to raise the temp to just under med in order to get them to lightly brown on sides. Cooled on rack. Muffins I won’t use right away I wrapped individually in plastic wrap & then in freezer safe containers.
5 STAR! They are fluffy and crumb is spot on! Flavor…divine! Why would anyone buy them when your recipe produces such fabulous results and so easy?
Thanks soooo much for the time and effort you put into your recipes.
Many many times. Great recipe!!
Hi hi! After you cook them, do you then slice & toast them? Asking because I want to give these to friends; I was going to cook them & then tell them to keep refrigerated & then toast them when they want to eat them-will this work? TY!
HI Kimberly, yes that works!
They came out beautifully!! Love how easy this recipe is .... they are perfect!!!
Making them this morning after bulk rise and then in the fridge over night. I did use bread flour so we will see how they turn out. Second rise happening now.
After the dough rises, I have a very hard time getting the dough out of the bowl and have to spend a lot of time scraping it so I don’t lose a lot of dough. Is it the dough or the bowl (glazed ceramic)?
Hi Lori, I would try oiling your bowl next time!
Maybe try using a silicon bowl scraper?
That helps me get the dough out of any bow I work with.
Best Regards!