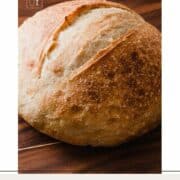
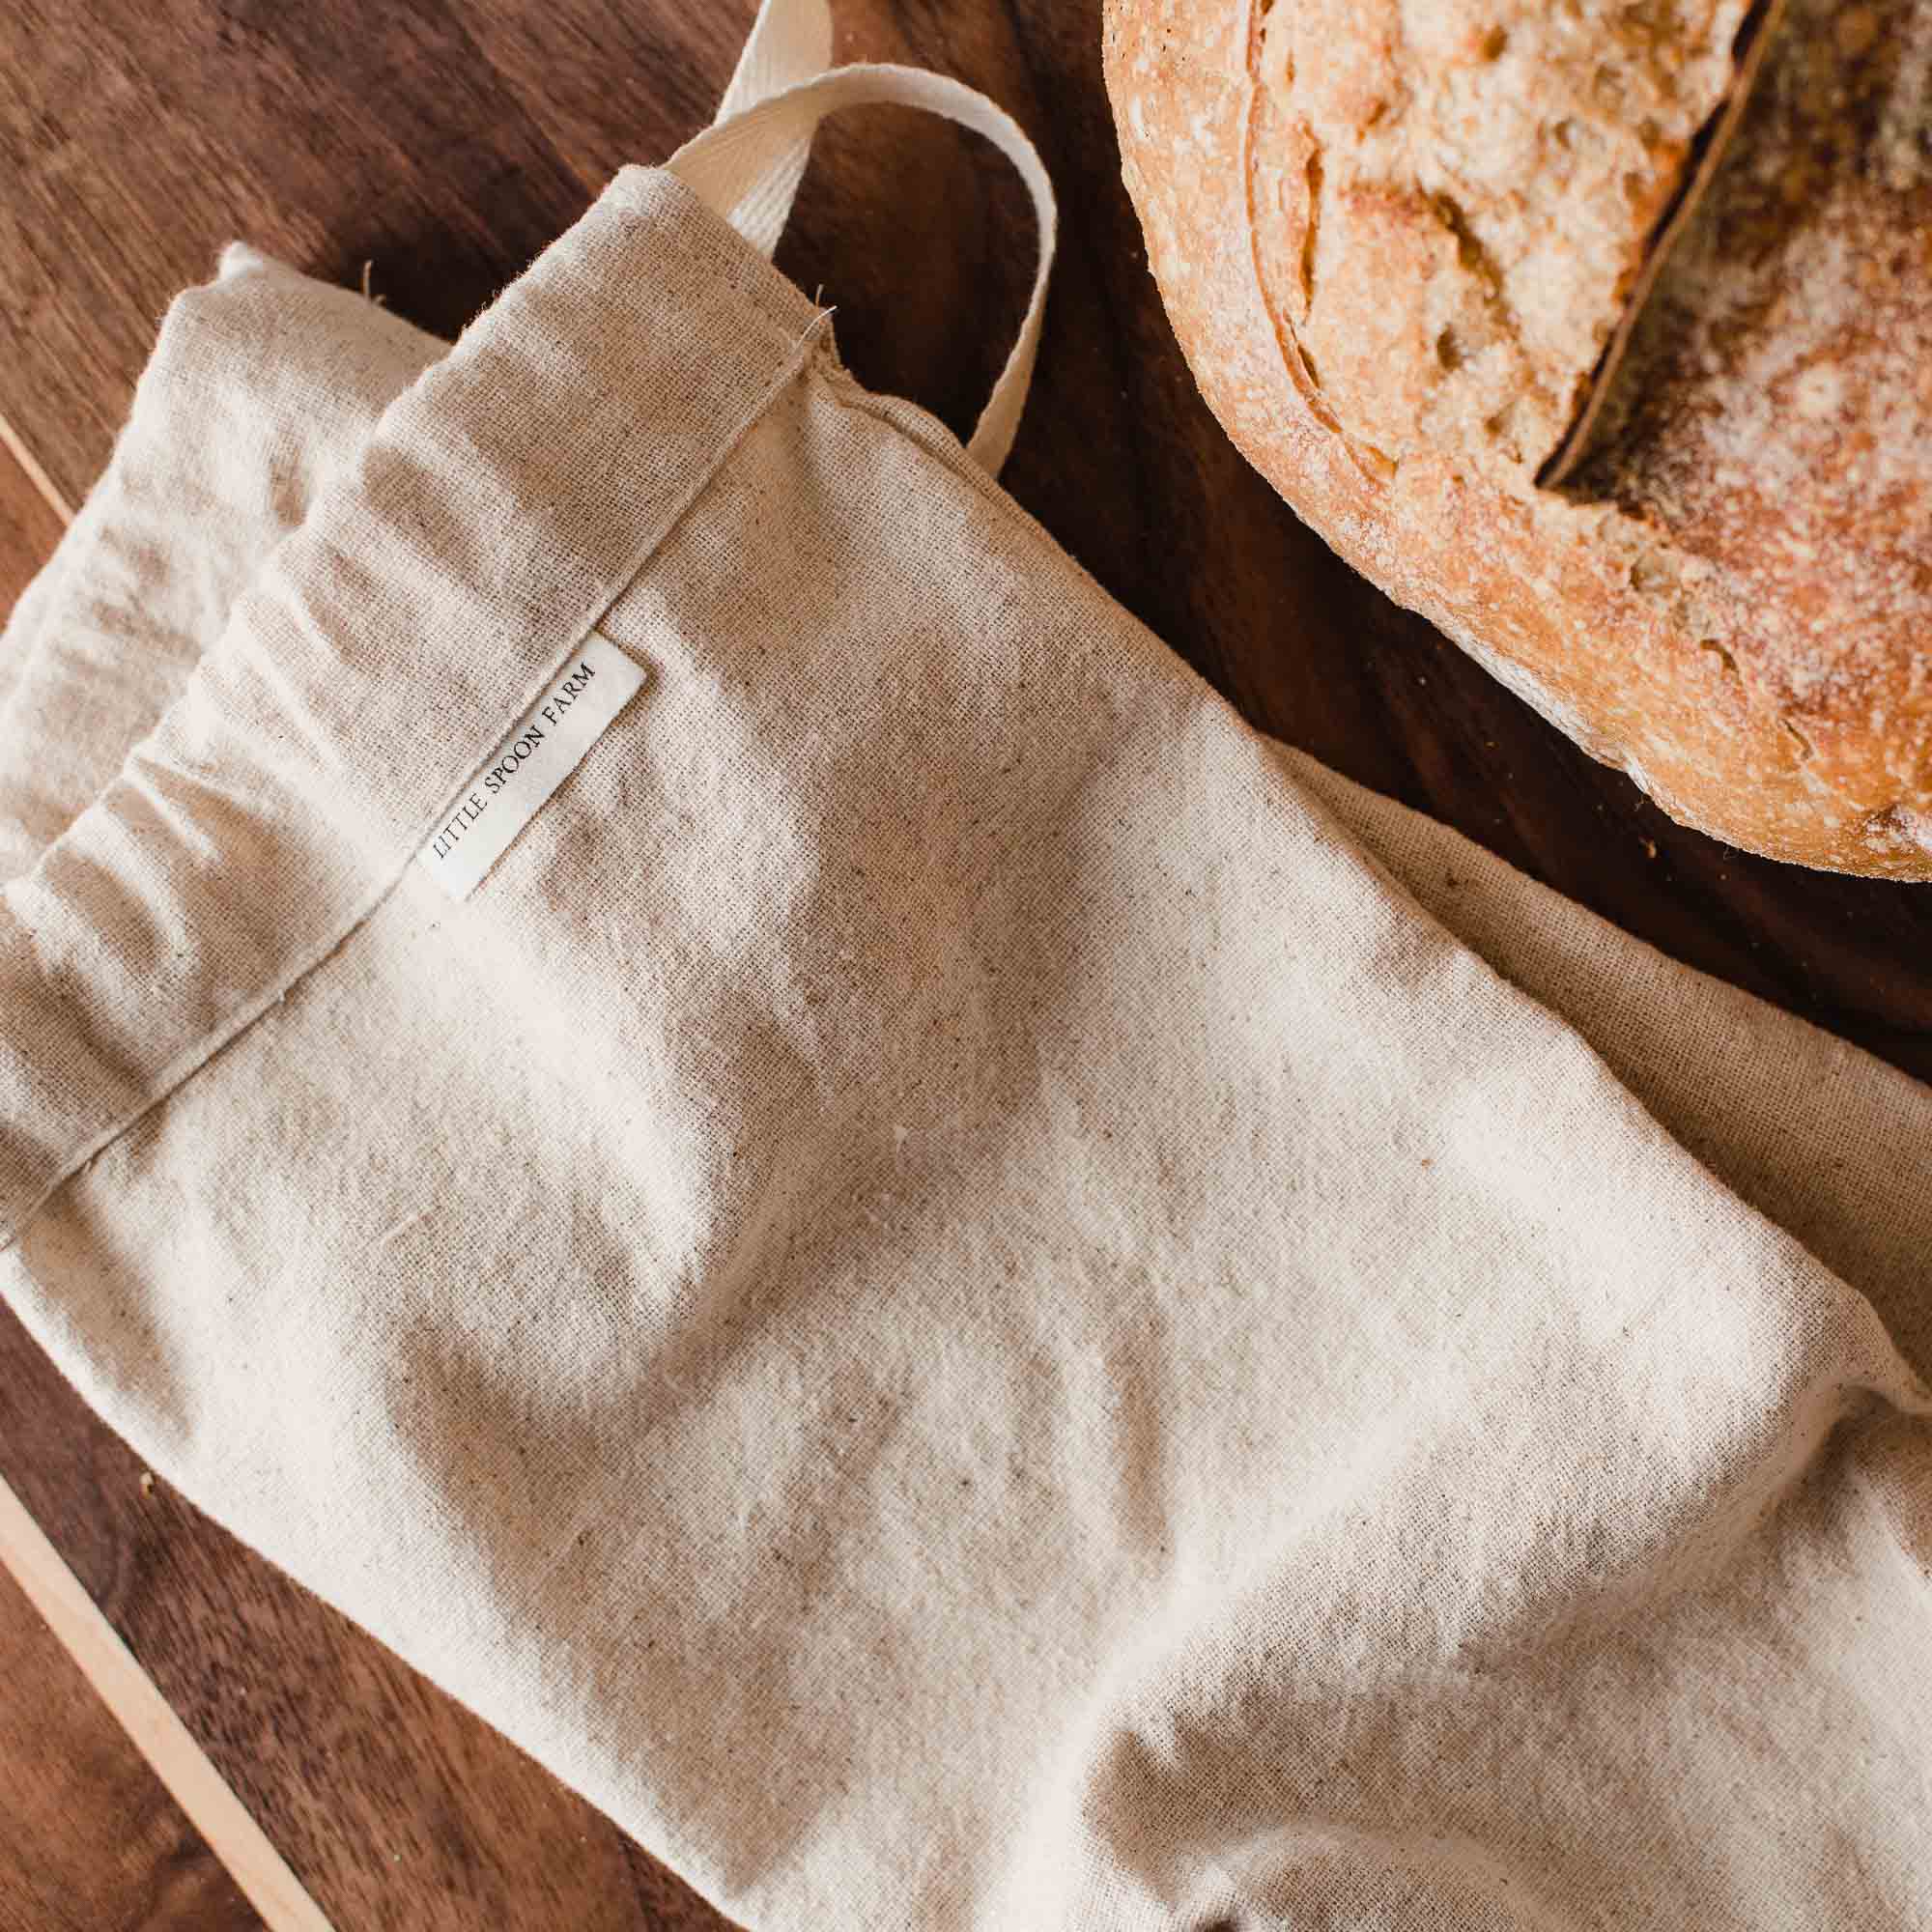
Beginner's Sourdough Bread Recipe


Want to learn how to make sourdough bread at home the easy way? Our beginners sourdough bread tutorial will guide you through the process, step-by-step.
Whether you want to bake in the morning or in the evening, you’ll only need about 10 minutes of hands-on time to get this sourdough recipe ready for the oven!
Are you ready to learn how to make simple sourdough bread from scratch, with no kneading, no fuss or frills? You can with our easy step-by-step guide and instructional video!
With this tutorial you’ll learn how to make sourdough bread without a stand mixer or a bread machine. Just let the sourdough starter and time do all the work, so there’s no kneading involved!
Once you gain confidence with this recipe, you'll be well on your way to enjoying homemade sourdough recipes such as sourdough pizza crust, sourdough bagels and pretzels and so much more!
Let’s dive into the basics of sourdough baking and how to troubleshoot any issues that you may come across in the process. Here's everything you need to know!
Jump to:
- Sourdough Bread Recipe
- Step-by-Step Instructions
- Sample Baking Schedule (AM and PM)
- Tips for Success
- Common Questions About Sourdough
- Equipment for Baking Sourdough Bread
My sourdough journey
In 2017 I started to become really interested in making bread the old-fashioned way. The way that people have been making bread for thousands of years, without commercial yeast.
I learned that by using a sourdough starter along with just a few ingredients; water, flour and salt, I could bake healthy bread without having to use active or instant yeast.
That’s when my sourdough starter Hound Dog was born and I haven’t used commercial yeast to bake bread with since!
A sourdough starter needs to be taken care of and fed, kind of like a pet, so go ahead and give yours a name. Make sure you leave the name of your starter in the comments below! 🙂
Learning how to make sourdough bread is a journey. Expect to bake a few loaves to get a feel for the dough as well as the other factors that will affect the final result.
The good thing is that once you start, you'll just want to keep going! It's a very rewarding skill to have and I just know with our tips and tricks, you'll be baking up all sorts of sourdough goodies!
What is sourdough bread?
Sourdough bread is a slow-fermented bread that is naturally leavened with a sourdough starter.
Instead of using commercial yeast, a live fermented culture, otherwise known as a sourdough starter, is used to make the bread rise.
The sourdough starter works within the dough to break down the gluten and creates a bread that is more easily digested by the body. Not only do you get a healthier bread, it tastes better than anything you could buy at the store or a bakery!
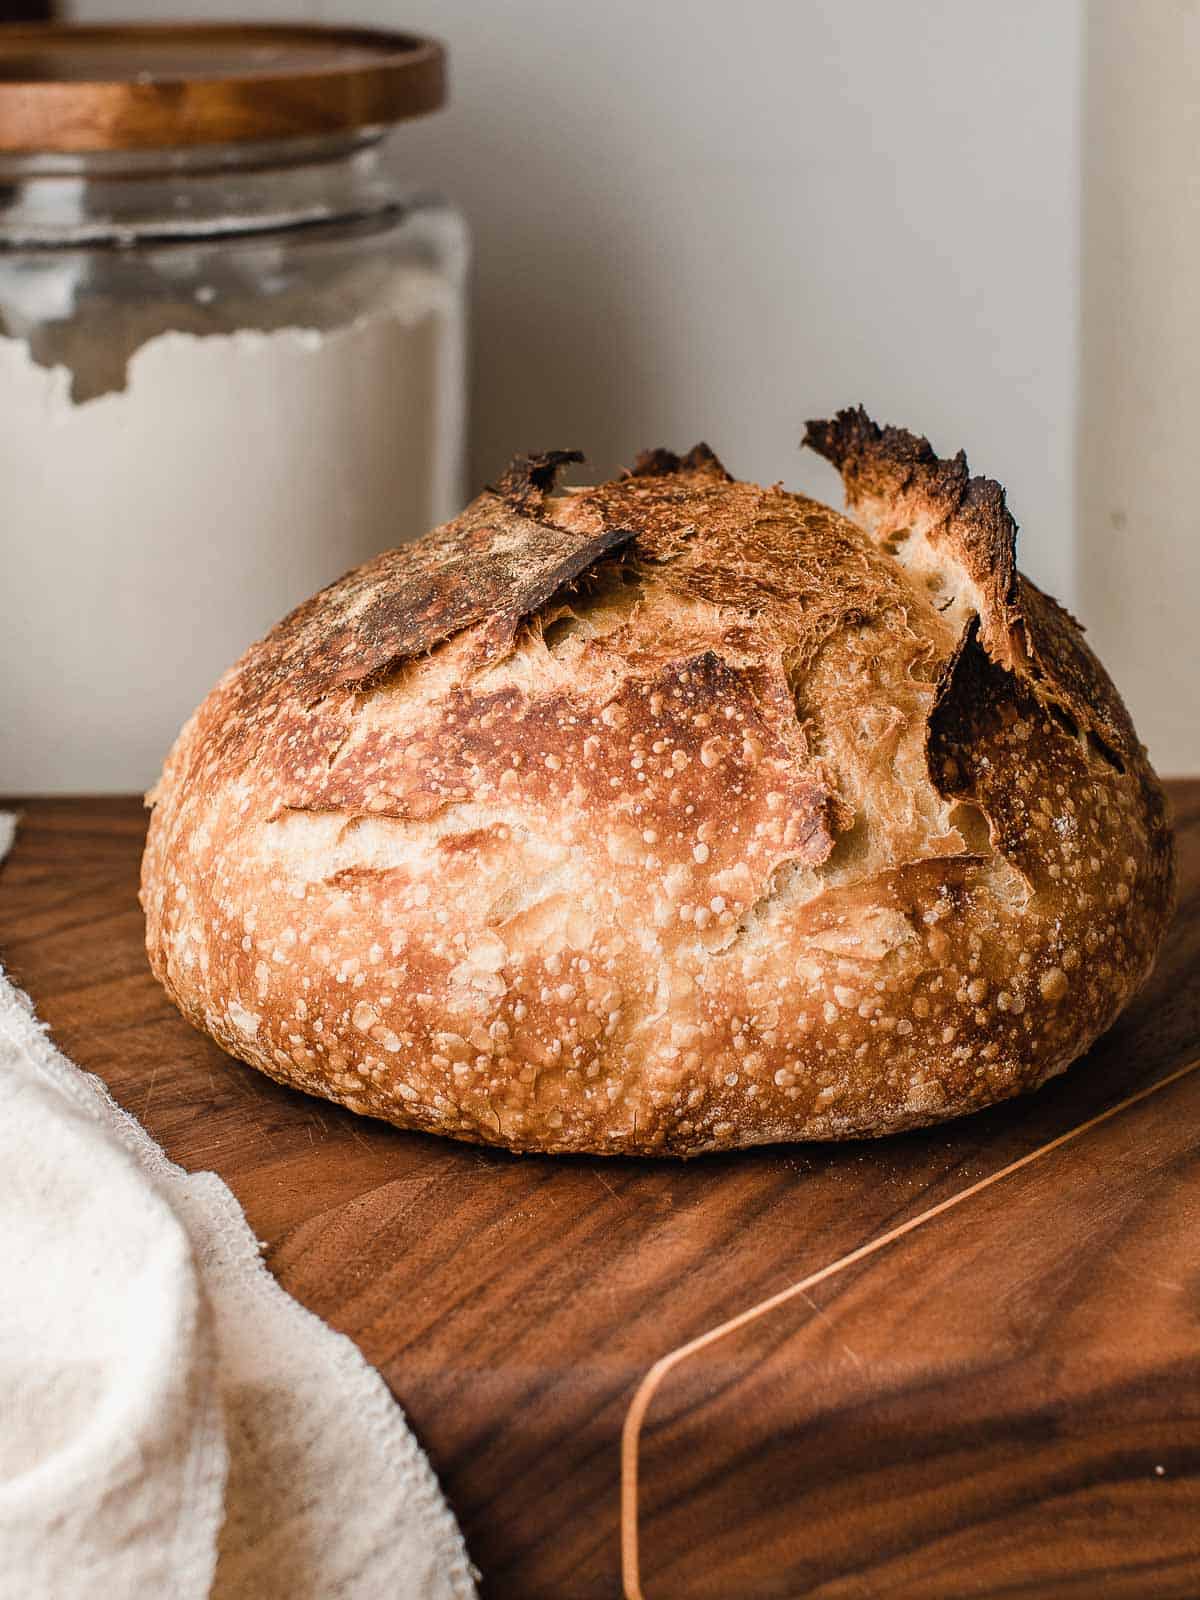
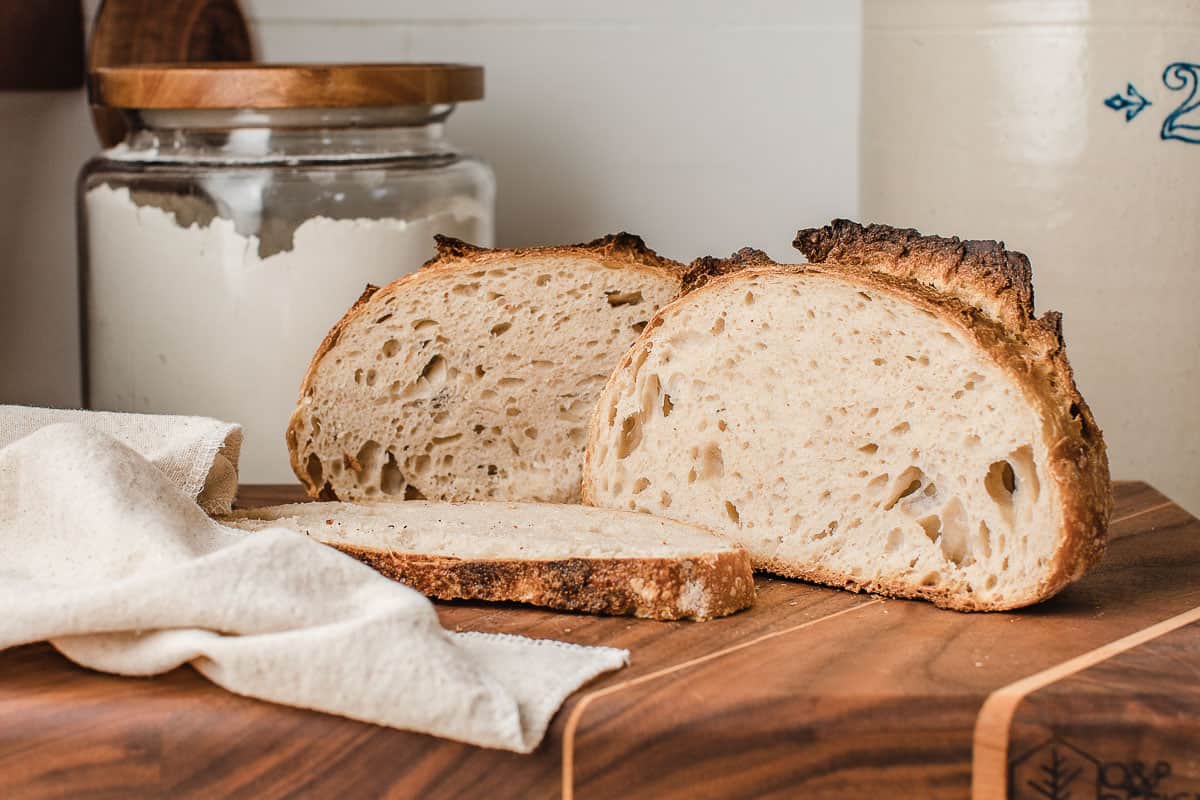
Sourdough bread is famous for its slightly sour flavor and a thick, chewy crust.
The sour flavor in sourdough bread comes from two types of gut-friendly bacteria that live inside of the sourdough starter - lactobacillus and acetobacillus. These bacteria help to ferment the sugar in the dough.
Sourdough starter
Before you make your first loaf of sourdough bread, you’ll need a sourdough starter.
A sourdough starter is made by mixing flour and water together in a jar. Wild yeast and bacteria from the surrounding environment feed off of the flour, causing the number of yeast and bacteria to multiply within the mixture.
With regular feedings, the starter becomes stronger and stronger and can eventually be used to bake sourdough bread.
The process of building a new sourdough starter from scratch takes anywhere from 7-14 days depending on the temperature of your kitchen.
How to feed your sourdough starter for this recipe
I like to use a small ratio of sourdough starter with water and flour when feeding so that it will rise slowly over several hours.
Feed the starter right before bed and mix the dough first thing in the morning for freshly baked bread that evening. Or, feed the starter in the morning, mix the dough before bed and then bake it in the morning. It's so easy to fit this recipe into your schedule!
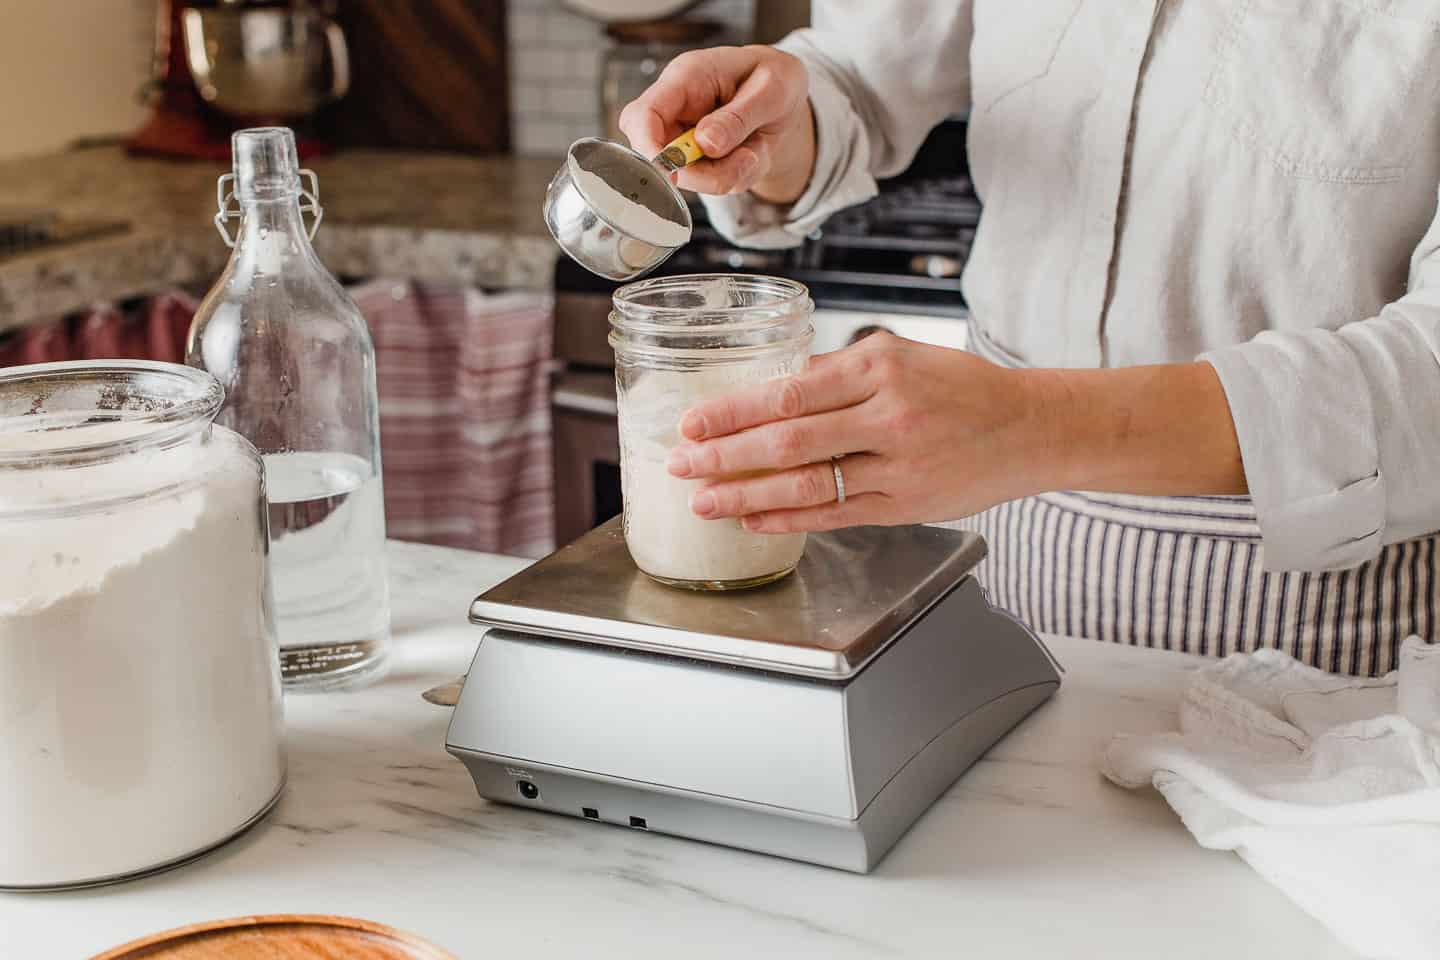
Whichever time you choose, 12 hours before you make the dough, mix 10 grams of unfed starter, 25 grams of flour and 25 grams of water into a clean jar, cover it loosely and let it rise at room temperature.
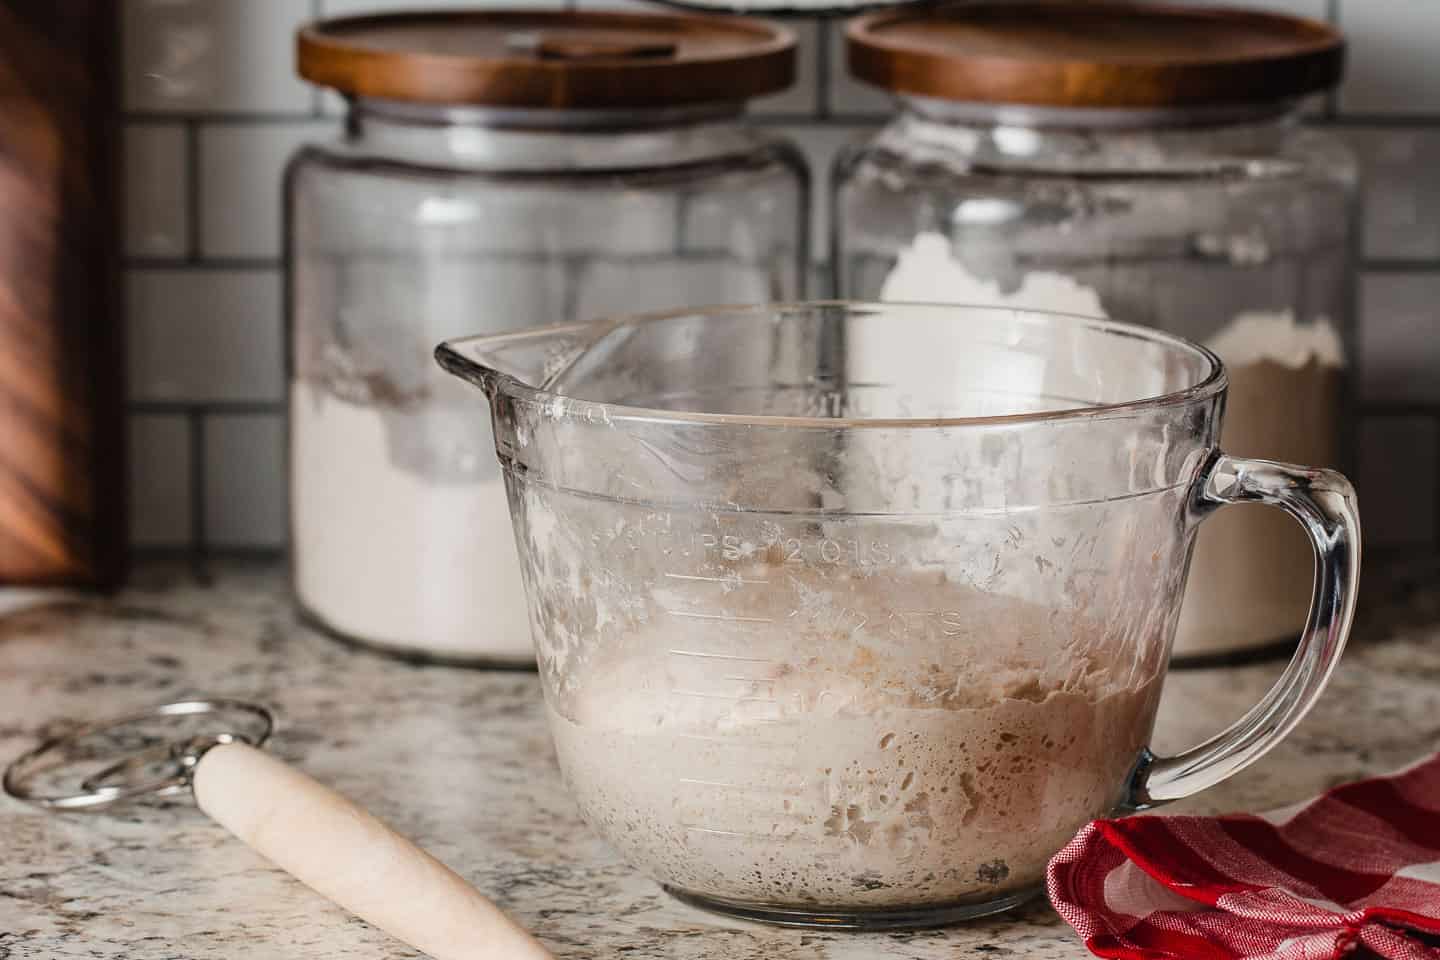
When is my starter ready to use?
You'll know the starter is ready to use when it's doubled in size and there are bubbles on the surface and sides of the jar.
In my 68° F (20°C) kitchen, this takes about 12 hours. In cooler kitchens it will take longer to ferment and in warmer kitchens it will take less time.
If you are unsure if the starter is ready, you can perform a float test. Drop a small amount of the starter into a glass of water. If it floats, it's ready to bake with. If it sinks to the bottom, give it a few more feedings and try again!
If you are working with a new sourdough starter, it can take multiple feedings to build the strength it needs in order to bake with.
Ingredients needed
The beauty of sourdough bread is that you only need a few basic ingredients;
- bread flour
- water
- salt
- sourdough starter
We recommend using organic flour if possible because it is free from bleach, bromate and glyshophate, but any type of bread flour available and within your budget is ok to use!
In the U.S., bread flour is a type of white flour with a high protein percentage. I like to use a bread flour with a protein percentage of 11.7% to 12.7%.
NOTE: Wheat flours are labeled differently in every country. Make sure to look at the label of the flour you are purchasing to ensure it has a high protein percentage.
How to make easy sourdough bread: step-by-step instructions
Before we dive into the details, let's take a look at the basic steps you will take to prepare a basic loaf of sourdough bread.
- Feed your sourdough starter and let rise until doubled.
- Mix the dough and let rest for 1 hour at room temperature.
- Perform 2 sets of stretch and folds 30 minutes apart.
- Cover the bowl and let the dough ferment for 7-10 hours on your kitchen counter.
- Shape the dough and let rise for 1-2 hours.
- Score and bake.
Step 1: feed the sourdough starter
About 12 hours before you plan to mix the dough, to a clean jar add;
- 10 grams unfed starter
- 25 grams water
- 25 grams flour
Cover the jar loosely and allow it to rest and room temperature.
This small ratio of unfed sourdough starter mixed with flour and water should take anywhere from 8-12 hours to double in size depending on the temperature of your kitchen.
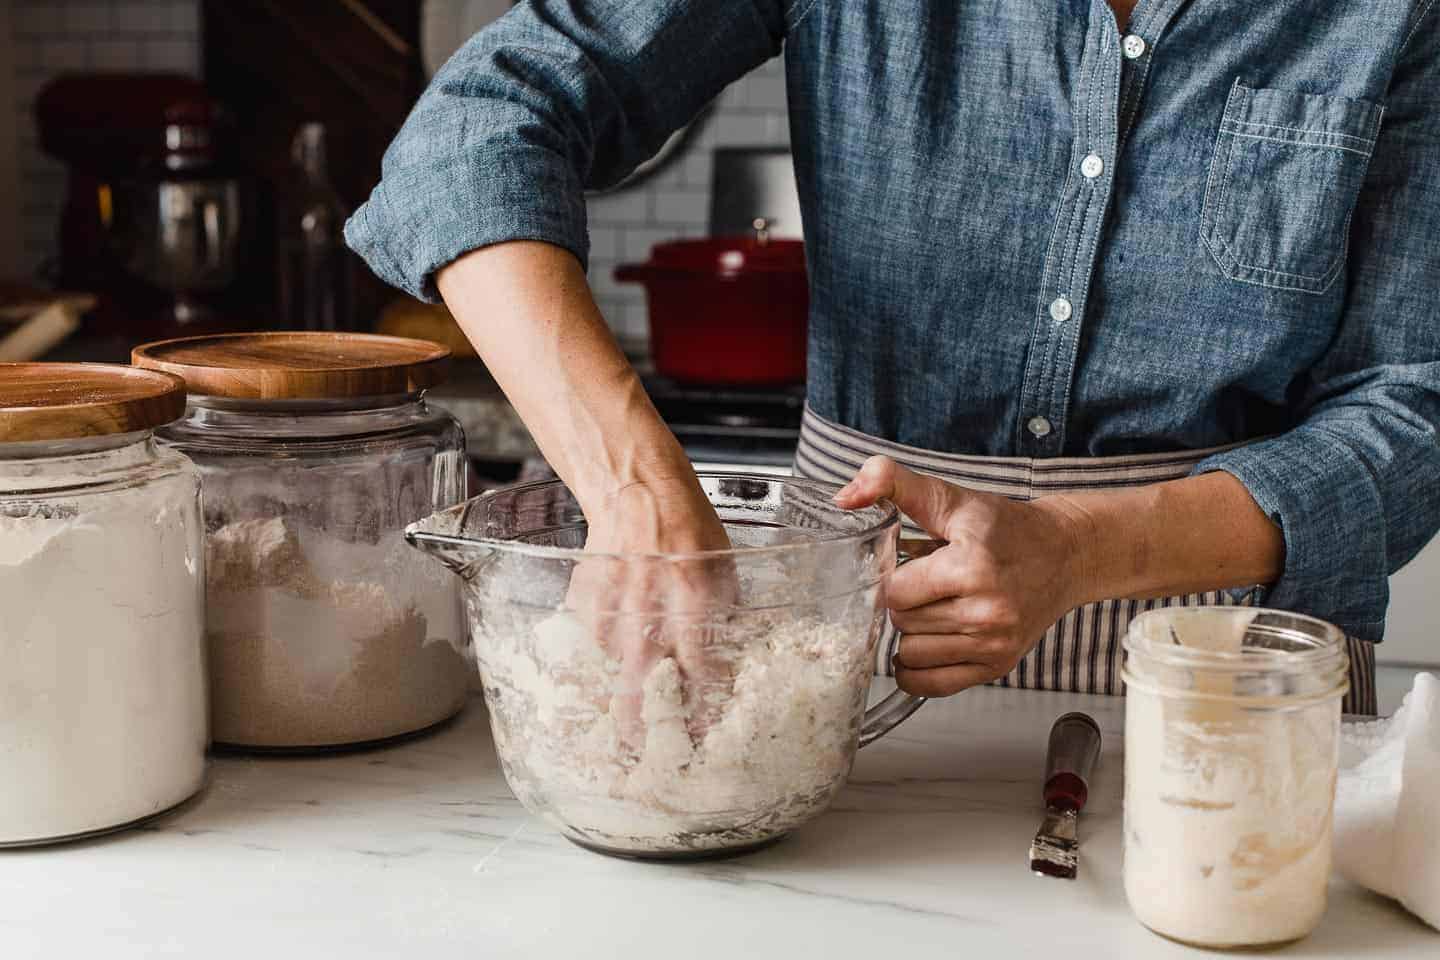
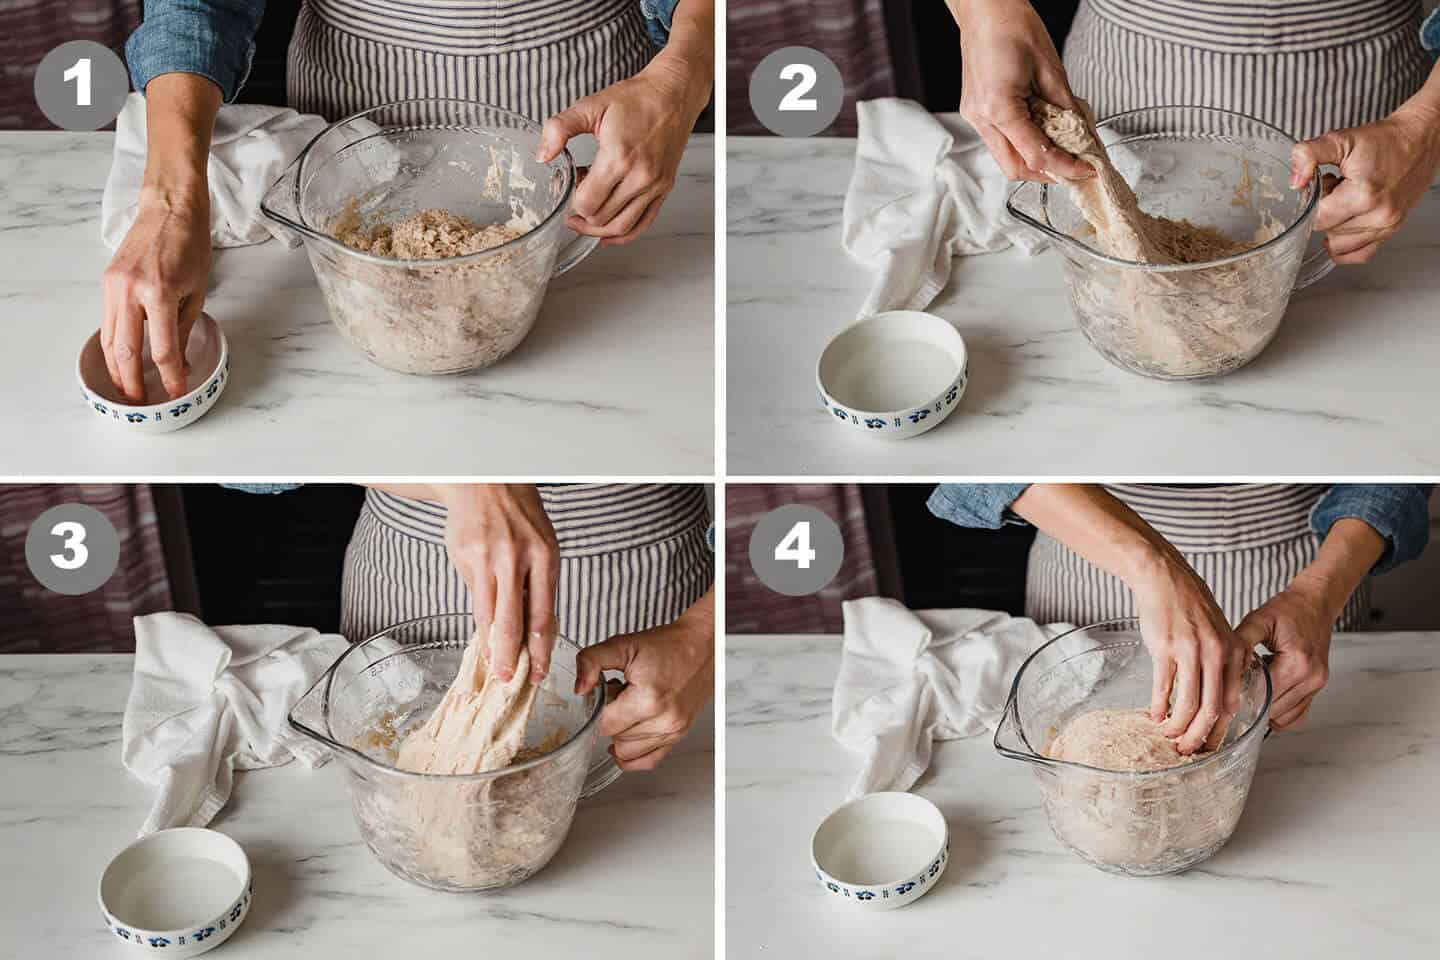
Step 2: mix the dough
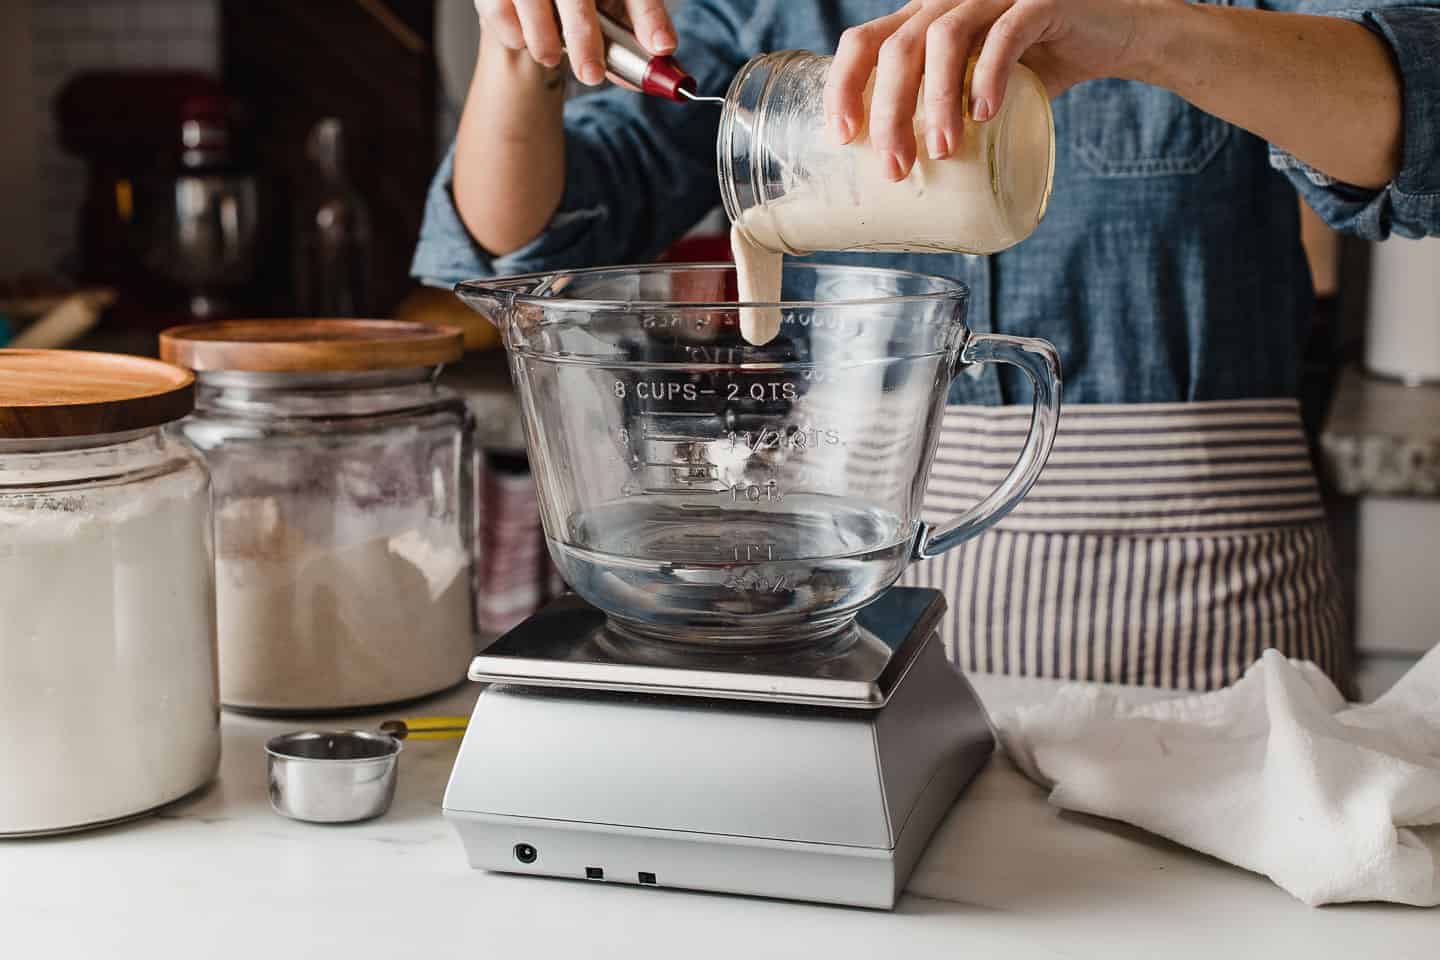
Once the starter has doubled in size, transfer it to a large bowl along with 350 grams of water.
Stir the two together with a stiff spatula to distribute the starter evenly in the water.
Next add 500 grams of bread flour and 10 grams of sea salt to the bowl.
Use the spatula or your hands to work the ingredients together until it forms a shaggy mass.
Make sure to work any dry bits stuck to the sides of the bowl into the dough.
This dough is a lower hydration dough which makes it easy for beginners to work with.
Cover the bowl with a silicone bowl cover, a beeswax cloth or a damp kitchen towel and let the dough rest for 1 hour on the counter.
This resting period is also referred to as "autolyse". During this hour, the dough will absorb the water, making it easier to work with.
Step 3: stretch and fold the dough
Once the hour is up, perform two sets of stretch and folds to the dough spaced 30 minutes apart.
This process will add strength to the dough and help with the gluten development.
(1) Wet your hand with water to prevent sticking. (2) Pick up the dough on one side and stretch it up and over itself.
(3) Turn the bowl a quarter turn and repeat this step until you have turned the bowl a full circle. (4) The dough should start to form into a tight ball.
Let the dough rest 30 minutes and repeat the stretch and fold process one more time.
Step 4: bulk fermentation (first rise)
After the second set of stretch and folds, cover the bowl and let the dough ferment for 7-10 hours on your kitchen counter.
How long will it take to rise?
The dough is ready for the next step when it has risen by about 50-75% in size.
In my 68°F (20°C) kitchen, this takes about 7-8 hours.
If your kitchen is warmer, start checking it after 3-4 hours to make sure it doesn't over-proof.
NOTE: If you feel like your dough has over-proofed and it becomes sticky and hard to shape into a ball, don't fret. Stick the dough in the refrigerator to firm up so that's it's easy to handle. (It can stay in the fridge for up to 2 days.) Divide the dough into 4 portions and make flatbread pizza crust. No need to waste anything!
Step 5: shape and second rise
Gently turn the dough out onto a lightly floured surface.
How to shape a round sourdough boule
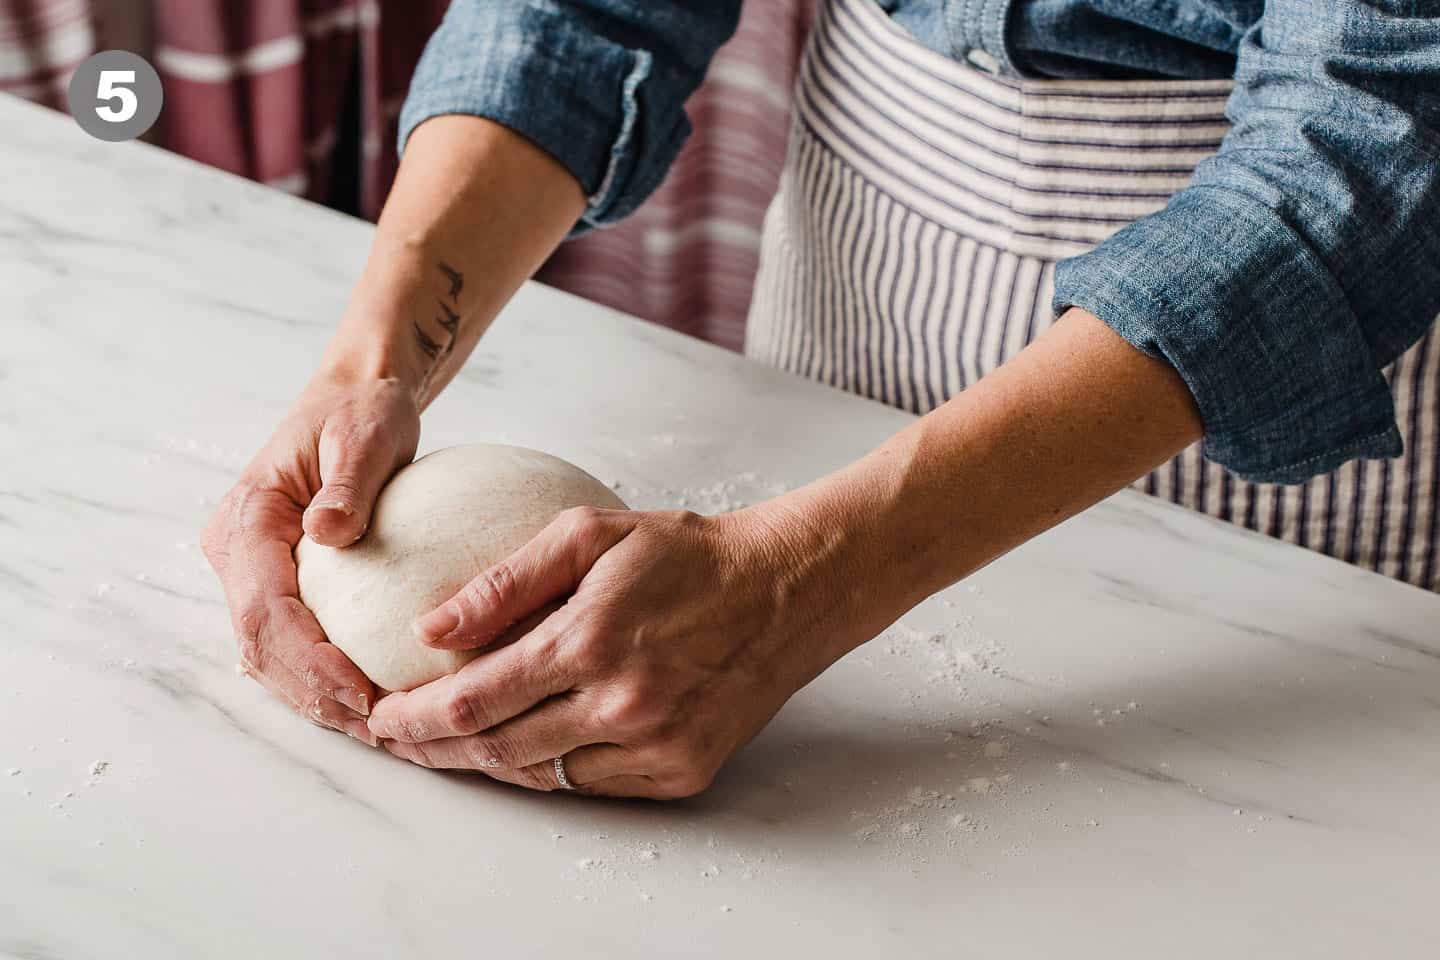
Shape the dough into a ball by pulling 4 sides of the dough up and into the middle of itself.
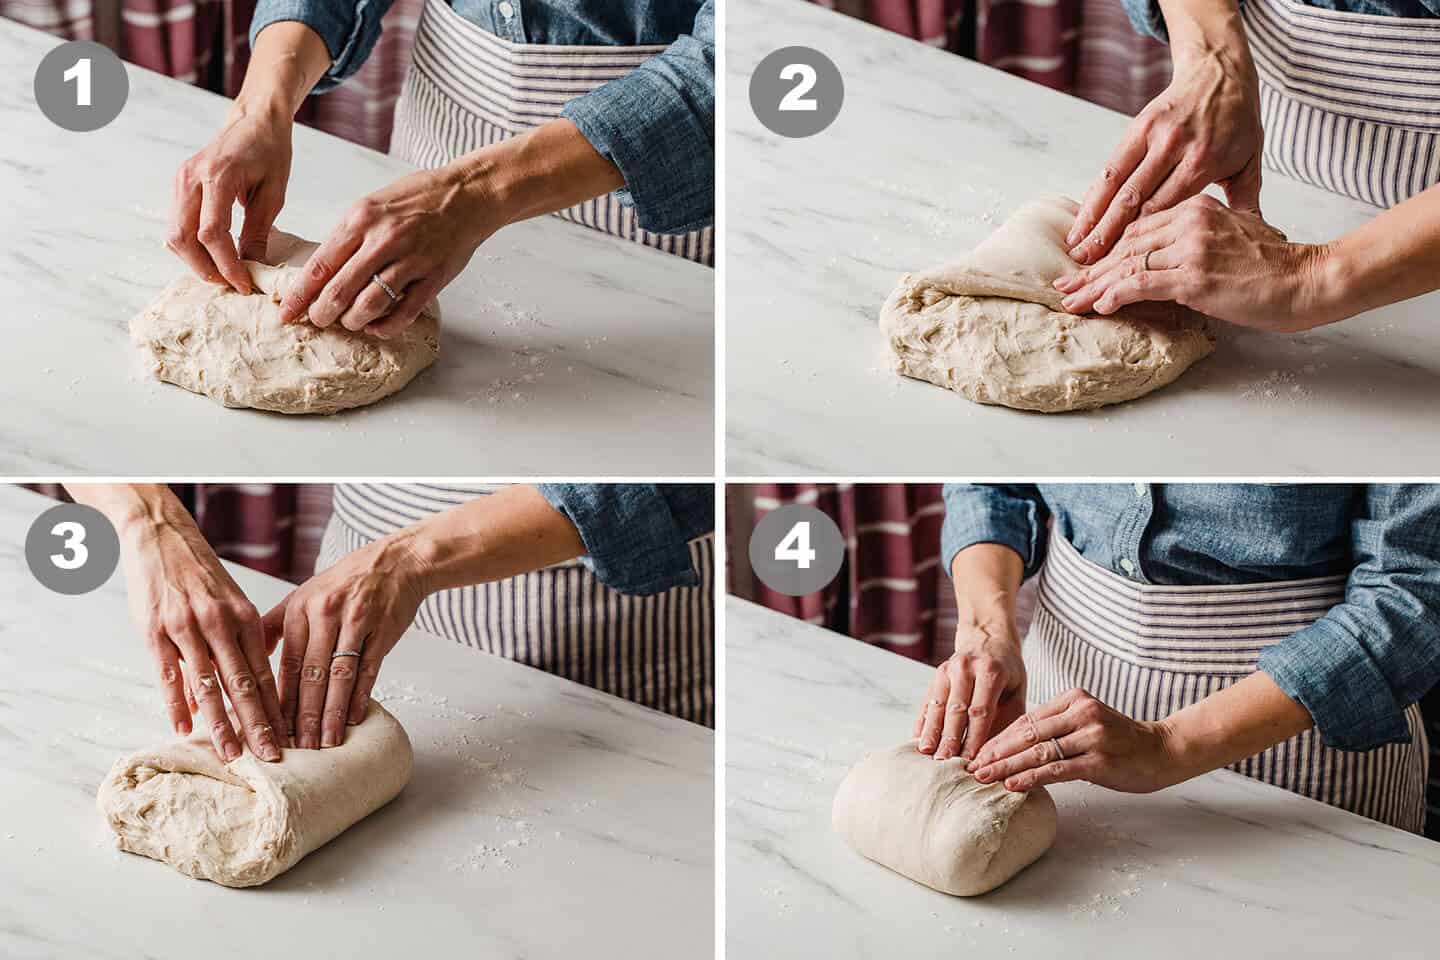
Turn the dough over so that the seam-side is down.
Gently cup the dough, pulling and twisting until it forms a tight skin with surface tension on the outside of the dough ball.
Center the dough onto a piece of parchment paper, seam-side down. Use the parchment paper as a sling to lift the dough up and into a bowl.
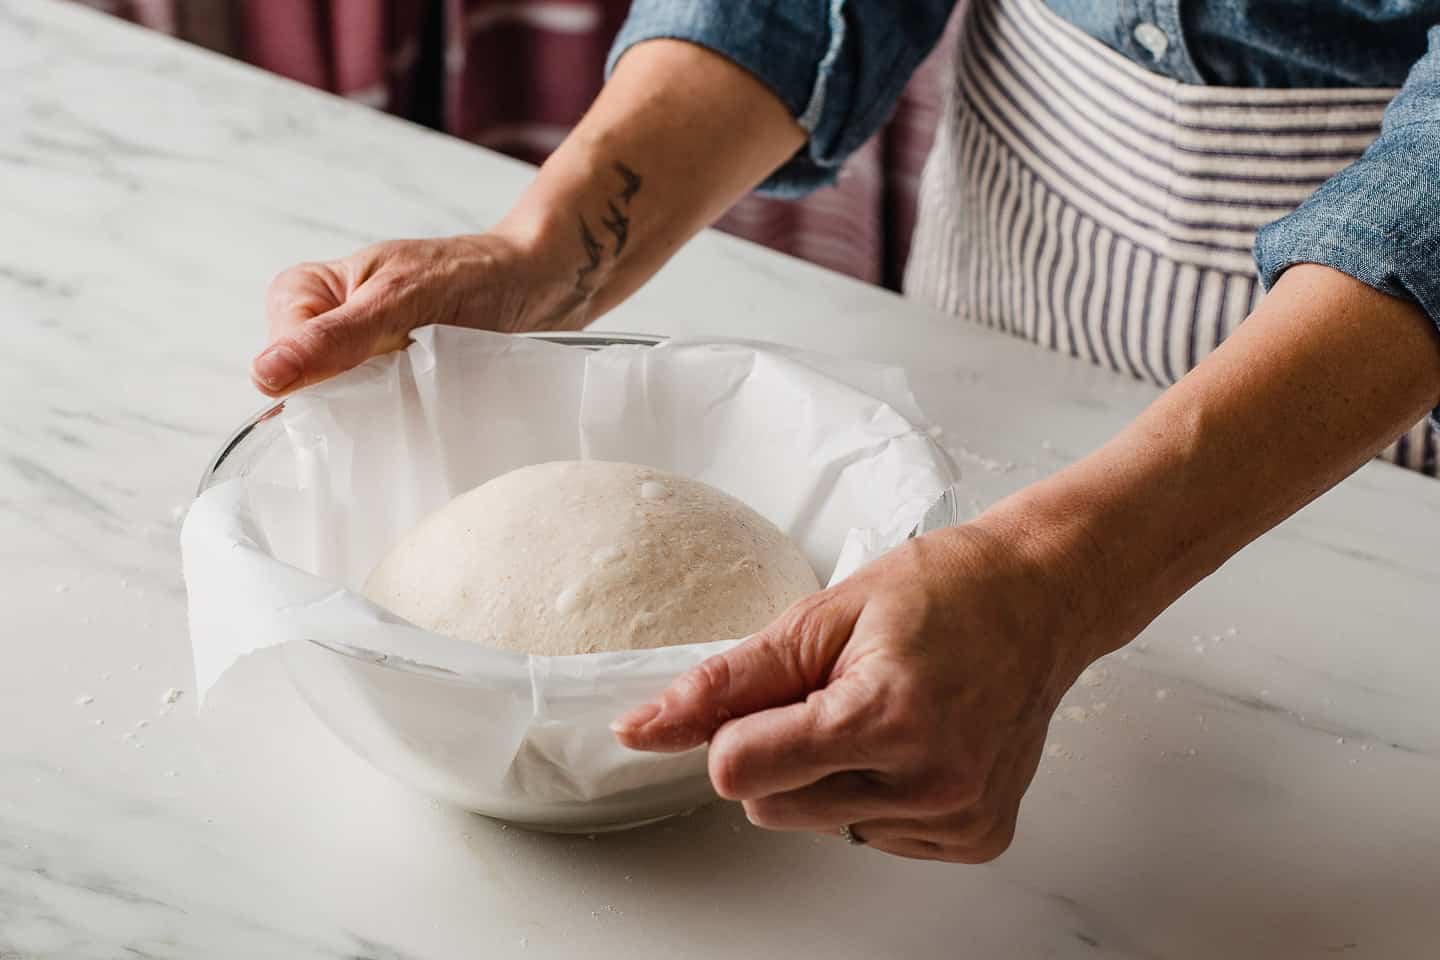
Cover the bowl and let the dough rise for 1-2 hours.
How do you know when the dough is ready to bake?
The dough is ready when it has risen by about 25%, NOT doubled.
If you are still unsure, use your thumb to make an indentation in the dough about a half inch deep. If the indention springs back very slowly, the dough is ready to bake.
If the indentation quickly springs back all the way, or almost all the way, it's still needs more time to rise.
If the indention doesn't spring back at all, it's more than likely over-proofed.
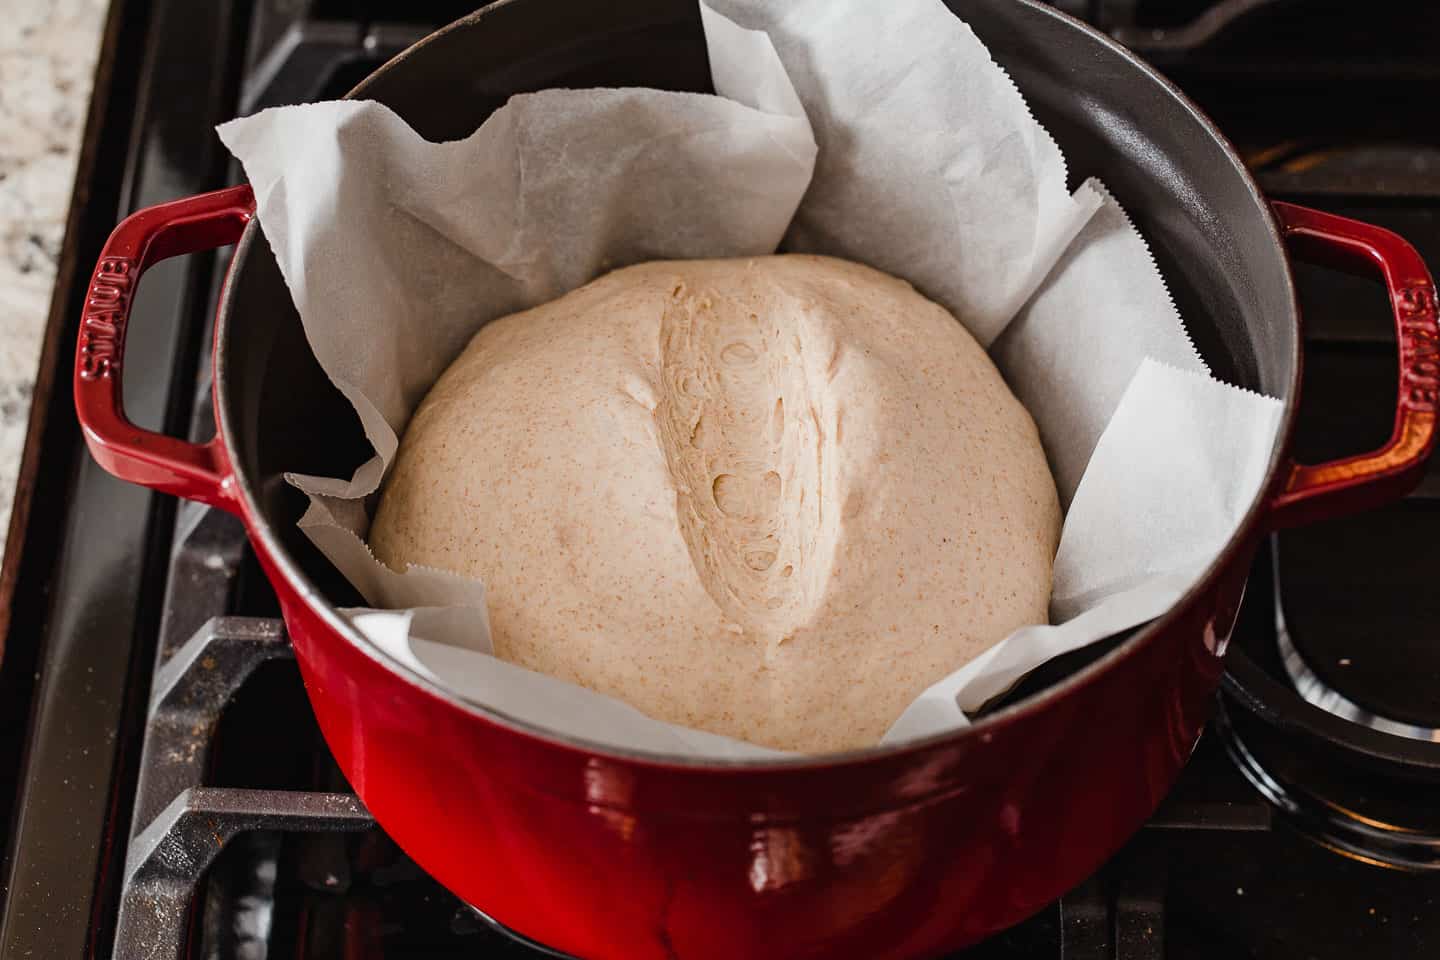
Step 6: preheat oven with a dutch oven inside
30 minutes or so, before the dough is ready to bake, preheat your oven to 450°F (232°C), with the empty dutch oven inside.
What do you bake sourdough bread in?
I use a 5 quart dutch oven to bake sourdough bread.
A dutch oven acts like a commercial steam oven by trapping the steam from the dough during the first 20 minutes of baking.
This steam helps to produce a good "oven spring" or rise to the bread.
Step 7: score and bake
Once the dough is ready, use a bread lame or a sharp razor blade to create a 2-3 inch slash to the top of the dough.
Scoring the dough allows the dough to expand and rise upwards instead of bursting at its weakest point.
Wearing a pair of heavy silicon gloves, remove the dutch oven from the oven and take off the lid.
Use the parchment paper that the dough is sitting in as a sling to carefully lift it out of the bowl and transfer it to the dutch oven.
Place the lid back onto the dutch oven, return it to the oven and bake for 20 minutes.
Remove the lid and bake uncovered for an additional 25-30 minutes or until the crust is golden brown.
TIP: A more accurate way to check that the bread has finished baking is to take the internal temperature with a digital food thermometer. It should register somewhere in the range of 205-210°F (96-99°C) when it is done.
Let the bread cool on a cooling rack for 1-2 hours before slicing to prevent it from becoming gummy.
Tips for success
I've put together a list of things that helped me when I started making sourdough bread.
Keep a baking journal
It's a good idea to keep notes the first ten or so times you bake sourdough bread.
Pay attention to the temperature of your kitchen and write it down in a journal or on a piece of paper.
Take note of how long it took your dough to rise so that you can make adjustments the next time.
Remember, warmer kitchens will speed up fermentation time and cooler kitchens slow it down.
Keeping a record of this information will help you achieve better and better results each time you bake!
Use recently fed sourdough starter
The best time to mix your dough is when your sourdough starter has been fed and is active and bubbly.
Once it starts to fall back down in the container, it needs to be fed again in order to make sourdough bread.
Use a kitchen scale
For the best results, use a kitchen scale. It will give you the most accurate measurements for sourdough bread ingredients.
If you don't have a kitchen scale use the scoop and level technique to measure your flour.
To do this, use a spoon to fluff up the flour in the bag. Use a spoon to scoop the flour into a measuring cup until it is heaped on top. Take a butterknife, level off the top and add it to your bowl.
Don't have a dutch oven?
Don't have a baking pot such as a dutch oven? No problem! You can bake this bread in a lightly greased 9" x 5" loaf pan.
After the first rise, shape the dough, place it seam-side down into the loaf pan and allow it to rise.
Bake the loaf in a 375°F (190°C) oven for 45 minutes or until the internal temperature is 190°F (88°C).
Sample baking schedule
Let the dough rise overnight for an early morning bake or mix it in the morning for freshly baked sourdough bread with dinner. It's up to you!
The following are my morning and evening baking schedules. For these two examples, the temperature of my kitchen is 68°F (20°C).
In colder kitchens, the rising times will need to be longer and in warmer kitchens, you need to shorten them.
To bake bread in the morning
- 8:00 am: Feed the sourdough starter in the morning the day BEFORE you wish to bake.
- 8:00 pm: That evening mix the dough and let it rest at room temperature for 1 hour.
- 9:00 pm: Stretch and fold the dough, cover and let it rest at room temperature for 30 minutes.
- 9:30 pm: Perform a second set of stretches and folds. Cover the bowl and let it rest on the kitchen counter overnight.
- 6:00 am: Shape the dough, place it onto a piece of parchment paper and then into a proofing bowl. Cover the bowl and let it rise for 1 hour.
- 6:30 am: While the dough is still rising, place your dutch oven into the oven and preheat at 450°F (232°C) for 30 minutes.
- 7:00 am: Bake covered for 20 minutes, uncover and bake an additional 25-30 minutes.
To bake bread in the evening
- 6:00 pm: Feed the sourdough starter the evening BEFORE you wish to bake.
- 6:00 am: The following morning mix dough and let it rest at room temperature for 1 hour.
- 7:00 am: Stretch and fold the dough, cover and let it rest at room temperature for 30 minutes.
- 7:30 am: Perform a second set of stretches and folds. Cover the bowl and let it rest on the kitchen counter.
- 4:00 pm: Shape the dough, place it onto a piece of parchment paper and then into a proofing bowl. Cover the bowl and let it rise for 1 hour.
- 4:30 pm: While the dough is still rising, place your dutch oven into the oven and preheat at 450°F (232°C) for 30 minutes.
- 5:00 pm: Bake covered for 20 minutes, uncover and bake an additional 25-30 minutes.
How to store sourdough bread
Store the bread at room temperature, in a bread bag, wrapped in a kitchen towel or beeswax wrap for up to 3 days.
You can also store the bread, cut-side down, on a cutting board with a cake-stand top covering the bread.
Do not refrigerate because the bread will become hard.
Freeze full loaves or individual slices wrapped tightly in plastic wrap and inserted into a freezer-safe container for up to 3 months.
I prefer to store my bread, in individual slices, in the freezer because it thaws so well.
Having these precut slices makes it so easy to enjoy things like avocado toast anytime I get a craving!
Common questions
Because all-purpose flour absorbs less water than bread flour, reduce the amount of water to 325g. If the dough feels too stiff during the first set of stretches and folds, add 5g of water at a time until it feels hydrated enough. If you end up adding too much water, work a light dusting of flour it into the dough until it comes together.
Bread made with 100% whole wheat typically turns out very dense. If you'd like to try using whole grains in sourdough bread, try our honey wheat sourdough sandwich bread or the sourdough country loaf bread recipe.
If the dough is sticky and hard to shape, it's more than likely over-proofed. Sourdough can easily over-proof in warm kitchens, so temperature is the most likely culprit. Take note of the temperature of your kitchen and adjust the rising time of your next bake accordingly.
If your sourdough starter is not fed regularly, it can take on a more sour flavor because of a build up of lactic acid. To get a less sour flavor, feed your starter more frequently before you bake with it.
If your sourdough is not rising while it bakes it can be one of several things. More than likely the sourdough starter is not strong enough or the dough wasn't shaped properly before the second rise.
A hard crust on the bottom of the loaf can be caused by a dutch oven that is too close to the heating element of the oven. To remedy this, place a pizza stone or baking sheet on the oven rack that is one level below the rack that the dutch oven is resting on. (NOT on the same rack.)
This will create a barrier between the dutch oven and the heating element of the oven to help keep the bottom of the dutch oven from getting too hot.
An over-all hard crust can be caused by a high oven temperature or over-baking. Increase the covered baking time to 30 minutes and decrease the uncovered baking time to 20 minutes. This will help trap more moisture and produce a softer crust.
If you bake often it's a good idea to use an oven thermometer once in a while to check the accuracy of your oven's temperature.
Yes you can! Before shaping the dough, divide it into two equal portions. Shape each piece and proceed with the next steps. Bake the smaller loaves at the same temperature for 20 minutes with the lid on and about 15-20 minutes with the lid off.
Easy sourdough bread recipes
- cinnamon raisin sourdough bread
- sourdough country loaf bread
- jalapeño cheddar sourdough bread
- olive and walnut sourdough bread
- honey wheat sourdough sandwich bread
Sourdough baking resources
- how to make a sourdough starter
- baking conversion chart
- sourdough glossary
- essential sourdough baking tools
Subscribe to our newsletter and we'll send you more fresh recipes, valuable troubleshooting advice, useful tips, and other information we believe will be helpful to you!

Beginner Sourdough Bread
INGREDIENTS
Ingredients to make ¼ cup (50 g) of Active Sourdough Starter
- 2 teaspoons (10 g) sourdough starter
- 3 tablespoons (25 g) all-purpose flour
- 5 teaspoons (25 g) water
Dough Ingredients
- ¼ cup (50 g) active sourdough starter (100% hydration)
- 1 ⅓ cups + 2 tablespoons (350 g) water
- 2 teaspoons (10 g) fine sea salt
- 4 cups + 2 tablespoons (500 g) bread flour
INSTRUCTIONS
Feed your Sourdough Starter
- 12 hours before you plan to mix the dough, add the ingredients to make ¼ cup (50 g) of active sourdough starter to a clean jar. Stir until combined, loosely cover the jar and let the starter rise at room temperature. (The ingredients will create a total of 60 g active starter but some of it will stick to the sides of the jar during the transfer, so we are making a little more than needed.) The sourdough starter is ready to use when it has doubled in size and there are plenty of bubbles on the surface and sides of the jar.
Make the Dough
- Mix the dough: Transfer 50 g of the active starter and 350 g water into a large mixing bowl. Stir to distribute the starter evenly. Add 500 g bread flour and 10 g sea salt to the bowl and use a stiff spatula or your hands to work the ingredients together until it forms a shaggy mass and there are no dry bits of flour left in the bowl. Cover the bowl and let the dough rest for one hour at room temperature.
- Stretch and Fold: Wet your hand with a little water to prevent sticking. Pick up the dough on one side and stretch it up and over itself. Turn the bowl a quarter turn and repeat this step until you have turned the bowl a full circle. The dough should form into a tight ball. Cover the bowl and let the dough rest for 30 minutes. Repeat the stretch and fold process one more time to help build volume in the final loaf.
- Bulk Fermentation: Cover the bowl and let the dough rise for 7-10 hours on your kitchen counter. The dough will have risen by about 50-75%, not doubled, when it is ready to shape. (If the dough has doubled in size and/or is hard to shape, it may be over-proofed. Reduce the rising time on your next bake.)
- Shape and Second Rise: Turn the dough out onto a lightly floured surface. Shape the dough into a ball by pulling 4 sides of the dough into the middle of itself. Turn the dough over so that it is seam-side down. Use your hands to gently cup the dough, pulling and twisting towards yourself until it forms a tight skin on the outside. Center the dough onto a piece of parchment paper, seam-side down. Use the parchment paper like a sling to lift the dough up and transfer it into a medium-sized bowl. Cover the bowl with a tea towel and let the dough rest at room temperature for 1-2 hours. Use your thumb to make an indentation in the dough about a ½ inch deep. If the indentation quickly springs back all the way, or almost all the way, it's under-proofed and still needs more time to rise.
- Score and Bake: 30 minutes before you're ready to bake, preheat the oven, with the dutch oven inside, to 450°F (232°C). Using long silicone gloves, carefully remove the hot dutch oven and take the lid off. Score the top of the dough with a razor or a sharp knife. Once again, use the parchment paper as a sling to lift the dough up and transfer it into the dutch oven. Place the lid on the dutch oven, return it to the oven and bake for 20 minutes. Remove the lid and bake an additional 25-30 minutes or until crust is golden brown. (The internal temperature of the bread should be around 205-210°F (96-99°C) using a digital food thermometer.)
- Cool: Transfer the baked bread to a cooling rack for 1-2 hours before slicing. The bread will continue to cook inside during this time. If you slice into it too soon, it will result in a gummy loaf.
- Store: Keep the bread at room temperature, in a bread bag, wrapped in a kitchen towel or beeswax wrap. You can also store the bread, cut-side down, on a cutting board with a cake-stand top covering the bread. Do not refrigerate. Freeze full loaves or individual slices wrapped tightly in plastic wrap and inserted into a freezer-safe container for up to 3 months.
- Serve: Nothing beats the taste of warm sourdough bread slathered with homemade butter, unless it's homemade Nutella or strawberry jam!
NOTES
- This recipe was tested in a 68°F (20°C) kitchen. If your kitchen is colder, rising times will take longer and if it's warmer, less time.
- If using all-purpose flour reduce water to 325g. Add more if necessary during first set of stretch and folds.
- This bread can be baked in a lightly greased 9" x 5" loaf pan. After the first rise, shape the dough, place it seam-side down into the loaf pan and allow it to rise. Bake the loaf in a 375°F (190°C) oven for 45 minutes or until the internal temperature is 190°F (88°C).
Nutrition
Useful equipment for sourdough bread baking
(Amazon affiliate links) - Check out my favorite kitchen essentials.
- bakers scale - a kitchen scale is highly recommended. You will achieve much better results by weighing the ingredients.
- bench scraper - an essential tool in my opinion. Use it to easily divide and shape the dough and clean flour from your work surface.
- bowl scraper - allows you to easily turn the dough out from the mixing bowl.
- mixing bowls - one with that comes with a reusable lid.
- long silicone gloves - protects your hands and forearms from being burned when transferring heavy cast iron to and from the oven.
- dutch oven - acts like a commercial steam oven by trapping the steam from the dough during the first 20 minutes of baking. This steam helps to produce a good "oven spring" or rise to the bread.
- parchment paper - each piece can be used more than once. Members Mark brand is my personal favorite.
- cooling rack - allows air to flow beneath the loaf as it cools so that it doesn't become soggy on the bottom.
- lame razor - a very sharp knife or scissors can also be used to score the dough.
- banneton - 9" proofing baskets provide structure to the dough as it rises. Any similar sized bowl lined with a kitchen tea towel will achieve a similar result.
- digital food thermometer - used to measure the internal temperature of the baked bread or dough.
- bread knife - to easily slice through the thick crust of sourdough bread.
- freezer thermometer - I place one on the counter near the dough. The temperature of your kitchen is the variable that will affect the dough rising times more than anything else.
I’m a new sourdough bread baker...I’ve made about five loaves. I’ve been given a banneton for Christmas. At what stage of the proofing do I put it into the banneton?
Hi there, congrats on your first banneton, you will love it! Have you tried our sourdough country loaf bread recipe? In that recipe you would shape the dough and then place it in the banneton for the final rise. I would highly recommend you check it out and then let me know if you still have questions.
Probably a dumb question, but I am confused about Step 1. Is the starter you are talking about different than the starter you have been making/using all along? If it takes only 4-12 hours rather than days, I would assume it is?
Also, could you consistently put the cup measurements in parenthesis after the grams for those of us without a scale?
I have a question regarding the starter. Once your starter is ready and has risen can you use the whole jar or should you just use the top part that has risen? I usually make a couple loaves at a time. When you make two loaves at one time when would you separate them into two loaves? PS. I have multiple jars of starter so I would not be left without any. Thank you for your help and I love your instructions.
I made your recipe twice in the past two days and it turned out perfectly both times. (And they were my first-ever sourdough loaves!) I had a terrible sourdough debacle last August (my first attempt at sourdough; ultimately, I didn't even put it in the oven because it was just a lake of gooey dough). It took me months to get up the courage to try again, but happily by then I'd found your recipe, which gave me hope. Thank you so much for the clear directions and the encouragement. Both loaves turned out wonderfully and I can't wait to do more.
One question, if you have time to respond: is it possible to put the dough in the fridge at some point (either during the bulk fermentation or for the second rise) just in order to manage the time a little better?
Thank you again!
Hi Samantha! Yes, you can. If you want to put it in during the bulk fermentation, I would let it rise for a few hours before putting in the fridge. Then take it out and proceed with the bulk rise until it's ready to shape. On the other hand, you can also put it in the fridge after you've shaped it for the second rise. It will rise very very slowly in the fridge so you will have more control on when you would like to bake it. I hope this helps!
Thank you! I’ll try both methods. By the way, I made a loaf with your recipe again yesterday and, as ever, it was perfect! Your recipe is magical. 😀
This recipe works like a charm each time. I also tried adding 2 Tbsp olive oil for more moisture and it was quite delicious to.
Thank you, after a few fits and starts, you’ve help me get over the hump - I’m actually making sourdough bread now, also sourdough pancakes are awesome too!
Love your channel and recopies. I made the biscuits to rave reviews in the family. I have made 5 loaves of the beginner sourdough and it's wonderful. I'm trying to duplicate everything you do and say. I'm measuring on a scale very accurately all the ingredients. The only part I'm not getting right seems to be that the dough is quite wet and very sticky feeling. When I put in in the dutch oven and attempt to score it with a razor blade, it mostly pulls the dough and doesn't actual cut it. Then this mornings loaf , though very tasty and wonderful seems a bit moist inside. Also when I pull it out the parchment falls apart and tends to stick to the bottom of the loaf. I use an old Wagner Drip drop roaster, I read somewhere that putting a baking sheet under the pot will help keep the bottom from setting too overcooked. Thanks.
I’ve really appreciated this recipe as a safe and sane way to break into the sourdough world. Thank you! (Also really appreciate the imperial measurements along with the weights/grams). A few things I’ve modified with good success:
- add one TBSP sugar to the flour mix (makes the starter go wild and you end up with a springier loaf);
- if not sour enough for your taste, add a couple TBSP vinegar to the liquid mix, just reduce water accordingly;
- wholeheartedly agree with the process of starting the afternoon/evening before. Do the recommended stretching and folding as many times as you can before bed (I do 6-8). By the next morning, it’s a risen blob of heaven. Then punch down lightly and let rise again on parchment for at least(!!) two hours. Less is not enough, as my loaves have ended up heavy when only an hour. 🙁
- don’t be shy with spraying water into the oven. I spray liberally when first placing in the bottom of my ditch oven before covering with the top for the first 20 mins;
- when removing the top of the Dutch oven, spritz liberally again, then bake another 25 mins. This ensures a perfect crispy/chewy sourdough crust. Yum!
Fantastic information, Amy - comprehensive and accurately portrays my experience as a first-time sourdough experimenter.
My first sourdough loaf turned out very well, too. Used Australian flour products in both the starter and the loaf - the starter using mainly plain flour (what you call all purpose flour) and the loaf using bakers flour which I think has a higher protein content. Next time I will pay more attention to the stretch and fold, doing it maybe four times in total seeking greater baked height.
I have also used some of the discard starter for scones (in US terms, "biscuits" I think.) Very tasty! Keep up the good work 🙂
Denis
made this bread 3 times love it also made a few pie crusts with the discard that has now become my favorite crust
My first attempt at sourdough bread and my first attempt at bread without a machine in 20 years. It was mostly a success. Crisp crust, soft center. Nice and mature tasting from my starter. Wonderful crumb. The dough was very sticky for me and didn’t hold shape so it wasn’t the prettiest loaf. I weighed all the ingredients but I think maybe it is the high humidity here in Florida. I will certainly try again and try to adjust the water accordingly.