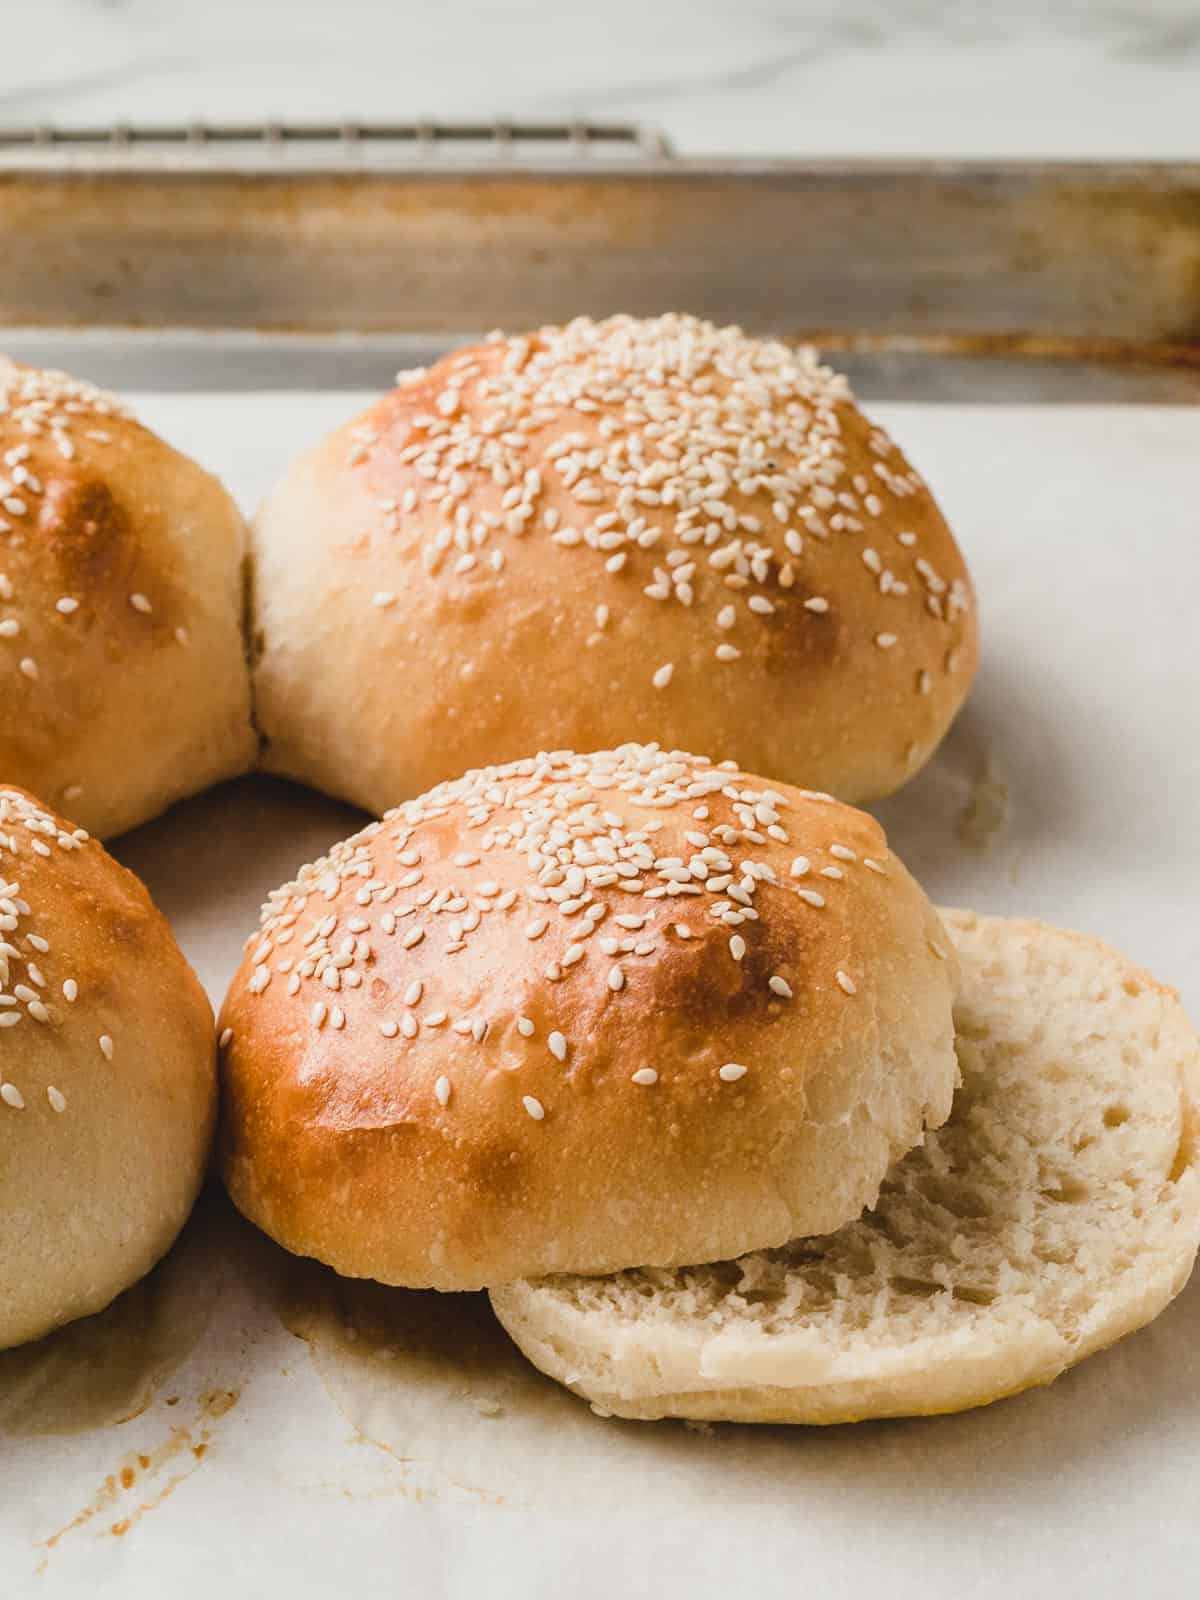
Sourdough Hamburger Buns


Sourdough hamburger buns are easy to make with your sourdough starter and a few simple ingredients. Mix the dough in the morning and bake them fresh for dinner the same day!
We love making as many baked goods with a sourdough starter as we can.
Instead of buying things such as tortillas, pizza crust or bagels at the store, it's easy to make them from scratch using a sourdough starter.
These homemade sourdough hamburger buns are so soft and fluffy. Whether you're craving a juicy cheeseburger or a delicious bean burger, these buns will become your new favorite way to stack them!
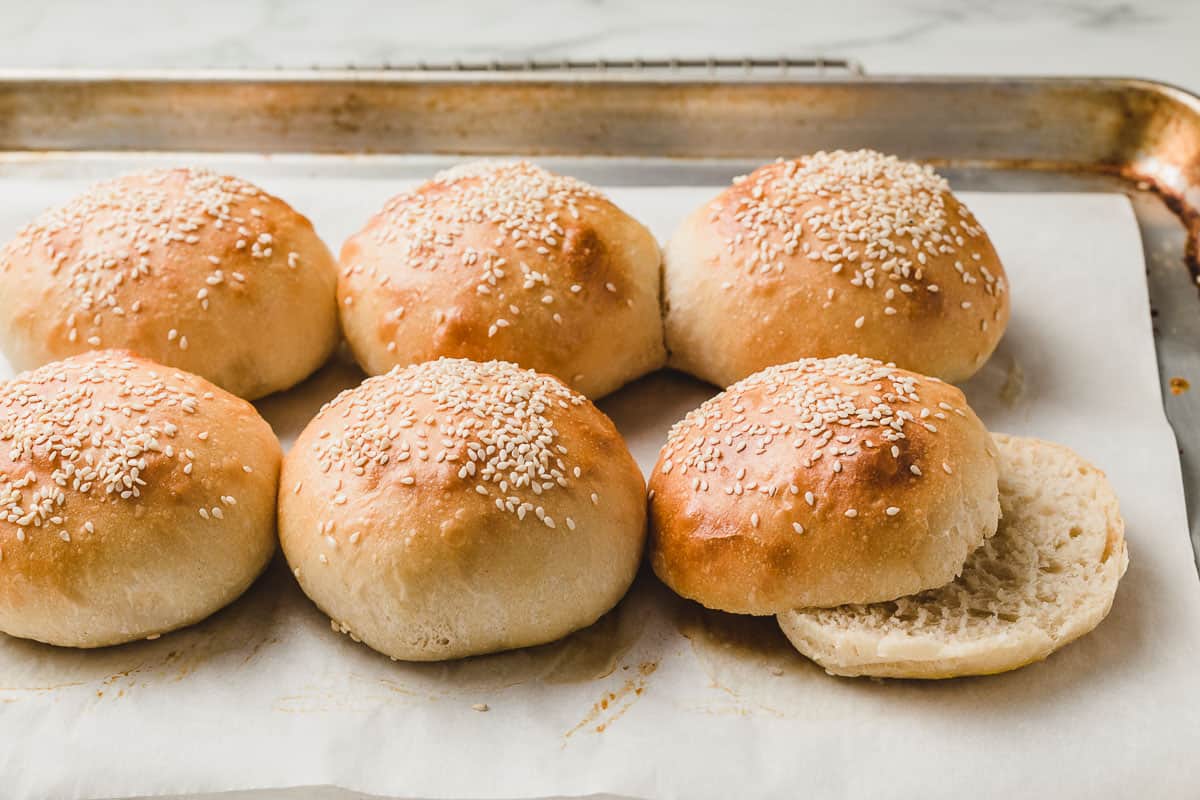
This recipe makes 6 nice sized hamburger buns. The dough can also be shaped into 6 hotdog buns.
Jump to:
Sample baking schedule
I tested this recipe in a 72°F (22°C) kitchen. Warmer kitchens will need less time for the dough to double and colder kitchens will need more time.
The night before
- 8:00 PM: Feed your sourdough starter.
The next morning
- 8:00 AM: Mix the dough and let rest for 30 minutes.
- 8:30 AM: Perform a set of stretch and folds.
- 9:00 AM: Perform second set of stretch and folds.
- 9:30 AM: Perform third set of stretch and folds. Cover and let rest until the dough has doubled in size.
- 3:30 PM: Divide and shape the dough. Cover and let rest until puffy.
- 5:00 PM: Brush dough with an egg-wash, sprinkle sesame seeds and bake.
Ingredients needed
- All-purpose flour: Up to 25% of the flour can be substituted with whole wheat flour if desired. You will need to add more water to the dough. Somewhere between 25-30g should be enough. Add it slowly until you get the right consistency.
- Sugar: Honey or maple syrup can be used in place of granulated sugar.
- Salt
- Water
- Egg: You will mix an egg with a tablespoon of water to use as an egg wash before baking the buns.
- Sesame seeds: This ingredient is optional but highly recommended! Regular, toasted or black sesame seeds can be used.
Step-by-step instructions
Let's go over the step-by-step instructions for making the best sourdough hamburger buns from scratch!
Feed your sourdough starter - 8 PM
The night before you plan to mix your dough, feed your sourdough starter. You will need 50g of active starter.
You can mix it directly in the bowl you plan to use for your dough or, measure it into a clean jar.
Mix the dough - 8 AM
In the morning, add the flour, sugar, salt, active sourdough starter and water into a large bowl. Mix everything together until the dough forms a shaggy mass.
Cover the dough and let it rest at room temperature for 30 minutes so the flour can absorb the water.
Stretch and fold - 8:30 AM
After the 30 minutes is up, perform a set of stretch and folds. Cover the dough and repeat this step 2 more times, spaced 30 minutes apart.
First rise - 9:30-3:30 PM*
After the last stretch and fold, cover the dough and allow it to rise until it has doubled in size.
*The first rise time is based on a kitchen temperature of 72°F (22°C). Adjust your rise time accordingly. Warmer needs less time, cooler needs more time.
Divide and shape - 3:30 PM
After the dough has doubled, it's time to divide it and shape it into buns.
Please note that the dough will be VERY sticky and a little difficult to work with if you are new to sourdough baking. (Make sure to watch the video where you can see how I handle the dough during the shaping process.)
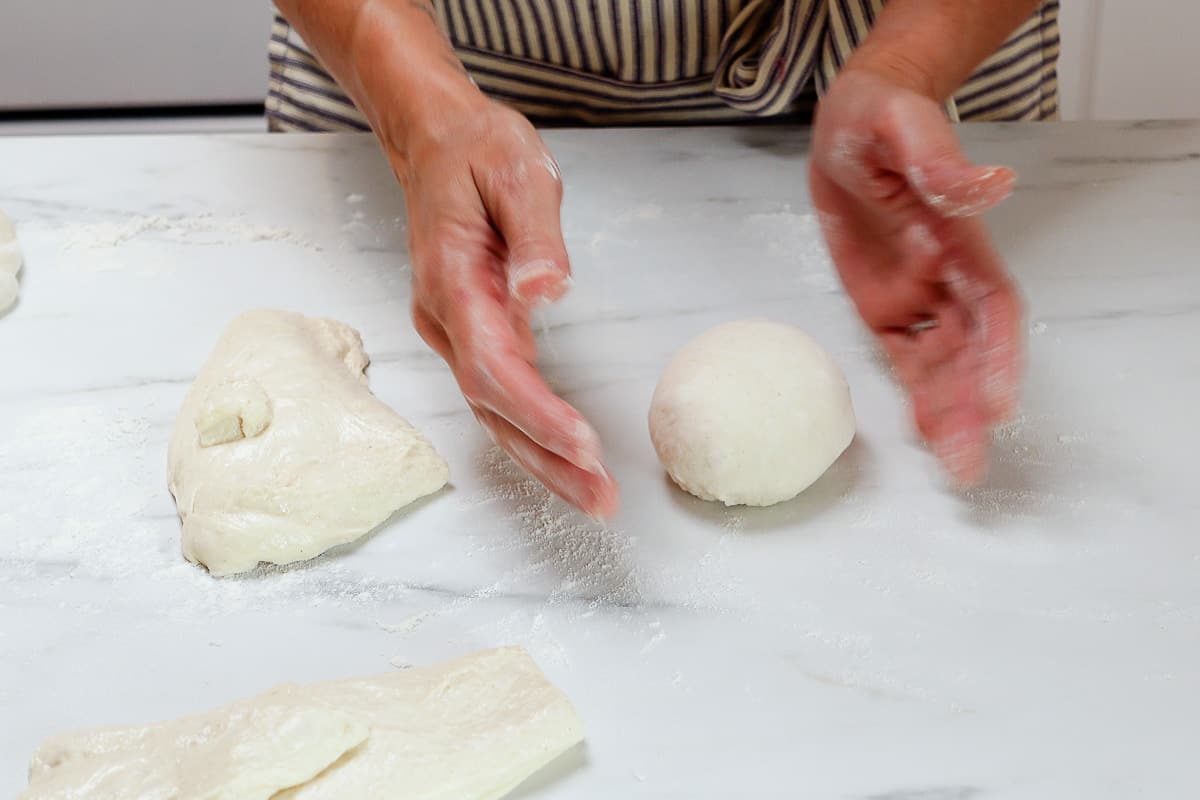
Turn the dough out onto a generously floured surface. It should be floured enough for the dough to slide around without sticking.
Use a bench scraper to divide the dough into 6 even portions. They should weigh about 112-115g each.
NOTE: You'll want the top of the dough to be free of flour so that as you shape the buns, the dough will stick to itself.
To shape the buns, pull the dough up on one side and press it into the center on top of the dough. Repeat this until you've come full circle around the dough and then flip the dough so that the seam side is facing down.
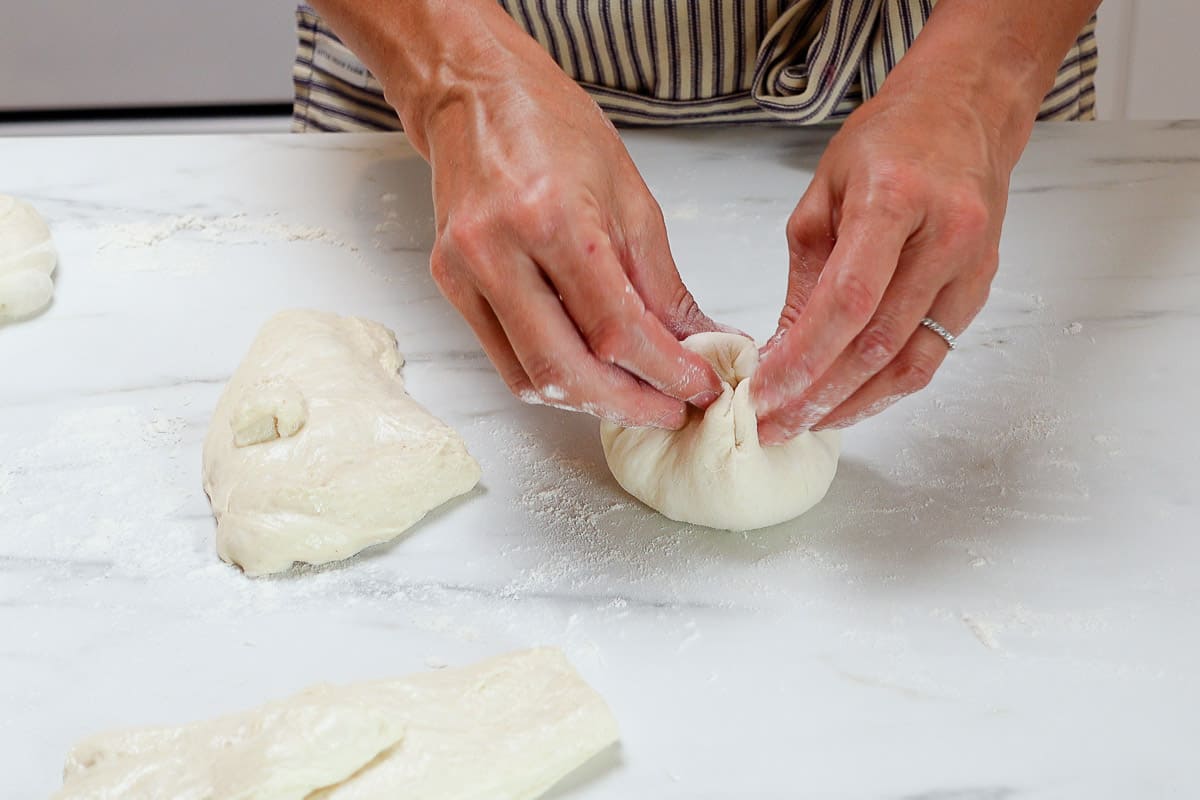
Use your hands to cup the bottom of the dough ball and gently twist it on the work surface to form a taut ball.
Transfer the dough ball to a parchment lined baking sheet. Repeat with the remaining dough.
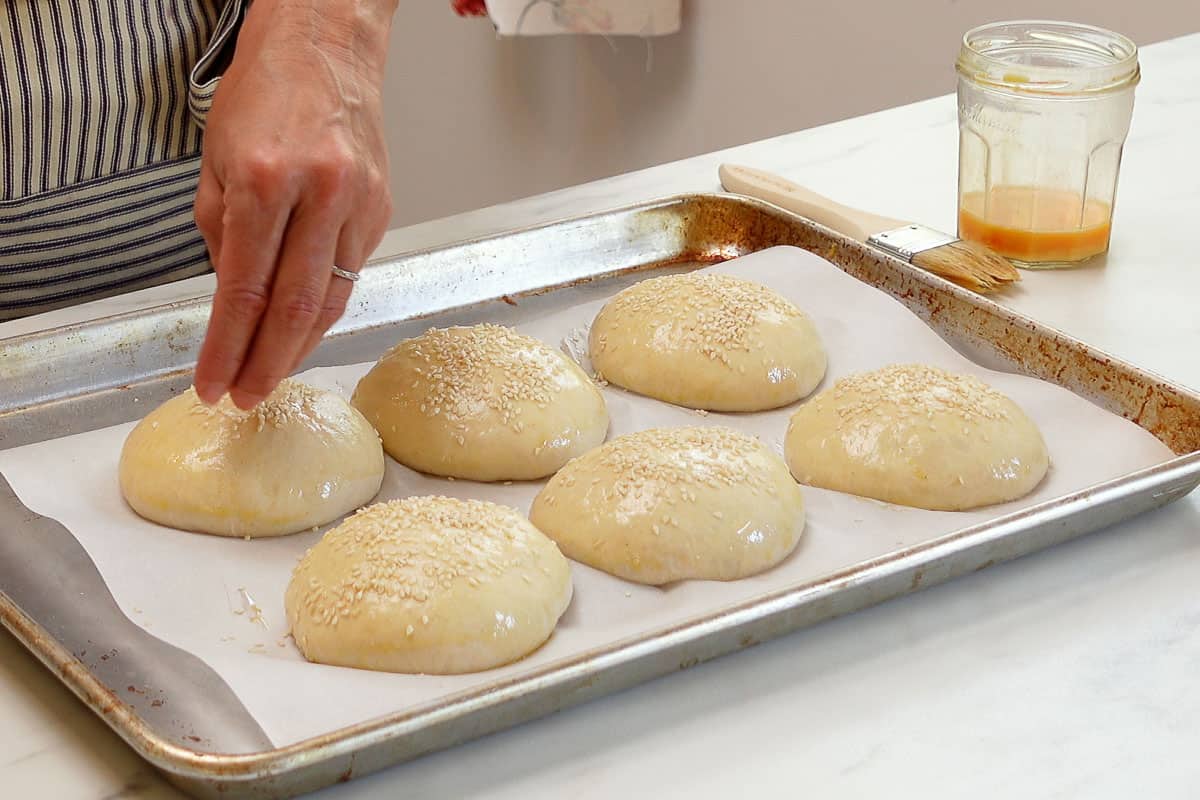
Cover the baking sheet with a clean kitchen towel and allow the dough to rest at room temperature until they are puffy. About 1-2 hours.
Preheat your oven to 375°F (190°C).
Beat an egg with a tablespoon of water in a small bowl to create an egg-wash.
Brush the top of each dough ball with the egg wash and sprinkle with sesame seeds.
Bake the buns for 25 minutes or until they are at your desired brown color. Remove the buns from the oven and transfer them to a wire rack to cool before slicing.
How to store and freeze
The sourdough hamburger buns will stay fresh at room temperature for up to 2 days. Store them wrapped in a towel or in a plastic bag.
You can also freeze the buns! Place them into a freezer-safe bag after they are completely cooled. Keep them in the freezer for up to one month for best quality.
When you are ready to eat one, simply take it out of the freezer and allow it to thaw at room temperature.
Subscribe to our newsletter and we'll send you more fresh recipes, valuable troubleshooting advice, useful tips, and other information we believe will be helpful to you!
More easy sourdough recipes: sourdough pretzels / sourdough english muffins / sourdough bread for beginners / thin crust sourdough pizza

Sourdough Hamburger Buns
INGREDIENTS
Ingredients to make 50 grams (¼ cup) of active sourdough starter
- 2 teaspoons (10 g) unfed sourdough starter
- 3 tablespoons (25 g) all-purpose flour
- 5 teaspoons (25 g) water
Dough Ingredients
- ¼ cup (50 g) active sourdough starter
- 3 cups (360 g) all-purpose flour
- 1 cup (240 g) water
- 1 ½ tablespoons (30 g) honey
- 1 ½ teaspoons (10 g) salt
Egg wash
- 1 egg
- 1 tablespoon water
- sesame seeds (optional topping)
INSTRUCTIONS
Feed Your Sourdough Starter
- 12 hours before you plan to mix the dough, add the ingredients to make ¼ cup (50 g) of active sourdough starter to a clean jar. Stir until combined, loosely cover the jar and let the starter rise at room temperature. The sourdough starter is ready to use when it has doubled in size and there are plenty of bubbles on the surface and sides of the jar.(The ingredients will create a total of 60 g active starter but some of it will stick to the sides of the jar during the transfer, so we are making a little more than needed.)
Mix the Dough
- Add the ingredients to a large mixing bowl and use a spatula or your hands to mix them together until there are no dry bits in the bottom of the bowl. Cover the bowl and allow the dough to rest on the counter for 30 minutes.
Perform 3 sets of stretch and folds (or stand mixer)
- Wet your hand with a little water to prevent sticking. Pick up the dough on one side and stretch it up and over itself. Turn the bowl a quarter turn and repeat this step until you have turned the bowl a full circle. The dough should form into a tight ball.Cover the bowl and let the dough rest for 30 minutes.Repeat the stretch and fold process two more times.Stand mixer: Use the dough attachment and mix on speed 3 for 8-10 minutes. Proceed to next step.
First Rise
- Cover the bowl and allow the dough to rise until doubled. (This took 6 hours in my 72°F (22°C) kitchen.)
- After the dough has doubled, you can place the dough in the fridge for up to 2 days to bake them later OR proceed to the next step. See notes.
Shape and Second Rise
- Turn the dough out onto a floured surface. Divide the dough into 6 equal portions of 112-115 grams each.
- Working with one portion at a time, shape the dough into a ball. Lightly flour the top of the dough and then place it on a parchment paper lined baking sheet. Repeat with the remaining dough.
- Cover the sheet with a clean kitchen towel and allow the buns to rise at room temperature until puffy, 1-2 hours.
Bake
- Preheat your oven to 375°F (190°C). Mix the egg with the water in a small bowl and lightly brush the top of each dough ball. Sprinkle sesame seeds on top if desired. Bake for 25 minutes or until the buns are golden brown.
- Remove the buns from the oven and allow them to cool before slicing.
NOTES
- If you decide to put the dough in the fridge after the first rise take note that you will need to let the dough rise longer during the second rise due to the dough being cold.
These were so delicious and the recipe was SO forgiving. My starter was past peak, I only did one set of stretch and folds, I left the house for too long and overproofed the dough, I didn't let them rise long enough after the last shaping as I was in a rush....but they still turned out absolutely fabulous!!! They are foolproof and easy.
i made these today for burgers and they were amazing! Everyone complimented them saying theyre the best buns theyve had. mine turned out a bit smaller and taller than pictured so in the future id shape a bit differently, im sure it depends on the consistency of your sourdough. amazing though!
im planning in using this recipie tomorrow, would you change any times if doubling? thanks
No, just follow the times listed 🙂
I just discovered your website and this has been the first recipe I have tried -it was fantastic! It made beautiful, soft, tasty buns... and it was such an easy recipe to make!
For those who might have been buying burger buns all their lives like me up until now, these are game-changer. However, they are smaller in size than shop-bought ones (my burgers nearly didn't fit!), so if this is your first time with the recipe: Either prepare smaller burgers or divide the dough in 4 instead of 6. 🙂
This is the first of many sourdough recipes I will try, they all look amazing -and are fast to make!!
In Spanish food blogs, the sourdough recipes are usually complicated and cannot be done in just one day. Take the sourdough pizza crust for example... the one I have takes 3 days to prepare (not counting the activation of the sourdough).
So for me, littlespoonfarm recipes are a complete revelation! Thank you, Amy!!
Thank you so much Mireia! 🙂
I loved this recipe. Super easy and fun. I just used a combination of flour using 240g of bread flour and 120g of whole wheat flour. I topped them with sukkah as I didn’t have any sesame seeds only on hand. They turned about perfect. Thanks for sharing this!!!
Hi there! I’ve made many of your recipes and love them all!!! I’m planning on making these soon. I have a question regarding refrigeration. After my bulk ferment can I shape the buns and then place them in the fridge overnight? If so, how will this affect my second rise the next day? Will I still need to let them sit at room temp for their second rise before baking or is the shaped cold retard adequate? I’d totally appreciate any input because I’m so excited for these!
Hi Amber, you can shape them and let them ferment in the fridge. Just take them out and let them rise before baking!
Making these for the second time for pulled pork sandwiches tonight! I’m going to rise them for a bit and then refrigerate until about an hour before I need to use them!
Delicious!! Mine did not turn out as beautiful as yours but they tasted sooooo good! Mine were still kinda doughy on the inside but the outside was getting too done. Also could you do a video tutorial of how to do the hot dog buns? I’m a very visual person and have done so much better at baking while watching your videos! Please and thank you!
Wow! These were delicious!! Definitely making these again!
How many days are these good?
They are good at room temperature for about 2 days. I would freeze them if you have any left past 2 days for the best taste and texture!